年轻人的第一个Flutter程序(2)
本章主要完成了首页底部导航栏以及Tab1的UI,另外记录了途中遇到的大坑。
主要内容有:
- Asset及默认字体
- BottomNavigationBar实现底部导航栏(有大坑)
- 动画Animation以及源码分析
- 列表ListView、卡片Card、水波纹点击效果InkWell、线性进度条LinearProgressIndicator
- 日期DateTime及其格式化等
1. 本章成果
开门见山,直接上本章成果。
底部导航栏以及Tab1 UI
本系列文章也会阶段性地release对应的apk供对照查看。apk都会发布在release上。此外配合源码对应的tag一起食用,效果更加。
本章代码tag为chapter01,配合chapter01.apk。
2. 底部导航栏
在Flutter中实现底部导航栏也非常容易,因为MaterialApp提供了这个参数,我们只需要定义自己的BottomNavigationBarItem,然后在Scaffold的body处根据currentIndex的值选择对应的Widget就行了。
在BottomNavigationBar中有这么一段Sample Code
BottomNavigationBar Sample Code
class MyHomePage extends StatefulWidget {
 MyHomePage({Key key}) : super(key: key);

 @override
 _MyHomePageState createState() => _MyHomePageState();
}

class _MyHomePageState extends State<MyHomePage> {
 int _selectedIndex = 1;
 final _widgetOptions = [
   Text('Index 0: Home'),
   Text('Index 1: Business'),
   Text('Index 2: School'),
 ];

 @override
 Widget build(BuildContext context) {
   return Scaffold(
     appBar: AppBar(
       title: Text('BottomNavigationBar Sample'),
     ),
     body: Center(
       child: _widgetOptions.elementAt(_selectedIndex),
     ),
     bottomNavigationBar: BottomNavigationBar(
       items: <BottomNavigationBarItem>[
         BottomNavigationBarItem(icon: Icon(Icons.home), title: Text('Home')),
         BottomNavigationBarItem(icon: Icon(Icons.business), title: Text('Business')),
         BottomNavigationBarItem(icon: Icon(Icons.school), title: Text('School')),
       ],
       currentIndex: _selectedIndex,
       fixedColor: Colors.deepPurple,
       onTap: _onItemTapped,
     ),
   );
 }

 void _onItemTapped(int index) {
   setState(() {
     _selectedIndex = index;
   });
 }
}
上面这段代码创建了三个BottomNavigationBarItem,它们的点击事件是_onItemTapped,此方法会更新_selectedIndex,并会刷新UI。刷新时body会根据_selectedIndex的值显示不同的内容,并且BottomNavigationBar的currentIndex也会更新为_selectedIndex。
这就是底部导航栏的工作原理。
那么我们在等什么?上就完事了!慢着,这样Tab之前切换太生硬了,我们参考flutter_gallery中的bottom_navigation_demo.dart来一点点过渡动画。
flutter_gallery已经包含在本地的SDK中了。位于$FLUTTER_ROOT/examples/flutter_gallery。
建议参照README编译出来看看Flutter为我们提供那些方便的便利。
直接上修改过的主页代码:
main.dart
import 'package:flutter/material.dart';

import 'stats/stats.dart';
import 'task/task_list.dart';

void main() => runApp(MyApp());

class MyApp extends StatelessWidget {
  @override
  Widget build(BuildContext context) {
    return new MaterialApp(
      title: 'Ready?',
      theme: new ThemeData(
        primarySwatch: Colors.indigo,
        fontFamily: 'Roboto'   // 指定默认字体
      ),
      home: MainPage(),
    );
  }
}

// 连接BottomNavigationBarItem与Tab内容的纽带
// icon: BottomNavigationBarItem的icon
// title: BottomNavigationBarItem的title
// tabView: Tab内容
// vsync: 动画需要的参数
class NavigationIconView {
  NavigationIconView({
    Widget icon,
    String title,
    Widget tabView,
    TickerProvider vsync,
  }) : _title = title,
      _tabView = tabView,
      item = BottomNavigationBarItem(
        icon: icon,
        title: Text(title),
      ), // 创建BottomNavigationBarItem
      // 创建动画控制器
      controller = AnimationController(
        duration: kThemeAnimationDuration, // 200ms
        vsync: vsync,
      ) {
    _animation = controller.drive(CurveTween(
      curve: const Interval(0.5, 1.0, curve: Curves.fastOutSlowIn),
    )); // 动画值从0.5到1.0的快出满进(fastOutSlowIn)插值效果的动画
  }

  final String _title;
  final BottomNavigationBarItem item;
  final AnimationController controller;
  final Widget _tabView;
  Animation<double> _animation;

  // Tab切换时的动画效果——淡入淡出动画伴随着滑动动画
  FadeTransition transition(BuildContext context) {
    // 最外层是一个淡入淡出动画,值是_animation
    return FadeTransition(
      key: Key(_title),
      opacity: _animation,
      // 伴随着一个滑动动画,动画值从Offset(0.0, 0.02)到Offset.zero
      // Offset表示的是偏移的百分比,即width * dx,height * dy
      child: SlideTransition(
        position: _animation.drive(
          Tween<Offset>(
            begin: const Offset(0.0, 0.02), // Slightly down.
            end: Offset.zero,
          ),
        ),
        // 作用在_tabView也就是Tab内容上
        child: _tabView
      ),
    );
  }
}

class MainPage extends StatefulWidget {
  static const String routeName = '/';

  @override
  createState() => _MainPageState();
}

// TickerProviderStateMixin是动画的需要
class _MainPageState extends State<MainPage> with TickerProviderStateMixin {
  // 当前选中的Tab
  int _currentIndex = 0;
  List<NavigationIconView> _navigationViews;

  // initState是StatefulWidget非常重要的一个生命周期方法,与之对应的是dispose方法
  // 对于StatefulWidget,我们可以在这创建不需要重复创建的变量
  @override
  void initState() {
    super.initState();

    _navigationViews = <NavigationIconView>[
      NavigationIconView(
        icon: const Icon(Icons.timer_off),
        title: "Ready",
        tabView: TaskListPage(),
        vsync: this,
      ),
      NavigationIconView(
        icon: const Icon(Icons.timeline),
        title: "Stats",
        tabView: StatsPage(),
        vsync: this,
      ),
    ];

    // 默认显示Tab1
    _navigationViews[_currentIndex].controller.value = 1.0;
  }

  @override
  void dispose() {
    // 回收资源
    for (NavigationIconView view in _navigationViews)
      view.controller.dispose();
    super.dispose();
  }

  // 构建Scaffold的body
  //
  // 取出NavigationIconView对应的FadeTransition(这也是一个Widget)
  // 按照其opacity从高到低进行排序,然后放入Stack(相当于Android中的FrameLayout)中
  Widget _buildTransitionsStack() {
    final List<FadeTransition> transitions = <FadeTransition>[];

    for (NavigationIconView view in _navigationViews)
      transitions.add(view.transition(context));

    // We want to have the newly animating (fading in) views on top.
    transitions.sort((FadeTransition a, FadeTransition b) {
      final Animation<double> aAnimation = a.opacity;
      final Animation<double> bAnimation = b.opacity;
      final double aValue = aAnimation.value;
      final double bValue = bAnimation.value;

      return aValue.compareTo(bValue);
    });

    return Stack(children: transitions);
  }

  @override
  Widget build(BuildContext context) {
    final BottomNavigationBar botNavBar = BottomNavigationBar(
      items: _navigationViews
        .map<BottomNavigationBarItem>((NavigationIconView navigationView) => navigationView.item)
        .toList(), // List的map操作
      currentIndex: _currentIndex,
      type: BottomNavigationBarType.fixed,
      onTap: (int index) {
        setState(() {
          // 切换Tab时,先执行原来Tab页面的退场动画,然后更新_currentIndex,最后执行新Tab的进场动画
          _navigationViews[_currentIndex].controller.reverse();
          _currentIndex = index;
          _navigationViews[_currentIndex].controller.forward();
        });

        // 延迟kThemeAnimationDuration,等待动画执行完之后再次刷新UI
        //
        // fix a bug that the current tab view can't interact with anything
        Future.delayed(kThemeAnimationDuration, () => setState(() {}));
      },
    );

    return Scaffold(
      body: Center(child: _buildTransitionsStack()),
      // 设置BottomNavigationBar的背景色为白色
      bottomNavigationBar: Theme(
        data: Theme.of(context).copyWith(canvasColor: Colors.white),
        child: botNavBar,
      ),
    );
  }
}
上面这段代码知识点比较多,可以分为以下三点
- BottomNavigationBar的 大坑
- Asset的使用——字体、图片等
- 动画Animation
2.1 BottomNavigationBar的大坑
BottomNavigationBar从官方demo上来看很美好,使用很简单。但是在实际过程中,遇到了两个问题
- BottomNavigationBarItem的每次切换都伴随着Tab的重建
- 解决了1之后,BottomNavigationBarItem来回切换后,Tab内容不能发生任何交互
其实这本质就是一个问题——如何完美使用BottomNavigationBar。
参考bottom_navigation_demo.dart来一点点过渡动画后,我们发现在两个Tab来回切换多次,会有重复构建现象。
flutter: [StatsPage] [build]
flutter: [TaskListPage] [build]
flutter: [TaskListPage] [build]
flutter: [StatsPage] [build]
flutter: [StatsPage] [build]
flutter: [TaskListPage] [build]
flutter: [TaskListPage] [build]
flutter: [StatsPage] [build]
flutter: [StatsPage] [build]
flutter: [TaskListPage] [build]
flutter: [TaskListPage] [build]
flutter: [StatsPage] [build]
flutter: [StatsPage] [build]
flutter: [TaskListPage] [build]
flutter: [TaskListPage] [build]
flutter: [StatsPage] [build]
flutter: [StatsPage] [build]
flutter: [TaskListPage] [build]
flutter: [TaskListPage] [build]
flutter: [StatsPage] [build]
经过多次google无果后,探索发现在NavigationIconView#transition方法中创建FadeTransition时加上key可以解决此问题:
class NavigationIconView {
  ...
  FadeTransition transition(BuildContext context) {
    return FadeTransition(
      key: Key(_title),
      ...
    );
  }
}
好景不长,随后又发现问题2。在关键节点打印日志后发现了问题所在。
下面是启动App->点击tab2->点击tab1的过程中,点击tab1的日志
flutter: [_MainPageState] [build] index=0
flutter: [NavigationIconView] [NavigationIconView] title=Stats, status=AnimationStatus.reverse
flutter: [NavigationIconView] [NavigationIconView] title=Ready, status=AnimationStatus.forward
flutter: [_MainPageState] [_buildTransitionsStack] [<'Ready'>]=0.0, [<'Stats'>]=1.0
flutter: [_MainPageState] [_buildTransitionsStack] index=0:[<'Ready'>] index=1:[<'Stats'>]
flutter: [NavigationIconView] [NavigationIconView] title=Stats, status=AnimationStatus.dismissed
flutter: [NavigationIconView] [NavigationIconView] title=Ready, status=AnimationStatus.completed
index=0:[<'Ready'>] index=1:[<'Stats'>](5),然后Stack按此顺序显示。最后Tab2页面的退场动画和Tab1的进场动画执行完毕(6, 7)。而Stack的布局特点 顾名思义就是Stack形式—— “长子”在底部 ,因此tab1实际上位于栈低,所以不能有交互。解决办法就是在动画完成时重新刷新下UI:
此外,关于此节问题,Stack注释中有这么一段话:
/// The stack paints its children in order with the first child being at the
/// bottom. If you want to change the order in which the children paint, you
/// can rebuild the stack with the children in the new order. If you reorder
/// the children in this way, consider giving the children non-null keys.
/// These keys will cause the framework to move the underlying objects for
/// the children to their new locations rather than recreate them at their
/// new location.
2.2 Asset的使用——字体
Using custom fonts
Assets and images
While Android treats resources and assets as distinct items, Flutter apps have only assets. Where do I store my resolution-dependent image files?
Flutter中本地资源管理都是用的Asset。字体可以放到fonts或者assets文件夹下面,但最后fonts打包时也会放到assets下面。在本程序中,字体是放到fonts文件夹下面的。
定义程序默认字体非常简单:
1、将字体文件放置到根目录/fonts文件夹下
|--lib
|   |--utils.dart
|   |--main.dart
|   |--task
|   |   |--task_list.dart
|   |--data
|   |   |--task.dart
|   |--stats
|   |   |--stats.dart
|--fonts
|   |--Roboto-Medium.ttf
|   |--Roboto-Regular.ttf
|   |--Roboto-Bold.ttf
2、在pubspec.yaml中进行配置,此部分还有一个example在注释中可供参考
flutter:
  uses-material-design: true

  fonts:
      - family: Roboto
        fonts:
          - asset: fonts/Roboto-Regular.ttf
          - asset: fonts/Roboto-Medium.ttf
            weight: 500
          - asset: fonts/Roboto-Bold.ttf
            weight: 700
3、设置app默认字体
void main() => runApp(MyApp());

class MyApp extends StatelessWidget {
  @override
  Widget build(BuildContext context) {
    return new MaterialApp(
      theme: new ThemeData(
        fontFamily: 'Roboto'
      ),
    );
  }
}
2.3 Animation
Cookbook - Fade a Widget in and out
User Interface - Animations
2.3.1 Animation的使用
在本文中,关于Animation的代码有如下这些:
1、创建AnimationController
kThemeAnimationDuration是定义在theme.dart中的常量const Duration kThemeAnimationDuration = Duration(milliseconds: 200);。 2、创建一个Animation对象,用于改变Tab的不透明度
_animation = controller.drive(CurveTween(
  curve: const Interval(0.5, 1.0, curve: Curves.fastOutSlowIn),
))
controller.drive(tween)方法会返回一个Animation,其value的get方法为tween.transform(controller.value)。其具体源码分析将在下一节。而
CurveTween#transform方法调用了curve参数的transform(t)。在本例中curve就是Interval(0.5, 1.0, curve: Curves.fastOutSlowIn)。 Interval的特点在于下面这段代码:
3、创建一个Tween用户改变Tab的位置
_animation.drive(
  Tween<Offset>(
    begin: const Offset(0.0, 0.02), // Slightly down.
    end: Offset.zero,
  ),
)
这步将一个Tween绑定到_animation上,这意味着_animation.value的值将作为Tween的输入。我们看下Tween的相关方法
class Tween<T extends dynamic> extends Animatable<T> {
  Tween({ this.begin, this.end });
  T begin;
  T end;

  @protected
  T lerp(double t) {
    assert(begin != null);
    assert(end != null);
    return begin + (end - begin) * t;
  }

  @override
  T transform(double t) {
    if (t == 0.0)
      return begin;
    if (t == 1.0)
      return end;
    return lerp(t);
  }
  ...
}
Tween就是一个估值器的作用。 4、点击的时候用AnimationController控制动画的播放
setState(() {
  _navigationViews[_currentIndex].controller.reverse();
  _currentIndex = index;
  _navigationViews[_currentIndex].controller.forward();
});
5、在dispose方法中对AnimationController进行回收
@override
void dispose() {
  for (NavigationIconView view in _navigationViews)
    view.controller.dispose();
  super.dispose();
}
在上面这些代码中,涉及到了如下概念:
- AnimationController
用来控制动画,可以进行forward、reverse、fling等操作 - Animation
表示可以在动画生命周期内发生改变的特定类型的值,大部分Widget都可以接受一个Animation对象作为参数,从而监听动画值的改变、读取当前动画值
可以用过addListener和addStatusListener添加监听器 - Tween
抽象类,起到一个 估值器 的作用,即将0.0-1.0的进度映射为具体的动画值 -
Curve
抽象类,起到一个 插值器 的作用,即将0.0-1.0的进度 曲线映射 为0.0-1.0的进度
Curve必须满足这两个条件:t=0.0 to 0.0 且 t=1.0 to 1.0Notice
Flutter可以Curve嵌套Curve,传入第一个Curve的t为动画流逝的百分比,传出最后一个Curve的结果为属性值改变的百分比。
2.3.2 关于Animation和Animatable
Animatable抽象类映射一个double值到特定类型的值。double值通常会在0.0到1.0的范围内。Animatable的主要子类是Tween。
Tween还有一些子类:
- ColorTween
- SizeTween
- RectTween
- IntTween
- StepTween
- ConstantTween
- CurveTween
另外,Curve也有一些子类:
- _Linear:线形
- SawTooth:锯齿形
- Interval:begin-end之间有效
- Threshold:[threshold, 1.0]之间为1
- Cubic:三次多项式的曲线
- FlippedCurve:翻转的曲线
- _DecelerateCurve:加速度减小的曲线,相当于Android中的DecelerateInterpolator
- _BounceInCurve:幅度越来越大的弹跳
- _BounceOutCurve:幅度越来越小的弹跳
- _BounceInOutCurve:先越来越大到0.5,然后越来越小到1.0的弹跳
- _ElasticInCurve:会超过范围的震荡曲线,不太好描述,看图更直观,下同
- _ElasticOutCurve
- ElasticInOutCurve
里面有一些类是私有的,但是Flutter为我们提供了一些静态常量可以使用这些定义好的Curve。效果合集在Curves-class
// PREDEFINED CURVES

/// A collection of common animation curves.
class Curves {
  Curves._();

  /// A linear animation curve.
  ///
  /// This is the identity map over the unit interval: its [Curve.transform]
  /// method returns its input unmodified. This is useful as a default curve for
  /// cases where a [Curve] is required but no actual curve is desired.
  ///
  /// {@animation 464 192 https://flutter.github.io/assets-for-api-docs/assets/animation/curve_linear.mp4}
  static const Curve linear = _Linear._();

  /// A curve where the rate of change starts out quickly and then decelerates; an
  /// upside-down `f(t) = t²` parabola.
  ///
  /// This is equivalent to the Android `DecelerateInterpolator` class with a unit
  /// factor (the default factor).
  ///
  /// {@animation 464 192 https://flutter.github.io/assets-for-api-docs/assets/animation/curve_decelerate.mp4}
  static const Curve decelerate = _DecelerateCurve._();

  /// A cubic animation curve that speeds up quickly and ends slowly.
  ///
  /// {@animation 464 192 https://flutter.github.io/assets-for-api-docs/assets/animation/curve_ease.mp4}
  static const Cubic ease = Cubic(0.25, 0.1, 0.25, 1.0);

  /// A cubic animation curve that starts slowly and ends quickly.
  ///
  /// {@animation 464 192 https://flutter.github.io/assets-for-api-docs/assets/animation/curve_ease_in.mp4}
  static const Cubic easeIn = Cubic(0.42, 0.0, 1.0, 1.0);

  /// A cubic animation curve that starts quickly and ends slowly.
  ///
  /// {@animation 464 192 https://flutter.github.io/assets-for-api-docs/assets/animation/curve_ease_out.mp4}
  static const Cubic easeOut = Cubic(0.0, 0.0, 0.58, 1.0);

  /// A cubic animation curve that starts slowly, speeds up, and then and ends slowly.
  ///
  /// {@animation 464 192 https://flutter.github.io/assets-for-api-docs/assets/animation/curve_ease_in_out.mp4}
  static const Cubic easeInOut = Cubic(0.42, 0.0, 0.58, 1.0);

  /// A curve that starts quickly and eases into its final position.
  ///
  /// Over the course of the animation, the object spends more time near its
  /// final destination. As a result, the user isn’t left waiting for the
  /// animation to finish, and the negative effects of motion are minimized.
  ///
  /// {@animation 464 192 https://flutter.github.io/assets-for-api-docs/assets/animation/curve_fast_out_slow_in.mp4}
  static const Cubic fastOutSlowIn = Cubic(0.4, 0.0, 0.2, 1.0);

  /// An oscillating curve that grows in magnitude.
  ///
  /// {@animation 464 192 https://flutter.github.io/assets-for-api-docs/assets/animation/curve_bounce_in.mp4}
  static const Curve bounceIn = _BounceInCurve._();

  /// An oscillating curve that first grows and then shrink in magnitude.
  ///
  /// {@animation 464 192 https://flutter.github.io/assets-for-api-docs/assets/animation/curve_bounce_out.mp4}
  static const Curve bounceOut = _BounceOutCurve._();

  /// An oscillating curve that first grows and then shrink in magnitude.
  ///
  /// {@animation 464 192 https://flutter.github.io/assets-for-api-docs/assets/animation/curve_bounce_in_out.mp4}
  static const Curve bounceInOut = _BounceInOutCurve._();

  /// An oscillating curve that grows in magnitude while overshooting its bounds.
  ///
  /// {@animation 464 192 https://flutter.github.io/assets-for-api-docs/assets/animation/curve_elastic_in.mp4}
  static const ElasticInCurve elasticIn = ElasticInCurve();

  /// An oscillating curve that shrinks in magnitude while overshooting its bounds.
  ///
  /// {@animation 464 192 https://flutter.github.io/assets-for-api-docs/assets/animation/curve_elastic_out.mp4}
  static const ElasticOutCurve elasticOut = ElasticOutCurve();

  /// An oscillating curve that grows and then shrinks in magnitude while overshooting its bounds.
  ///
  /// {@animation 464 192 https://flutter.github.io/assets-for-api-docs/assets/animation/curve_elastic_in_out.mp4}
  static const ElasticInOutCurve elasticInOut = ElasticInOutCurve();
}
在Flutter中,Animation.drive(Animatable)等于Animatable.animate(Animation),并返回一个Animation对象,该对象value的get方法会调用Animatable.evaluate(Animation)方法。就这样,Flutter将一个估值器绑定到了插值器上。
我们从AnimationController.drive开始,看看相应代码:
/// Animation
@optionalTypeArgs
Animation<U> drive<U>(Animatable<U> child) {
  assert(this is Animation<double>);
  return child.animate(this as dynamic); // TODO(ianh): Clean this once https://github.com/dart-lang/sdk/issues/32120 is fixed.
}

/// Animatable
Animation<T> animate(Animation<double> parent) {
  return _AnimatedEvaluation<T>(parent, this);
}

/// _AnimatedEvaluation
class _AnimatedEvaluation<T> extends Animation<T> with AnimationWithParentMixin<double> {
  _AnimatedEvaluation(this.parent, this._evaluatable);

  @override
  final Animation<double> parent;

  final Animatable<T> _evaluatable;

  @override
  T get value => _evaluatable.evaluate(parent);
  ...
}
2.3.3 Animation的源码
看一下相关源码可以加深我们对Flutter动画系统的了解,先从创建AnimationController开始
animation_controller.dart
class AnimationController extends Animation<double>
  with AnimationEagerListenerMixin, AnimationLocalListenersMixin, AnimationLocalStatusListenersMixin {

  AnimationController({
    double value,
    this.duration,
    this.debugLabel,
    this.lowerBound = 0.0,
    this.upperBound = 1.0,
    this.animationBehavior = AnimationBehavior.normal,
    @required TickerProvider vsync,
  }) : ...,
       _direction = _AnimationDirection.forward {
    _ticker = vsync.createTicker(_tick);
    _internalSetValue(value ?? lowerBound);
  }

  void _internalSetValue(double newValue) {
    _value = newValue.clamp(lowerBound, upperBound);
    if (_value == lowerBound) {
      _status = AnimationStatus.dismissed;
    } else if (_value == upperBound) {
      _status = AnimationStatus.completed;
    } else {
      _status = (_direction == _AnimationDirection.forward) ?
        AnimationStatus.forward :
        AnimationStatus.reverse;
    }
  }

  Ticker _ticker;
  ...
}
AnimationController时内部首先会创建一个Ticker,然后初始化AnimationController的_value和_status。_value的值会被clamp在[lowerBound, upperBound]范围之内,然后根据_value与两个边界以及动画方向确定初始_status。 这里冒出了一个Ticker:
- Ticker类会hookScheduler的
scheduleFrameCallback()机制,以便在每个tick中调用回调,在回调方法中会更新动画的进度并通知所有的(状态)监听器
然后来看看创建Ticker的过程。
首先是在AnimationController的构造方法中调用了vsync.createTicker(_tick),vsync我们实际传入的是TickerProviderStateMixin。我们看一下其源码。
ticker_provider.dart
/// If you only have a single [Ticker] (for example only a single
/// [AnimationController]) for the lifetime of your [State], then using a
/// [SingleTickerProviderStateMixin] is more efficient. This is the common case.
@optionalTypeArgs
mixin TickerProviderStateMixin<T extends StatefulWidget> on State<T> implements TickerProvider {
  Set<Ticker> _tickers;

  @override
  Ticker createTicker(TickerCallback onTick) {
    /// _tickers为空就new一个Set<_WidgetTicker>(),否则就等于自己
    _tickers ??= Set<_WidgetTicker>();
    /// 创建一个_WidgetTicker对象,并添加到set中
    final _WidgetTicker result = _WidgetTicker(onTick, this, debugLabel: 'created by $this');
    _tickers.add(result);
    /// 返回_WidgetTicker对象
    return result;
  }

  /// _WidgetTicker在其dispose方法中调用
  void _removeTicker(_WidgetTicker ticker) {
    ...
    _tickers.remove(ticker);
  }
  ...
}

// This class should really be called _DisposingTicker or some such, but this
// class name leaks into stack traces and error messages and that name would be
// confusing. Instead we use the less precise but more anodyne "_WidgetTicker",
// which attracts less attention.
class _WidgetTicker extends Ticker {
  _WidgetTicker(TickerCallback onTick, this._creator, { String debugLabel }) : super(onTick, debugLabel: debugLabel);

  final TickerProviderStateMixin _creator;

  @override
  void dispose() {
    _creator._removeTicker(this);
    super.dispose();
  }
}
createTicker的参数是一个TickerCallback类型,该类型定义在ticker.dart中。 该类型就是一个参数为Duration的方法,返回值为void。此处对应创建
AnimationController时传入的_tick方法。我们看看这部分代码干了什么 void _tick(Duration elapsed) {
_lastElapsedDuration = elapsed;
final double elapsedInSeconds = elapsed.inMicroseconds.toDouble() / Duration.microsecondsPerSecond;
assert(elapsedInSeconds >= 0.0);
_value = _simulation.x(elapsedInSeconds).clamp(lowerBound, upperBound);
if (_simulation.isDone(elapsedInSeconds)) {
_status = (_direction == _AnimationDirection.forward) ?
AnimationStatus.completed :
AnimationStatus.dismissed;
stop(canceled: false);
}
notifyListeners();
_checkStatusChanged();
}
elapsed参数是动画开始到现在的duration,这会在后面讲到。_tick方法干了3件事: - 根据elapsed计算当前动画的进度
- 判断动画是否已经完成。若已完成,则设置对应的状态,并调用
stop方法释放一些资源 - 通知所有的由
addListener监听的监听器以及由addStatusListener监听的状态监听器
在计算时,还涉及到了一个Simulation类:
Simulation抽象类将一个相对时间值映射到时间流逝百分比
我们以AnimationController的forward过程为例,其内部的调用流程为_animateToInternal(upperBound)->_startSimulation(_InterpolationSimulation(_value, target, simulationDuration, curve, scale));
在_startSimulation方法内部完成了_simulation的赋值,赋的值为_InterpolationSimulation。我们看一下该类的源码
class _InterpolationSimulation extends Simulation {
  _InterpolationSimulation(this._begin, this._end, Duration duration, this._curve, double scale)
    : assert(_begin != null),
      assert(_end != null),
      assert(duration != null && duration.inMicroseconds > 0),
      _durationInSeconds = (duration.inMicroseconds * scale) / Duration.microsecondsPerSecond;

  final double _durationInSeconds;
  final double _begin;
  final double _end;
  final Curve _curve;

  @override
  double x(double timeInSeconds) {
    final double t = (timeInSeconds / _durationInSeconds).clamp(0.0, 1.0);
    if (t == 0.0)
      return _begin;
    else if (t == 1.0)
      return _end;
    else
      return _begin + (_end - _begin) * _curve.transform(t);
  }

  @override
  double dx(double timeInSeconds) {
    final double epsilon = tolerance.time;
    return (x(timeInSeconds + epsilon) - x(timeInSeconds - epsilon)) / (2 * epsilon);
  }

  @override
  bool isDone(double timeInSeconds) => timeInSeconds > _durationInSeconds;
}
x方法先计算动画的进度,然后根据起始、结尾位置用Curve(默认是线性的)映射出新的进度。 我们回过头看一下AnimationController#_tick方法是如何每一个tick都会触发的。
上面我们说到,TickerProviderStateMixin#createTicker方法创建了_WidgetTicker,而_WidgetTicker又继承了Ticker。在AnimationController的forward过程中,最后在_startSimulation方法内部调用了_ticker.start()开始了动画。我们看一下相关代码:
class Ticker {
  Ticker(this._onTick, { this.debugLabel }) {
    ...
  }
  ...

  bool get muted => _muted;
  bool _muted = false;

  bool get isActive => _future != null;

  TickerFuture start() {
    assert(() {
      if (isActive) {
        throw FlutterError(...);
      }
      return true;
    }());
    ...
    _future = TickerFuture._();
    if (shouldScheduleTick) {
      scheduleTick();
    }
    if (SchedulerBinding.instance.schedulerPhase.index > SchedulerPhase.idle.index &&
        SchedulerBinding.instance.schedulerPhase.index < SchedulerPhase.postFrameCallbacks.index)
      _startTime = SchedulerBinding.instance.currentFrameTimeStamp;
    return _future;
  }

  @protected
  bool get scheduled => _animationId != null;

  @protected
  bool get shouldScheduleTick => !muted && isActive && !scheduled;
  ...
  /// Schedules a tick for the next frame.
  ///
  /// This should only be called if [shouldScheduleTick] is true.
  @protected
  void scheduleTick({ bool rescheduling = false }) {
    assert(!scheduled);
    assert(shouldScheduleTick);
    _animationId = SchedulerBinding.instance.scheduleFrameCallback(_tick, rescheduling: rescheduling);
  }
  ...
}
start方法时,各项检查都通过了,然后调用了scheduleTick方法。在方法里面调用了SchedulerBinding.instance.scheduleFrameCallback方法,这就是每个动画帧我们都能收到回调的原因。 接着让下看相关代码: mixin SchedulerBinding on BindingBase, ServicesBinding {
int scheduleFrameCallback(FrameCallback callback, { bool rescheduling = false }) {
scheduleFrame();
_nextFrameCallbackId += 1;
_transientCallbacks[_nextFrameCallbackId] = _FrameCallbackEntry(callback, rescheduling: rescheduling);
return _nextFrameCallbackId;
}
/// If necessary, schedules a new frame by calling
/// [Window.scheduleFrame].
///
/// After this is called, the engine will (eventually) call
/// [handleBeginFrame]. (This call might be delayed, e.g. if the device's
/// screen is turned off it will typically be delayed until the screen is on
/// and the application is visible.) Calling this during a frame forces
/// another frame to be scheduled, even if the current frame has not yet
/// completed.
///
/// Scheduled frames are serviced when triggered by a "Vsync" signal provided
/// by the operating system. The "Vsync" signal, or vertical synchronization
/// signal, was historically related to the display refresh, at a time when
/// hardware physically moved a beam of electrons vertically between updates
/// of the display. The operation of contemporary hardware is somewhat more
/// subtle and complicated, but the conceptual "Vsync" refresh signal continue
/// to be used to indicate when applications should update their rendering.
///
/// To have a stack trace printed to the console any time this function
/// schedules a frame, set [debugPrintScheduleFrameStacks] to true.
///
/// See also:
///
/// * [scheduleForcedFrame], which ignores the [lifecycleState] when
/// scheduling a frame.
/// * [scheduleWarmUpFrame], which ignores the "Vsync" signal entirely and
/// triggers a frame immediately.
void scheduleFrame() {
if (_hasScheduledFrame || !_framesEnabled)
return;
assert(() {
if (debugPrintScheduleFrameStacks)
debugPrintStack(label: 'scheduleFrame() called. Current phase is $schedulerPhase.');
return true;
}());
ui.window.scheduleFrame();
_hasScheduledFrame = true;
}
}
scheduleFrameCallback方法首先会调用scheduleFrame方法在必要的时候开始一个新的帧。然后将tick回调封装成一个_FrameCallbackEntry注册到_transientCallbacks的最后,并返回这个下标。在
scheduleFrame方法中的ui.window.scheduleFrame()是一个native方法:void scheduleFrame() native 'Window_scheduleFrame'我们就不接着往下追踪了。 不过我们可以在scheduleFrame方法的注释中看到,handleBeginFrame方法会接着被引擎调用。我们看看里面的内容
Duration _adjustForEpoch(Duration rawTimeStamp) {
  final Duration rawDurationSinceEpoch = _firstRawTimeStampInEpoch == null ? Duration.zero : rawTimeStamp - _firstRawTimeStampInEpoch;
  return Duration(microseconds: (rawDurationSinceEpoch.inMicroseconds / timeDilation).round() + _epochStart.inMicroseconds);
}

/// Called by the engine to prepare the framework to produce a new frame.
///
/// This function calls all the transient frame callbacks registered by
/// [scheduleFrameCallback]. It then returns, any scheduled microtasks are run
/// (e.g. handlers for any [Future]s resolved by transient frame callbacks),
/// and [handleDrawFrame] is called to continue the frame.
void handleBeginFrame(Duration rawTimeStamp) {
  _firstRawTimeStampInEpoch ??= rawTimeStamp;
  _currentFrameTimeStamp = _adjustForEpoch(rawTimeStamp ?? _lastRawTimeStamp);
  if (rawTimeStamp != null)
    _lastRawTimeStamp = rawTimeStamp;
  ...
  _hasScheduledFrame = false;
  try {
    // TRANSIENT FRAME CALLBACKS
    ...
    final Map<int, _FrameCallbackEntry> callbacks = _transientCallbacks;
    _transientCallbacks = <int, _FrameCallbackEntry>{};
    callbacks.forEach((int id, _FrameCallbackEntry callbackEntry) {
      if (!_removedIds.contains(id))
        _invokeFrameCallback(callbackEntry.callback, _currentFrameTimeStamp, callbackEntry.debugStack);
    });
    _removedIds.clear();
  }
  ...
}

void _invokeFrameCallback(FrameCallback callback, Duration timeStamp, [ StackTrace callbackStack ]) {
  ...
  try {
    callback(timeStamp);
  } catch (exception, exceptionStack) {
    ...
  }
  ...
}
_adjustForEpoch方法计算_currentFrameTimeStamp,_adjustForEpoch方法可以简单的理解为传入参数与_firstRawTimeStampInEpoch之间的差,其他情况与开发者设置有关。然后将_hasScheduledFrame复位为false,最后依次调用没有取消回调事件的回调。 这里的回调是Ticker的_tick方法,此方法传入的是一个时间间隔,而不是一个时间戳:
void _tick(Duration timeStamp) {
  assert(isTicking);
  assert(scheduled);
  _animationId = null;

  _startTime ??= timeStamp;
  _onTick(timeStamp - _startTime);

  // The onTick callback may have scheduled another tick already, for
  // example by calling stop then start again.
  if (shouldScheduleTick)
    scheduleTick(rescheduling: true);
}
AnimationController#_tick方法。这里可以证明AnimationController#_tick方法接收到的是动画开始到现在的duration。 2.3.4 Animation源码总结
在探索源码的时候,我们额外看到了三个动画相关的类
- Scheduler
The SchedulerBinding is a singleton class that exposes the Flutter scheduling primitives.
在动画中,key primitive指的就是帧回调。 - Ticker
Ticker类会hookScheduler的scheduleFrameCallback()机制,以便在每个tick中调用回调,在回调方法中会更新动画的进度并通知所有的(状态)监听器 - Simulation
Simulation抽象类将一个相对时间值映射到时间流逝百分比
我们总结一下Animation工作的流程。
- 创建
AnimationController时会调用TickerProvider#createTicker创建Ticker对象,并会注册回调到_tick方法 - 调用
forward时,会创建Simulation对象并作为参数传入_startSimulation方法 - 在
_startSimulation方法中会调用_ticker.start()开始动画 Ticker#start方法最后会调用SchedulerBinding.instance.scheduleFrameCallback方法开始新的帧,并在新帧产生后回调Ticker#_tick方法Ticker#_tick方法回调AnimationController#_tick方法- 在该方法中会调用
Simulation#x方法根据动画的进度利用Curve计算出transform出新的动画进度,并通知所有的(状态)监听器 - 监听器收到通知后可以取Animation的
value来更新UI,取value时可能会经过Tween的计算,把动画进度值转化为真正的动画属性值;
3. Tab1内容
3.1 基本布局的写法
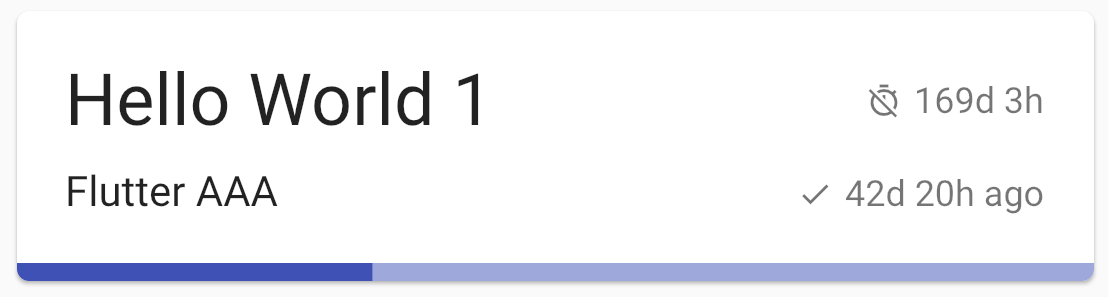
我们回顾下Tab1的UI。Tab1主要用来展示所有的任务,因此整体是一个列表。每一项是一个卡片。
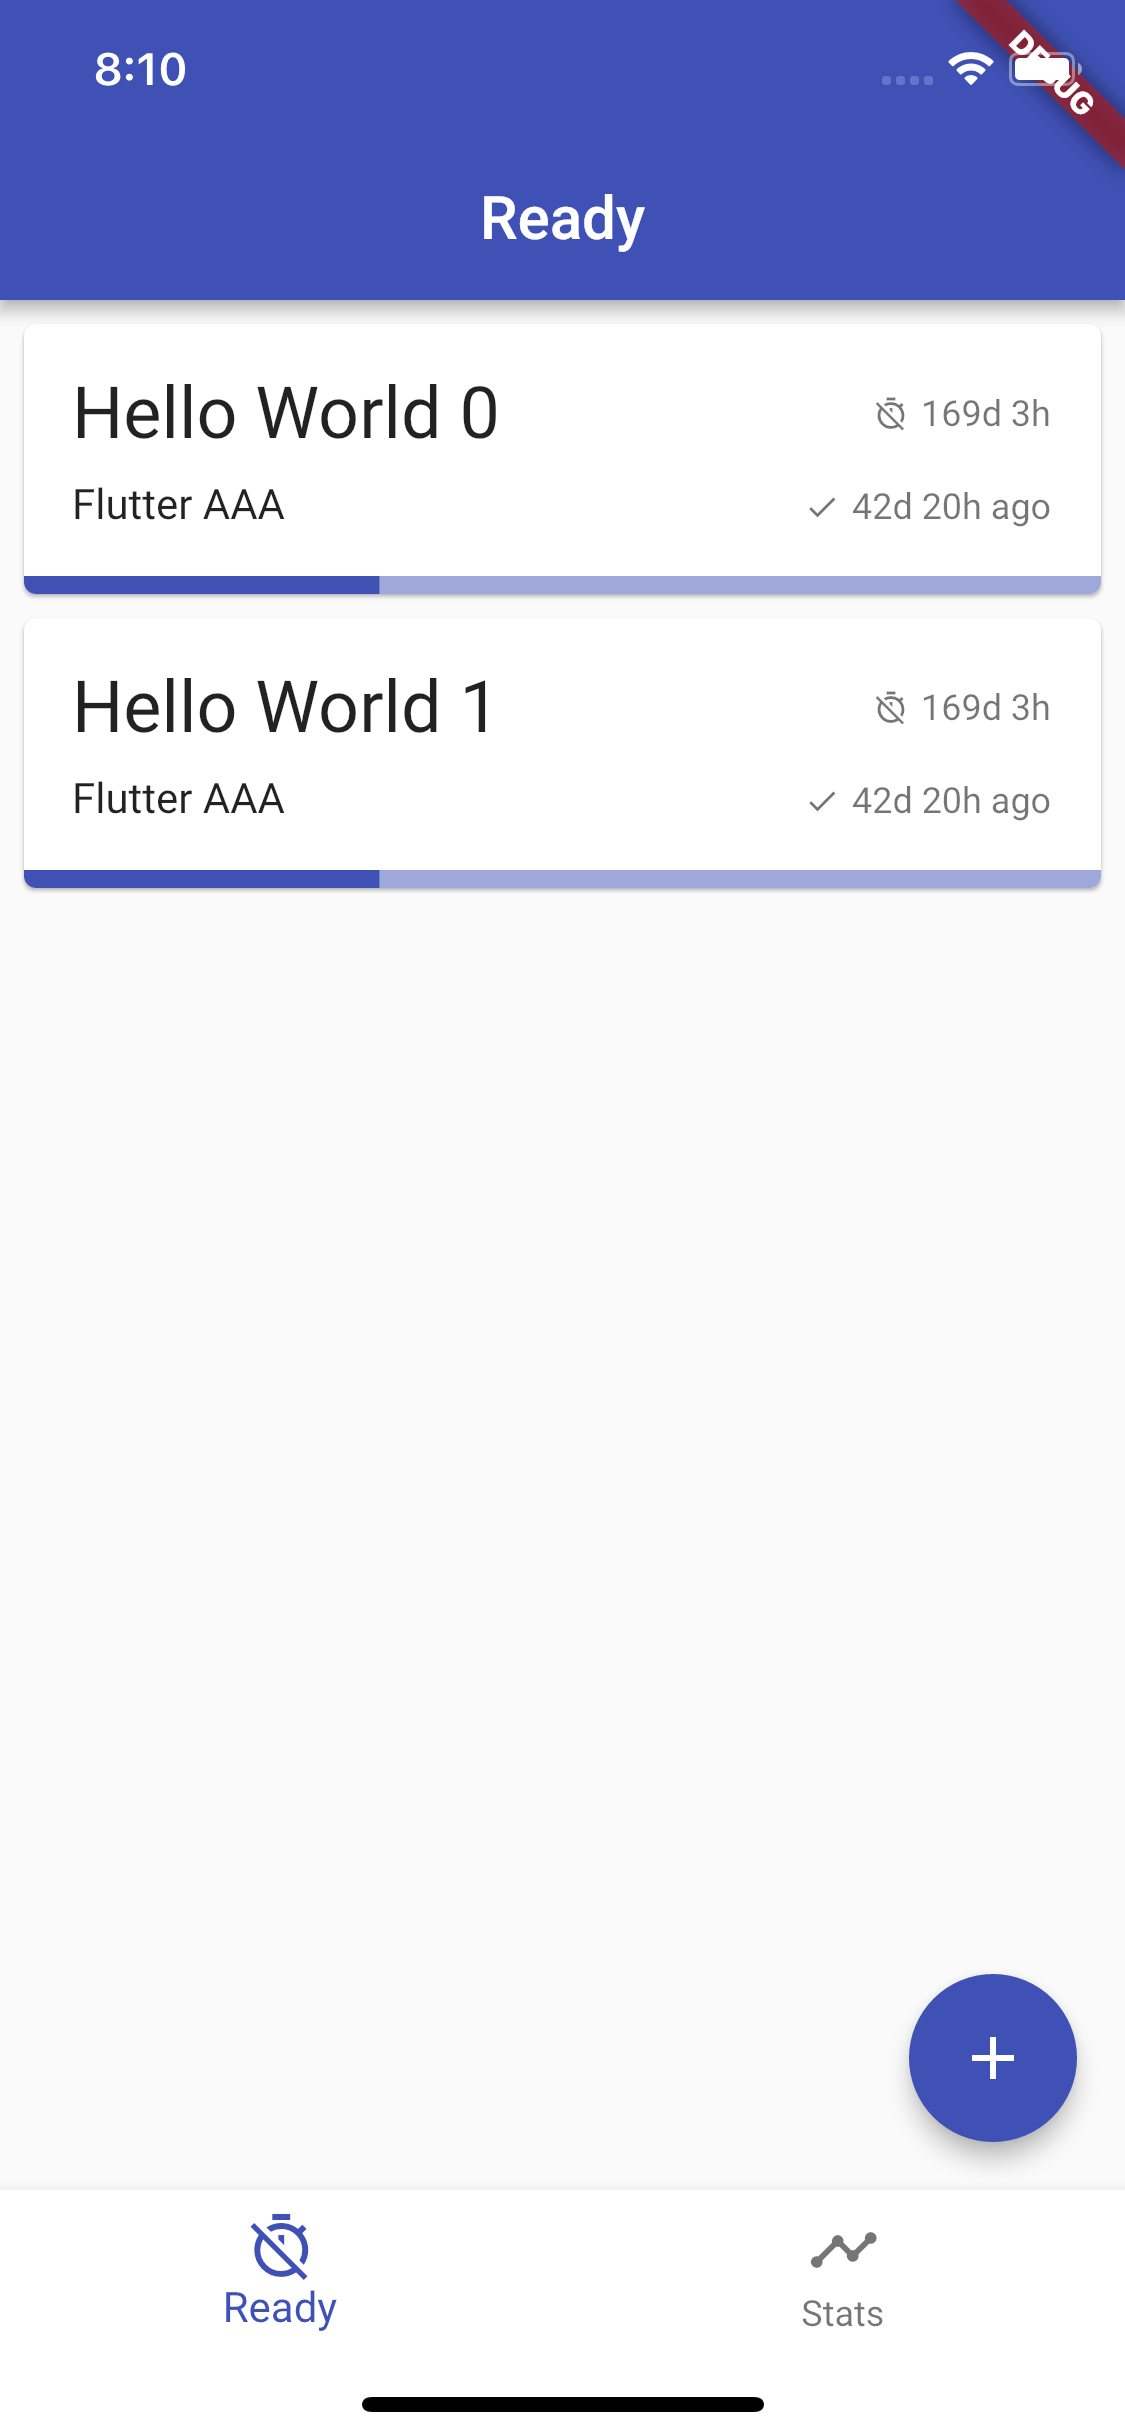
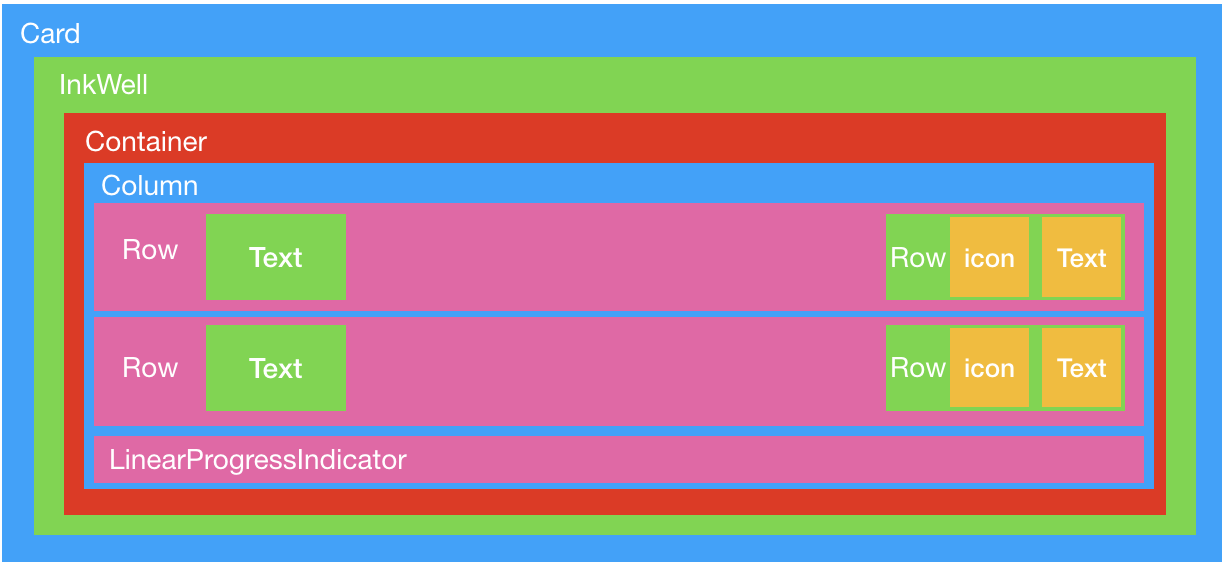
我们分析一下Item的结构:在不考虑padding、margin的情况下,整个Item最外层应该是一个Card,内部是一个包裹着三行的Column。前两行都是Row,里面包含一个显示主要信息的Text和一个带有Icon的时间,带Icon的时间由Row组成。最后一行只有一个LinearProgressIndicator。
考虑到Card没有点击事件,所以我们使用InkWell包裹Card的widget,这样点击Card就有水波纹效果,且可以响应点击事件。
下面是Item的布局剖析图。
我们解释一下Item的布局代码:
return Card(
  margin: const EdgeInsets.fromLTRB(8.0, 8.0, 8.0, 0.0),  // Card距左上右8个逻辑像素,距下0个逻辑像素
  color: Colors.white,                                    // Card的背景为白色
  clipBehavior: Clip.antiAlias,     // 使用抗锯齿的方式裁切,这样Card底部的进度条下半部分也会有Card的圆角
  // 使用InkWell可以让其子Widget有水波纹效果的点击事件
  child: InkWell(
    onTap: () {}, // InkWell的点击事件
    child: Container(
      padding: const EdgeInsets.only(top: 16.0),
      child: Column(
        mainAxisAlignment: MainAxisAlignment.spaceBetween,
        crossAxisAlignment: CrossAxisAlignment.start,
        children: <Widget>[
          Padding(
            // 第一行,用来显示Task的title、截止时间
            padding: const EdgeInsets.symmetric(horizontal: 16.0),
            child: Row(
              mainAxisAlignment: MainAxisAlignment.spaceBetween,
              crossAxisAlignment: CrossAxisAlignment.center,
              children: <Widget>[
                Text(
                  task.title,
                  // 指定text的样式
                  style: Theme.of(context).textTheme.headline,
                ),
                Container(
                  child: Row(
                    crossAxisAlignment: CrossAxisAlignment.center,
                    children: <Widget>[
                      Container(
                        margin: const EdgeInsets.only(right: 4.0),
                        child: Icon(
                          Icons.timer_off,
                          size: 12.0,
                          color: Theme.of(context).textTheme.caption.color,
                        ),
                      ),
                      Text(
                        // Flutter格式化时间 1️⃣
                        Utils.duration(DateTime.fromMillisecondsSinceEpoch(task.deadline)),
                        style: Theme.of(context).textTheme.caption,
                      ),
                    ],
                  )
                ),
              ],
            ),
          ),
          Padding(
            // 第二行,用来显示Task的message、上次操作时间
            padding: const EdgeInsets.fromLTRB(16.0, 8.0, 16.0, 16.0),
            child: Row(
              mainAxisAlignment: MainAxisAlignment.spaceBetween,
              // 子元素基线对齐,必须要指定textBaseline属性
              crossAxisAlignment: CrossAxisAlignment.baseline,
              textBaseline: TextBaseline.alphabetic,
              children: <Widget>[
                Text(
                  task.message,
                  style: Theme.of(context).textTheme.body1,
                ),
                // 如果有更新时间,显示更新时间,否则显示空的Text布局
                task.updated != null ?
                Container(
                  child: Row(
                    crossAxisAlignment: CrossAxisAlignment.center,
                    children: <Widget>[
                      Container(
                        margin: const EdgeInsets.only(right: 4.0),
                        child: Icon(
                          Icons.done,
                          size: 12.0,
                          color: Theme.of(context).textTheme.caption.color,
                        ),
                      ),
                      Text(
                        Utils.duration(DateTime.fromMillisecondsSinceEpoch(task.updated)),
                        style: Theme.of(context).textTheme.caption,
                      ),
                    ],
                  )
                ) : Text(''),
              ],
            ),
          ),
          // 线性进度条
          LinearProgressIndicator(
            value: task.currentCount / task.totalCount,
          ),
        ],
      ),
    ),
  )
);
- Flutter中的Widget不像Android中的View那样,有非常多通用的布局属性。当我们需要在Flutter中加一些padding、margin或者color等属性时,如果某个具体的Widget没有提供这个属性,我们需要使用一个包含该属性的Widget包裹它。
-
在第二节的代码中,我们使用了如下代码来设置
BottomNavigationBar的背景色为白色。这是因为没有属性可以直接修改bottomNavigationBar: Theme( data: Theme.of(context).copyWith(canvasColor: Colors.white), child: botNavBar, ),BottomNavigationBar的背景色,其默认颜色是canvasColor。如果我们在MaterialApp中没有指定canvasColor,canvasColor默认就为canvasColor ??= isDark ? Colors.grey[850] : Colors.grey[50];。同时canvasColor也是Scaffold的颜色。
所以我们copy一份主题,然后修改canvasColor为白色,传给BottomNavigationBar,这样就OK了。
3.2 使用三方库
在Flutter中,导包时可以加上一些限定词,比如as、show、hide。
as关键词可以避免混淆本文件的方法与包中的全局方法、常量,比如duration方法是utils.dart中的一个全局方法,我们使用as关键词可以这样:
show、hide关键词可以让我们指定包中特定的类、方法等可见或不可见。下面指定了我们只能访问utils.dart的duration方法。 在Flutter中,格式化时间需要导入intl库
1、在pubspec.ymal中添加依赖
dependencies:
  flutter:
    sdk: flutter

  # The following adds the Cupertino Icons font to your application.
  # Use with the CupertinoIcons class for iOS style icons.
  cupertino_icons: ^0.1.2
  intl: ^0.15.7  // add
2、在安装库后,可以参考如下代码进行日期的格式化
String formatDate(DateTime dateTime) {
  var dateFormat = DateFormat('yyyy-MM-dd');
  return dateFormat.format(dateTime);
}
在了解完Item的结构后,我们在看一下Tab1的其他代码:
import 'package:flutter/material.dart';

import '../data/task.dart';
import '../utils.dart' as Utils;

class TaskListPage extends StatelessWidget {

  @override
  Widget build(BuildContext context) {
    print("build => ${this.runtimeType.toString()}");

    // ListView的构造方法,只需要传入总个数以及每个item如何构建就行
    final body = ListView.builder(
        itemCount: 2,
        itemBuilder: (context, index) {
          return TaskListItem(index);
        }
      );

    return Scaffold(
      appBar: AppBar(
        title: Text('Ready'),
      ),
      body: body,
      floatingActionButton: FloatingActionButton(
        onPressed: () {},
        tooltip: "添加Task",
        child: Icon(Icons.add),
      ),
    );
  }
}
我们在下一章中将会新增一个Task的详情/新增页面,编辑完成后会SQLite来存储数据。编辑的同时也会存下相关的日志,这样tab2就有数据可以展示了。
另外,但是我们注意到Tab1也可以是一个Scaffold,在整个主页也是Scaffold的情况下,真是amazing。