App内自定义软键盘
最近由于项目需要,需要自定义软键盘。直接摆Button真是low爆了,所以想试试系统关于键盘这方面的API。尝试了一下,用着还行,就是有一点点注意事项。
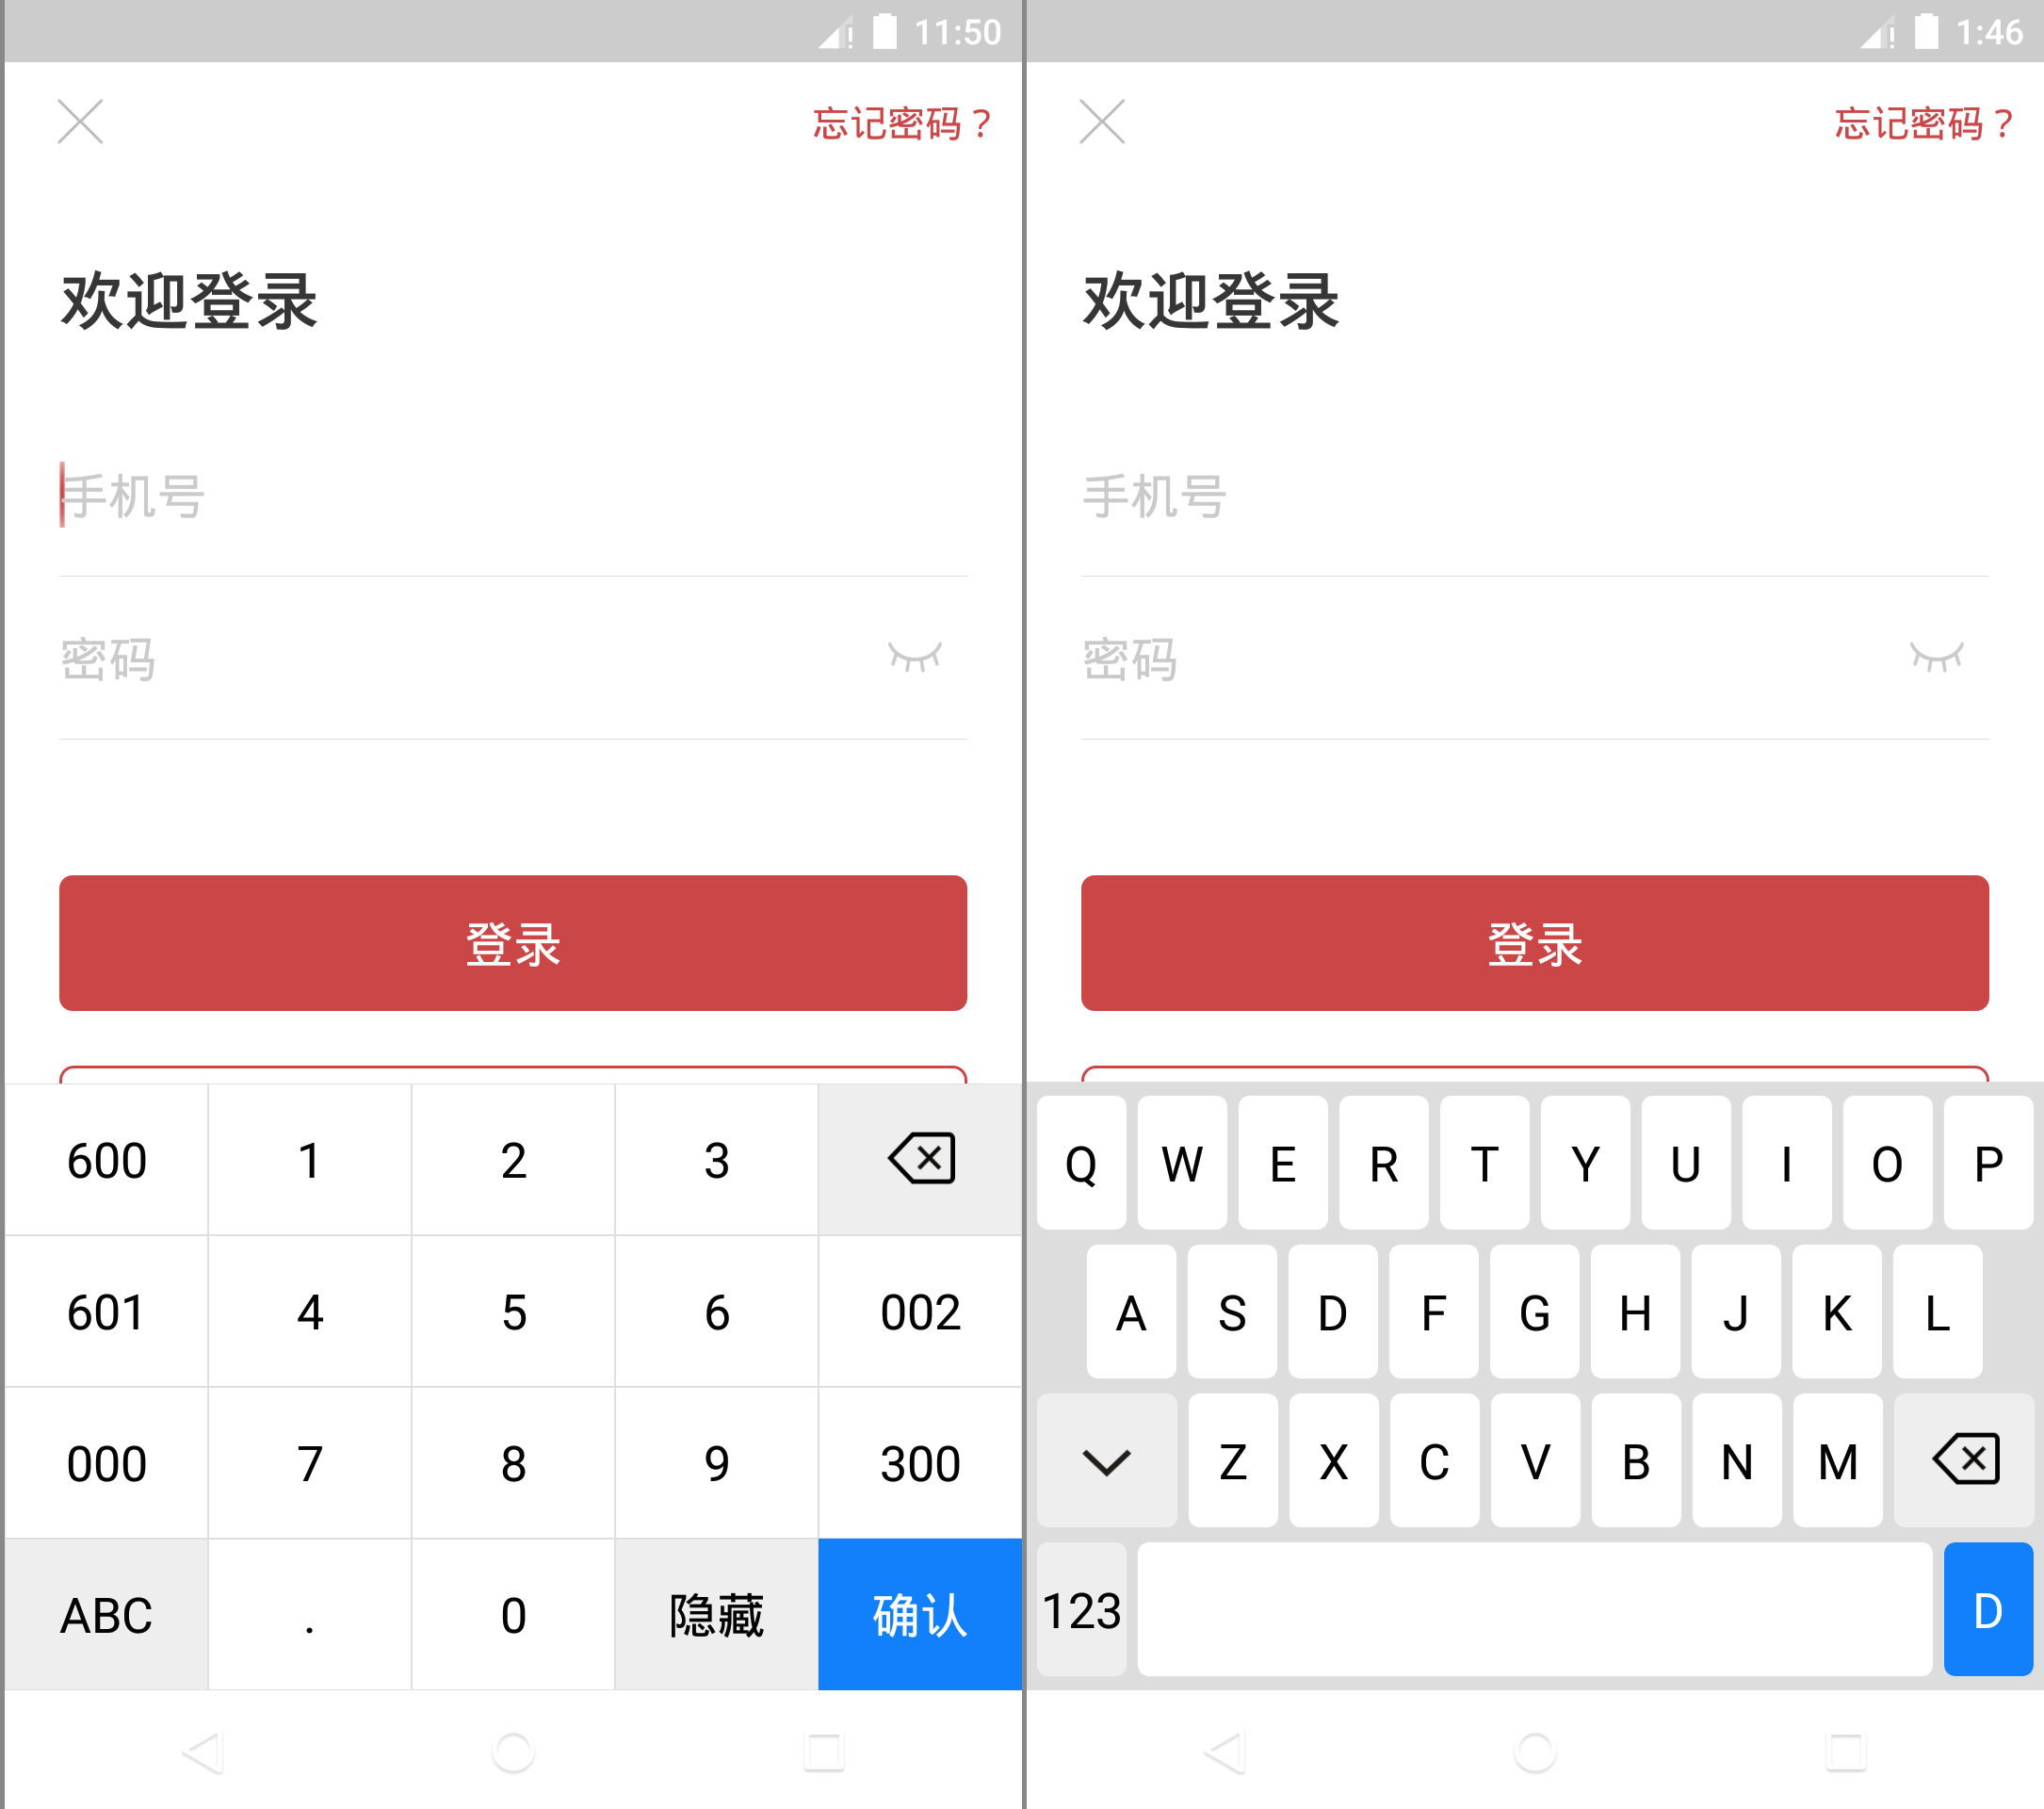
键盘分为常规的数字键盘+字母键盘两部分,先上效果图:
创建App内软键盘非常简单,只需要一个或多个描述键盘如何布局的Keyboard以及容器KeyboardView,其中Keyboard中键盘布局靠xml进行。
自定义的过程可以分为以下几步
- 在xml中为某种类型的软键盘进行布局,供
Keyboard创建时使用 - 自定义
KeyboardView,重写其onDraw方法为每个键绘制文字、Icon以及背景色;若有多种键盘类型,可为其提供切换键盘的API - 定义一个类实现
KeyboardView.OnKeyboardActionListener接口来处理按键点击事件;并监听EditText的点击、触摸、焦点改变事件来弹出、隐藏自定义的KeyboardView - 将自定义的
KeyboardView加入布局中,开始使用
下面一步步操作并将源码附上。
1. 按键布局
按键布局用xml实现,放在res/xml目录下。该资源决定了一种Keyboard的按键如何布局。可以根据项目需要,创建多种键盘的布局文件,然后在KeyboardView中进行切换。
在上面的项目中,有两种键盘:数字键盘和字母键盘。我们这里创建了两个文件:keyboard_number.xml和keyboard_qwerty.xml。
先上代码keyboard_number.xml,随后会进行分析。
<?xml version="1.0" encoding="utf-8"?>
<Keyboard xmlns:android="http://schemas.android.com/apk/res/android"
    android:verticalGap="0px"
    android:horizontalGap="0px"
    android:keyHeight="9%p"
    android:keyWidth="20%p">

    <Row>
        <Key
            android:codes="-1004,-1004"
            android:keyLabel="600" />
        <Key
            android:codes="49"
            android:keyLabel="1" />
        <Key
            android:codes="50"
            android:keyLabel="2" />
        <Key
            android:codes="51"
            android:keyLabel="3" />
        <Key
            android:codes="-5"
            android:isRepeatable="true"
            android:keyEdgeFlags="right"
            android:keyIcon="@drawable/kb_ic_keyboard_delete_n" />
    </Row>

    <Row>
        <Key
            android:codes="-1005,-1005"
            android:keyLabel="601" />
        <Key
            android:codes="52"
            android:keyLabel="4" />
        <Key
            android:codes="53"
            android:keyLabel="5" />
        <Key
            android:codes="54"
            android:keyLabel="6" />
        <Key
            android:codes="-1002,-1002"
            android:keyLabel="002" />
    </Row>

    <Row>
        <Key
            android:codes="-1001,-1001"
            android:keyLabel="000" />
        <Key
            android:codes="55"
            android:keyLabel="7" />
        <Key
            android:codes="56"
            android:keyLabel="8" />
        <Key
            android:codes="57"
            android:keyLabel="9" />
        <Key
            android:codes="-1003,-1003"
            android:keyLabel="300" />
    </Row>

    <Row>
        <Key
            android:codes="-2"
            android:keyLabel="ABC" />
        <Key
            android:codes="46"
            android:keyLabel="." />
        <Key
            android:codes="48"
            android:keyLabel="0" />
        <Key
            android:codes="-3"
            android:keyLabel="隐藏" />
        <Key
            android:codes="-4"
            android:keyEdgeFlags="right"
            android:keyLabel="确认" />
    </Row>
</Keyboard>
对于键盘整体来说
- 所有按键之间不需要间隔,所以水平间隙和竖直间隙都设置为0
- 按键每排5个,所以keyWidth为20%p
- 键盘的高度固定为36%p,因此keyHeight为9%p
对于单个按键来说,宽高都不需要单独指定,只需要指定按键表示的android:codes、怎么显示(显示图标android:keyIcon还是文字android:keyLabel)、按下时是否一直发送事件android:isRepeatable,至于android:keyEdgeFlags指不指定没有多大关系。
android:codes会由我们自己进行处理。方面起见,可以用UNICODE码表示的就是UNICODE码,一些控制键可以使用系统预留的值,自定义按键的值建议使用负数。下面是定义在Keyboard中的所有控制键:
public static final int KEYCODE_SHIFT = -1;
public static final int KEYCODE_MODE_CHANGE = -2;
public static final int KEYCODE_CANCEL = -3;
public static final int KEYCODE_DONE = -4;
public static final int KEYCODE_DELETE = -5;
public static final int KEYCODE_ALT = -6;
在数字键盘中,我们使用了-2至-5,这四个值。
另外,我们自定义的特殊按键(比如600),其android:codes是两个一样的数字。这个做是为了让KeyboardView绘制文字时,不把600进行加粗。其源码如下:
if (label != null) {
    // For characters, use large font. For labels like "Done", use small font.
    if (label.length() > 1 && key.codes.length < 2) {
        paint.setTextSize(mLabelTextSize);
        paint.setTypeface(Typeface.DEFAULT_BOLD);
    } else {
        paint.setTextSize(mKeyTextSize);
        paint.setTypeface(Typeface.DEFAULT);
    }
    // Draw a drop shadow for the text
    paint.setShadowLayer(mShadowRadius, 0, 0, mShadowColor);
    // Draw the text
    canvas.drawText(label,
        (key.width - padding.left - padding.right) / 2
                + padding.left,
        (key.height - padding.top - padding.bottom) / 2
                + (paint.getTextSize() - paint.descent()) / 2 + padding.top,
        paint);
    // Turn off drop shadow
    paint.setShadowLayer(0, 0, 0, 0);
}
我们可以看到,如果label长度超过1且其codes长度小于1,就使用mLabelTextSize并进行加粗;否则使用mKeyTextSize,正常字体。
如果我们在xml中不加double的code,自定义的特殊按键就是粗体,而其他普通文字都是正常,这样看起来就很怪。当然,此处double处理了,在KeyboardView.OnKeyboardActionListener中也需要进行过滤处理,后面再说。
下面是字母键盘keyboard_qwerty.xml,还是先上代码在分析。
<?xml version="1.0" encoding="utf-8"?>
<Keyboard
    xmlns:android="http://schemas.android.com/apk/res/android"
    android:horizontalGap="0.91%p"
    android:verticalGap="0.8%p"
    android:keyWidth="9%p"
    android:keyHeight="8%p">

    <Row android:keyHeight="0px"/>

    <Row>
        <Key android:codes="81" android:keyLabel="Q" android:keyEdgeFlags="left" />
        <Key android:codes="87" android:keyLabel="W" />
        <Key android:codes="69" android:keyLabel="E" />
        <Key android:codes="82" android:keyLabel="R" />
        <Key android:codes="84" android:keyLabel="T" />
        <Key android:codes="89" android:keyLabel="Y" />
        <Key android:codes="85" android:keyLabel="U" />
        <Key android:codes="73" android:keyLabel="I" />
        <Key android:codes="79" android:keyLabel="O" />
        <Key android:codes="80" android:keyLabel="P" android:keyEdgeFlags="right" />
    </Row>

    <Row>
        <Key android:codes="65" android:keyLabel="A" android:horizontalGap="5.86%p" android:keyEdgeFlags="left" />
        <Key android:codes="83" android:keyLabel="S" />
        <Key android:codes="68" android:keyLabel="D" />
        <Key android:codes="70" android:keyLabel="F" />
        <Key android:codes="71" android:keyLabel="G" />
        <Key android:codes="72" android:keyLabel="H" />
        <Key android:codes="74" android:keyLabel="J" />
        <Key android:codes="75" android:keyLabel="K" />
        <Key android:codes="76" android:keyLabel="L" android:keyEdgeFlags="right" />
    </Row>

    <Row>
        <Key android:codes="-3" android:keyIcon="@drawable/kb_ic_keyboard_arrow_n" android:keyWidth="13.95%p" android:keyEdgeFlags="left"/>
        <Key android:codes="90" android:keyLabel="Z" />
        <Key android:codes="88" android:keyLabel="X" />
        <Key android:codes="67" android:keyLabel="C" />
        <Key android:codes="86" android:keyLabel="V" />
        <Key android:codes="66" android:keyLabel="B" />
        <Key android:codes="78" android:keyLabel="N" />
        <Key android:codes="77" android:keyLabel="M" />
        <Key android:codes="-5" android:keyIcon="@drawable/kb_ic_keyboard_delete_n" android:keyWidth="13.95%p" android:keyEdgeFlags="right" android:isRepeatable="true" />
    </Row>

    <Row>
        <Key android:codes="-2" android:keyLabel="123"/>
        <Key android:codes="32" android:keyLabel="" android:keyWidth="78.36%p" android:isRepeatable="true"  />
        <Key android:codes="-4" android:keyLabel="D" android:keyEdgeFlags="right"  />
    </Row>

    <Row android:keyHeight="0px" android:rowEdgeFlags="bottom" />
</Keyboard>
对于键盘整体来说
-
为了使键盘高度和数字键盘一致,总间距+按键高度*4要等于36%p。而
android:verticalGap指定的间距只会在两两Row之间,也就是第一行默认是置顶的,最后一行同理。所以为了让第一行、最后一行与顶部、底部之间有空隙,在键盘第一行和最后一行插入一个0高度的空行,这样就完美了。 如图所示,绿线即为0高度的空行。这样5space+4row=36%,调整一下比例,row取8%p,space取0.8%p。
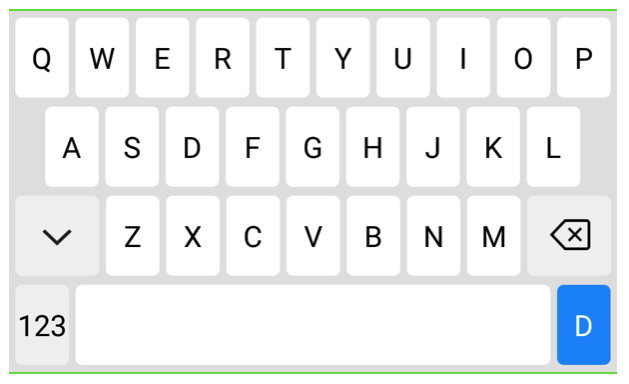
字母键盘 绿线即为0高度的空行 -
android:horizontalGap不像竖直方向的,此属性在最左端与第一列之间也会生效。所以11space+10col=100%p,space取10/11,col取9%p。
第一行无需做任何调整,开始第二行。第二行只有9个按键,100-(10space+9col)=109/11,也就说两边多余的间隙为109/22,再加上本来就有的10/11的间隙,第二行第一个键的空隙应该为129/22=5.863636364。
第三行7个标准按键,两个大按键,所以这里要计算大按键的宽度,2big+7col+10space=100 ===> big=307/22=13.954545455。
最后一行,两个标准按键,一个长按键,large+2col+4space=100 ===> large=862/11=78.363636364
另外,需要注意,如果某个按键需要跨多行或多列,那么直接设置宽或高的值即可
2. KeyboardView
在该步骤中我们继承了KeyboardView并重写了其onDraw方法,来**实现所有的绘制逻辑**,所以其实上一步中讲到的android:codes进行double是可有可无的。
由于数字键盘和字母键盘中按键的背景是两套(数字键盘没有圆角,字母键盘全部加了圆角),而KeyboardView没有提供修改android:keyBackground值的API接口,无法实现切换键盘时也随着切换android:keyBackground,所以只能自己绘制普通按键的背景。
此时如果在自己的绘制逻辑之前调用super.onDraw方法,会导致看不见普通按键的文字;如果在自己的绘制逻辑之后调用,会导致自己的绘制逻辑失效。所以干脆不调用super.onDraw,全部自己绘制。
此外,由于有两种键盘需要切换,所以切换逻辑也内聚到了该类中。
直接上该部分代码:
class RSKeyboardView(
    context: Context,
    attrs: AttributeSet? = null
) : KeyboardView(context, attrs)  {

    // 键盘背景色
    private var mBackground: Drawable = ColorDrawable(0xFF000000.toInt())
    // 键盘文字大小
    private var mLabelTextSize: Int = 14
    // 普通按键的文字颜色
    private var mKeyTextColor: Int = 0xFF000000.toInt()
    private val mPaint: Paint by lazy {
        Paint().apply {
            textAlign = Paint.Align.CENTER
            isAntiAlias = true
        }
    }

    // 数字键盘
    private val mKeyboardNumber: Keyboard by lazy { Keyboard(context, R.xml.keyboard_number) }
    // 字母键盘
    private val mKeyboardQwerty: Keyboard by lazy { Keyboard(context, R.xml.keyboard_qwerty) }
    // 按键背景资源
    private var mKeyBackgroundResourceTriple = NUMBER_KEY_BACKGROUND

    // 默认键盘模式
    var keyboardMode = KEYBOARD_MODE_NUMBER
        private set

    /**
     * 切换键盘模式
     */
    fun toggleMode() {
        if (keyboardMode == RSKeyboardView.KEYBOARD_MODE_QWERTY) {
            keyboard = mKeyboardNumber
            keyboardMode = RSKeyboardView.KEYBOARD_MODE_NUMBER
            mKeyBackgroundResourceTriple = NUMBER_KEY_BACKGROUND
        } else {
            keyboard = mKeyboardQwerty
            keyboardMode = RSKeyboardView.KEYBOARD_MODE_QWERTY
            mKeyBackgroundResourceTriple = QWERTY_KEY_BACKGROUND
        }
    }

    init {
        // 从xml中读取设置
        val set = arrayOf(
            android.R.attr.background,
            android.R.attr.labelTextSize,
            android.R.attr.keyTextColor
        ).toIntArray()

        val a = context.obtainStyledAttributes(attrs, set)

        mBackground = a.getDrawable(0) ?: mBackground
        @SuppressLint("ResourceType")
        mLabelTextSize = a.getDimensionPixelSize(1, mLabelTextSize)
        @SuppressLint("ResourceType")
        mKeyTextColor = a.getColor(2, mKeyTextColor)

        a.recycle()

        // 设置键盘
        this.keyboard = mKeyboardNumber
        this.isEnabled = true
        this.isPreviewEnabled = false
    }

    override fun onDraw(canvas: Canvas?) {
        canvas ?: return
        val keys = keyboard?.keys ?: return

        for (key in keys) {
            when (key.codes[0]) {
                Keyboard.KEYCODE_DONE -> {
                    // DONE按键
                    drawKeyBackground(mKeyBackgroundResourceTriple.first, canvas, key)
                    drawText(canvas, key, Color.WHITE)
                    drawIcon(canvas, key)
                }
                Keyboard.KEYCODE_MODE_CHANGE,
                Keyboard.KEYCODE_DELETE,
                Keyboard.KEYCODE_CANCEL -> {
                    // 控制按键
                    drawKeyBackground(mKeyBackgroundResourceTriple.second, canvas, key)
                    drawText(canvas, key, mKeyTextColor)
                    drawIcon(canvas, key)
                }
                else -> {
                    // 普通按键
                    drawKeyBackground(mKeyBackgroundResourceTriple.third, canvas, key)
                    drawText(canvas, key, mKeyTextColor)
                    drawIcon(canvas, key)
                }
            }
        }
    }

    /**
     * 绘制按键背景
     */
    private fun drawKeyBackground(@DrawableRes drawableId: Int, canvas: Canvas, key: Keyboard.Key) {
        val drawable = ContextCompat.getDrawable(context, drawableId) ?: return

        val drawableState = key.currentDrawableState
        if (key.codes[0] != 0) {
            drawable.state = drawableState
        }

        key.run {
            drawable.setBounds(x + paddingStart, y + paddingTop, x + paddingStart + width, y + paddingTop + height)
        }
        drawable.draw(canvas)
    }

    /**
     * 绘制按键label
     */
    private fun drawText(canvas: Canvas, key: Keyboard.Key, color: Int) {
        key.label ?: return

        mPaint.color = color
        mPaint.textSize = mLabelTextSize.toFloat()

        canvas.drawText(
            key.label.toString(),
            (key.x + ((key.width - paddingLeft - paddingRight) / 2 + paddingLeft)).toFloat(),
            key.y + ((key.height - paddingTop - paddingBottom) / 2).toFloat() + (mPaint.textSize - mPaint.descent()) / 2 + paddingTop.toFloat(),
            mPaint
        )
    }

    /**
     * 绘制按键icon
     */
    private fun drawIcon(canvas: Canvas, key: Keyboard.Key) {
        key.icon ?: return

        key.icon.setBounds(
            key.x + (key.width - key.icon.intrinsicWidth) / 2 + paddingStart,
            key.y + (key.height - key.icon.intrinsicHeight) / 2 + paddingTop,
            key.x + (key.width - key.icon.intrinsicWidth) / 2 + key.icon.intrinsicWidth + paddingStart,
            key.y + (key.height - key.icon.intrinsicHeight) / 2 + key.icon.intrinsicHeight + paddingTop
        )
        key.icon.draw(canvas)
    }

    companion object {
        // 数字键盘模式
        const val KEYBOARD_MODE_NUMBER = 1
        // 字母键盘模式
        const val KEYBOARD_MODE_QWERTY = 2
        // 数字键盘模式模式下按键背景
        private val NUMBER_KEY_BACKGROUND = Triple(
            R.drawable.selector_kb_number_keyboard_done,
            R.drawable.selector_kb_number_keyboard_action,
            R.drawable.selector_kb_number_keyboard_normal
        )
        // 字母键盘模式模式下按键背景
        private val QWERTY_KEY_BACKGROUND = Triple(
            R.drawable.selector_kb_qwerty_keyboard_done,
            R.drawable.selector_kb_qwerty_keyboard_action,
            R.drawable.selector_kb_qwerty_keyboard_normal
        )
    }
}
可以看到,切换键盘逻辑非常简单,主需要把事先创建好的Keyboard传入KeyboardView.setKeyboard方法中即可。
此外,代码中提到的按键背景资源就是一个个selector,例子如下:
selector_kb_number_keyboard_normal.xml
<?xml version="1.0" encoding="UTF-8"?>
<selector
    xmlns:android="http://schemas.android.com/apk/res/android">
    <item android:state_pressed="true">
        <shape android:shape="rectangle">
            <solid android:color="#EEEEEE" />
            <stroke android:color="#dfdfdf"
                android:width="1px" />
        </shape>
    </item>
    <item>
        <shape android:shape="rectangle">
            <solid android:color="#FFFFFF" />
            <stroke android:color="#dfdfdf"
                android:width="1px" />
        </shape>
    </item>
</selector>
3. 键盘辅助类
现在KeyboardView以及xml都写好了,还需要一个类实现KeyboardView.OnKeyboardActionListener接口来处理按键点击事件;并监听EditText的点击、触摸、焦点改变事件来弹出、隐藏自定义的KeyboardView。
这部分代码也很简单:
/**
 * 软键盘辅助类
 * @param rootView 页面的根布局 会在里面findViewById(R.id.keyboard_view)
 */
class RSKeyboard(
    rootView: View
) {
    /**
     * 点击KEYCODE_CANCEL时的回调
     */
    interface OnKeyboardCancelListener {
        fun onCancel()
    }

    /**
     * 点击KEYCODE_DONE时的回调
     */
    interface OnKeyboardDoneListener {
        fun onDone()
    }

    private val mKeyboardView: RSKeyboardView = rootView.findViewById(R.id.keyboard_view)

    // 要使用自定义键盘进行输入的输入框
    private var mAttachedEditText: EditText? = null

    // 点击按键时的回调
    private val mOnKeyboardActionListener =
        object : KeyboardView.OnKeyboardActionListener {
            /**
             * code值到文字的映射
             * -1001 -> 000
             * -1002 -> 002
             * -1003 -> 300
             * -1004 -> 600
             * -1005 -> 601
             */
            private val code2StringMap = SparseArray<String>(5)
            private val KEY_000 = "000"
            private val KEY_002 = "002"
            private val KEY_300 = "300"
            private val KEY_600 = "600"
            private val KEY_601 = "601"
            private val KEY_000_CODE = -1001
            private val KEY_002_CODE = -1002
            private val KEY_300_CODE = -1003
            private val KEY_600_CODE = -1004
            private val KEY_601_CODE = -1005

            init {
                code2StringMap[KEY_000_CODE] = KEY_000
                code2StringMap[KEY_002_CODE] = KEY_002
                code2StringMap[KEY_300_CODE] = KEY_300
                code2StringMap[KEY_600_CODE] = KEY_600
                code2StringMap[KEY_601_CODE] = KEY_601
            }

            override fun swipeRight() {}
            override fun onPress(primaryCode: Int) {}
            override fun onRelease(primaryCode: Int) {}
            override fun swipeLeft() {}
            override fun swipeUp() {}
            override fun swipeDown() {}
            override fun onText(text: CharSequence?) {}

            override fun onKey(primaryCode: Int, keyCodes: IntArray?) {
                mAttachedEditText?.let {
                    val editable = it.text
                    val start = it.selectionStart

                    when (primaryCode) {
                        Keyboard.KEYCODE_DELETE -> {
                            // primaryCode=-1004 keyCodes=[-1 -1 -1 -1 -1 -1 -1 -1 -1 -1 -1 -1]
                            // primaryCode=-5 keyCodes=[-5]
                            // primaryCode=-1004 keyCodes=[-1 -1 -1 -1 -1 -1 -1 -1 -1 -1 -1 -1]
                            // primaryCode=-5 keyCodes=[-1 -1 -1 -1 -1 -1 -1 -1 -1 -1 -1 -1]
                            // 连续点击多个codes的键时 会触发delete 此时keyCodes为[-5]
                            if (keyCodes?.size == 1) {
                                return
                            }
                            if (editable != null && editable.isNotEmpty() && start > 0) {
                                editable.delete(start - 1, start)
                            } else {
                            }
                        }
                        Keyboard.KEYCODE_CANCEL -> {
                            hideKeyBoard()
                            onKeyBoardCancelListener?.onCancel()
                            mAttachedEditText?.performHapticFeedback(HapticFeedbackConstants.KEYBOARD_TAP)
                        }
                        Keyboard.KEYCODE_DONE -> {
                            hideKeyBoard()
                            onKeyboardOkListener?.onDone()
                            mAttachedEditText?.performHapticFeedback(HapticFeedbackConstants.KEYBOARD_TAP)
                        }
                        Keyboard.KEYCODE_MODE_CHANGE -> {
                            mKeyboardView.toggleMode()
                            mAttachedEditText?.performHapticFeedback(HapticFeedbackConstants.KEYBOARD_TAP)
                        }
                        else -> {
                            if (code2StringMap.containsKey(primaryCode)) {
                                editable.insert(start, code2StringMap[primaryCode])
                            } else {
                                editable.insert(start, primaryCode.toChar().toString())
                            }
                            mAttachedEditText?.performHapticFeedback(HapticFeedbackConstants.KEYBOARD_TAP)
                        }
                    }
                }
            }
        }

    /**
     * 点击KEYCODE_DONE时的回调
     */
    var onKeyboardOkListener: OnKeyboardDoneListener? = null
    /**
     * 点击KEYCODE_CANCEL时的回调
     */
    var onKeyBoardCancelListener: OnKeyboardCancelListener? = null

    @SuppressLint("ClickableViewAccessibility")
    fun attachTo(editText: EditText) {
        mAttachedEditText = editText

        // 设置按键回调
        mKeyboardView.setOnKeyboardActionListener(mOnKeyboardActionListener)

        // 处理弹出、关闭键盘的逻辑
        editText.setOnClickListener {
            showKeyBoard()
        }
        editText.setOnTouchListener { _, _ ->
            editText.requestFocus()
            editText.requestFocusFromTouch()
            hideSystemSoftKeyboard(context, editText)
            return@setOnTouchListener  false
        }
        editText.setOnFocusChangeListener { _, hasFocus ->
            if (!hasFocus) {
                hideKeyBoard()
            }
        }
    }

    /**
     * 显示键盘
     */
    fun showKeyBoard() {
        if (mKeyboardView.visibility != View.VISIBLE) {
            mKeyboardView.visibility = View.VISIBLE
        }
    }

    /**
     * 隐藏键盘
     */
    fun hideKeyBoard() {
        if ( mKeyboardView.visibility == View.VISIBLE) {
            mKeyboardView.visibility = View.GONE
        }
    }

    companion object {
        /**
         * 隐藏系统键盘
         */
        @SuppressLint("ObsoleteSdkInt")
        fun hideSystemSoftKeyboard(context: Context, editText: EditText) {
            when {
                Build.VERSION.SDK_INT >= Build.VERSION_CODES.LOLLIPOP -> {
                    editText.showSoftInputOnFocus = false
                }
                Build.VERSION.SDK_INT >= Build.VERSION_CODES.HONEYCOMB -> {
                    try {
                        val clazz = EditText::class.java
                        val setShowSoftInputOnFocus = clazz.getMethod("setShowSoftInputOnFocus", Boolean::class.javaPrimitiveType)
                        setShowSoftInputOnFocus.isAccessible = true
                        setShowSoftInputOnFocus.invoke(editText, false)
                    } catch (e: Exception) { }
                }
                else -> {
                    editText.inputType = InputType.TYPE_NULL
                }
            }

            val imm = context.getSystemService(Context.INPUT_METHOD_SERVICE) as? InputMethodManager ?: return
            imm.hideSoftInputFromWindow(editText.windowToken, 0)
        }
    }
}
上面这段代码只有一点需要注意一下,这点在第一节中也说到了,这就是处理doubleandroid:codes的问题。
多codes的按键,在连续快速点击时,中间会发出KEYCODE_DELETE事件。以<Key android:codes="-1004,-1004" android:keyLabel="600" />为例,如果我们快速连击两次,会发出如下事件:
primaryCode=-1004 keyCodes=[-1 -1 -1 -1 -1 -1 -1 -1 -1 -1 -1 -1]
primaryCode=-5 keyCodes=[-5]
primaryCode=-1004 keyCodes=[-1 -1 -1 -1 -1 -1 -1 -1 -1 -1 -1 -1]
而正常的KEYCODE_DELETE是这样的:
所以我们在处理KEYCODE_DELETE时,要过滤keyCodes长度为1的情况。
4. 使用准备
由于我们在自定义的KeyboardView中没有调用super.onDraw,所以KeyboardView的很多xml属性都没有必要设置。
可以设置的样式只有三个(见第二节的自定义KeyboardView源码):
android:background
键盘背景颜色android:labelTextSize
按键文字大小android:keyTextColor
按键文字颜色
所以,我们可以写一个layout等待inculde:
include_keyboard.xml
<?xml version="1.0" encoding="utf-8"?>
<com.redstock.android.core.keyboard.RSKeyboardView
    xmlns:android="http://schemas.android.com/apk/res/android"
    android:id="@+id/keyboard_view"
    android:layout_width="match_parent"
    android:layout_height="wrap_content"
    android:background="#DDDDDD"
    android:labelTextSize="18sp"
    android:keyTextColor="#030303"
    android:visibility="gone"/>
然后在需要软键盘的页面中include进来:
<?xml version="1.0" encoding="utf-8"?>
<layout>
    <data>
        ...
    </data>

    <androidx.constraintlayout.widget.ConstraintLayout
        xmlns:android="http://schemas.android.com/apk/res/android"
        xmlns:tools="http://schemas.android.com/tools"
        xmlns:app="http://schemas.android.com/apk/res-auto"
        android:layout_width="match_parent"
        android:layout_height="match_parent"
        tools:background="@color/colorWindow">
        ...
        <include
            layout="@layout/include_keyboard"
            android:layout_width="match_parent"
            android:layout_height="wrap_content"
            app:layout_constraintStart_toStartOf="parent"
            app:layout_constraintEnd_toEndOf="parent"
            app:layout_constraintBottom_toBottomOf="parent" />

    </androidx.constraintlayout.widget.ConstraintLayout>
</layout>
最后在页面代码中初始化一下即可:
class LoginActivity : BaseActivity() {
    ...
    @Inject
    lateinit var dataBinding: ViewDataBinding

    private val mRSKeyboard by lazy { RSKeyboard(dataBinding.root) }

    override fun onCreate(savedInstanceState: Bundle?) {
        super.onCreate(savedInstanceState)
        ...
        mRSKeyboard.attachTo(etPhone)
        mRSKeyboard.onKeyboardOkListener = object : RSKeyboard.OnKeyboardDoneListener {
            override fun onDone() {
                viewModel.toastString.value = "DONE"
            }
        }
        mRSKeyboard.onKeyBoardCancelListener = object : RSKeyboard.OnKeyboardCancelListener {
            override fun onCancel() {
                viewModel.toastString.value = "CANCEL"
            }
        }
    }
}
完工