View的绘制原理以及自定义View
本文主要讲述View的绘制原理以及自定义View。
1 ViewRootImpl和DecorView
在介绍View的三大流程之前,我们先介绍一下ViewRootImpl和DecorView的基本概念。
ViewRootImpl是连接WindowManager和DecorView的纽带,View的measure、layout、draw三大流程均是通过ViewRootImpl开始的。
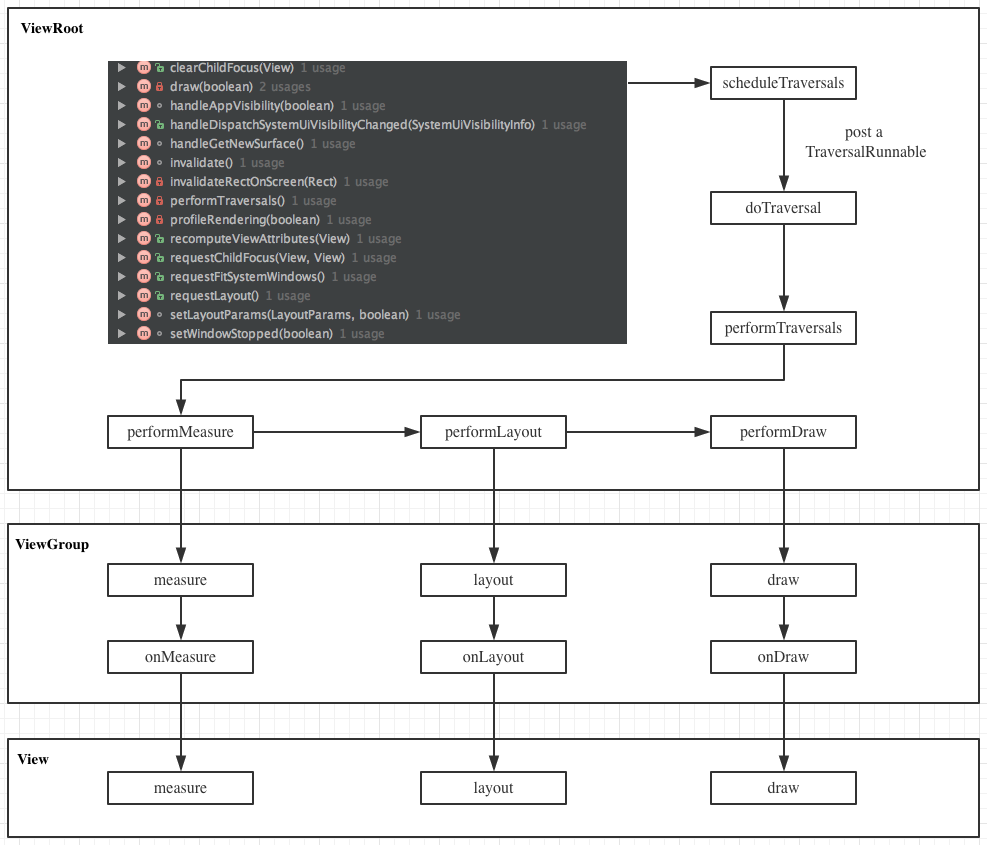
View的绘制流程是从ViewRoot的performTraversals开始的,经过measure、layout、draw才能将一个View绘制出来。
private void performTraversals() {
    ...
    if (...) {
        ...
        if (...) {
            ...
            if (...) {
                ...
                performMeasure(childWidthMeasureSpec, childHeightMeasureSpec);
                ...
                layoutRequested = true;
            }
        }
    }...

    final boolean didLayout = layoutRequested && (!mStopped || mReportNextDraw);
    ...
    if (didLayout) {
        performLayout(lp, mWidth, mHeight);
        ...
    }

    ...
    boolean cancelDraw = mAttachInfo.mTreeObserver.dispatchOnPreDraw() || !isViewVisible;

    if (!cancelDraw && !newSurface) {
        ...
        performDraw();
    }...
}
performTraversals方法会由doTraversal调用,doTraversal又被封装在TraversalRunnable里面,TraversalRunnable会在scheduleTraversals方法注册到Choreographer中,在下一个VSync信号到达的时候进行触发。 invalidate、requestLayout等等方法都会调用scheduleTraversals。如图:
measure过程决定了View的宽高,Measure完成后,可以通过getMeasuredWidth和getMeasuredHeight方法来获取View测量后的宽高。
需要注意的ViewGroup继承至View,所以ViewGroup的measure方法实际上就是View的measure方法。View会在measure方法中调用onMeasure方法,而ViewGroup会在onMeasure中完成对子View的measure操作。如果子元素也是ViewGroup,也会沿着控件树继续传递下去,直到最后的节点是View为止。
View会在onMeasure方法中设置自己的宽高;而ViewGroup并没有实现此方法,该方法需要ViewGroup的具体子类去实现。下面是View.onMeasure方法的代码:
protected void onMeasure(int widthMeasureSpec, int heightMeasureSpec) {
    setMeasuredDimension(getDefaultSize(getSuggestedMinimumWidth(), widthMeasureSpec),
            getDefaultSize(getSuggestedMinimumHeight(), heightMeasureSpec));
}
layout调用过程和measure调用过程一致。layout过程将会决定View怎么进行摆放。
draw调用过程与上面的两个过程有点不一样,顶层View的draw在ViewRootImpl#drawSoftware方法中调用,其传递是通过dispatchDraw来实现的,onDraw仅仅用来draw自身的内容。
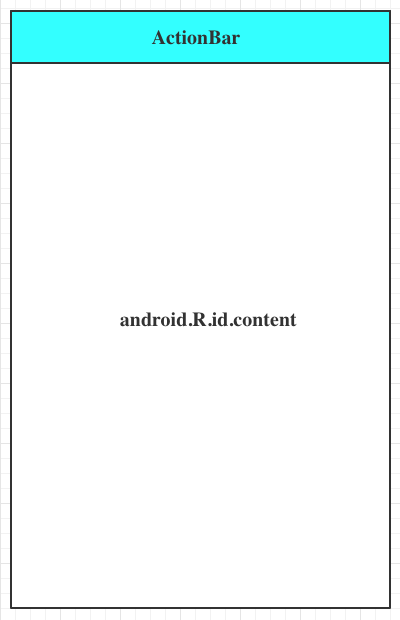
DecorView是一个继承至FrameLayout的顶级View,一般情况下它内部会包含一个竖直方向的LinearLayout。这个LinearLayout有两个部分,上面部分是标题栏,下面部分是id为content的内容栏,所谓的setContentView就是指这个View。
DecorView为何叫做Decor View,前面的Decor表明了这是一个装饰者模式的View。更多关于DecorView的知识,参考Window与WindowManager
2 MeasureSpec
MeasureSpec会在测量过程中将View的LayoutParams根据父容器的规则进行转换,通过这个MeasureSpec可以测量View的宽高。
2.1 MeasureSpec的详细描述
MeasureSpec类是View的内部类,我们可以在View的代码中找到这个类。
public static class MeasureSpec {
    private static final int MODE_SHIFT = 30;
    private static final int MODE_MASK  = 0x3 << MODE_SHIFT;
    ...

    /**
     * Measure specification mode: The parent has not imposed any constraint
     * on the child. It can be whatever size it wants.
     */
    public static final int UNSPECIFIED = 0 << MODE_SHIFT;

    /**
     * Measure specification mode: The parent has determined an exact size
     * for the child. The child is going to be given those bounds regardless
     * of how big it wants to be.
     */
    public static final int EXACTLY     = 1 << MODE_SHIFT;

    /**
     * Measure specification mode: The child can be as large as it wants up
     * to the specified size.
     */
    public static final int AT_MOST     = 2 << MODE_SHIFT;

    /**
     * Creates a measure specification based on the supplied size and mode.
     *
     * The mode must always be one of the following:
     * <ul>
     *  <li>{@link android.view.View.MeasureSpec#UNSPECIFIED}</li>
     *  <li>{@link android.view.View.MeasureSpec#EXACTLY}</li>
     *  <li>{@link android.view.View.MeasureSpec#AT_MOST}</li>
     * </ul>
     *
     * <p><strong>Note:</strong> On API level 17 and lower, makeMeasureSpec's
     * implementation was such that the order of arguments did not matter
     * and overflow in either value could impact the resulting MeasureSpec.
     * {@link android.widget.RelativeLayout} was affected by this bug.
     * Apps targeting API levels greater than 17 will get the fixed, more strict
     * behavior.</p>
     *
     * @param size the size of the measure specification
     * @param mode the mode of the measure specification
     * @return the measure specification based on size and mode
     */
    public static int makeMeasureSpec(@IntRange(from = 0, to = (1 << MeasureSpec.MODE_SHIFT) - 1) int size,
                                      @MeasureSpecMode int mode) {
        if (sUseBrokenMakeMeasureSpec) {
            return size + mode;
        } else {
            return (size & ~MODE_MASK) | (mode & MODE_MASK);
        }
    }

    ...

    /**
     * Extracts the mode from the supplied measure specification.
     *
     * @param measureSpec the measure specification to extract the mode from
     * @return {@link android.view.View.MeasureSpec#UNSPECIFIED},
     *         {@link android.view.View.MeasureSpec#AT_MOST} or
     *         {@link android.view.View.MeasureSpec#EXACTLY}
     */
    @MeasureSpecMode
    public static int getMode(int measureSpec) {
        //noinspection ResourceType
        return (measureSpec & MODE_MASK);
    }

    /**
     * Extracts the size from the supplied measure specification.
     *
     * @param measureSpec the measure specification to extract the size from
     * @return the size in pixels defined in the supplied measure specification
     */
    public static int getSize(int measureSpec) {
        return (measureSpec & ~MODE_MASK);
    }
    ...
}
MeasureSpec是一个32位int型值,高两位代表测量模式SpecMode,低30位代表测量规格SpecSize。MeasureSpec将SpecMode和SpecSize打包成一个int值来存储。上面就是其提供的打包、解包方法。
SpecMode有三类:
- UNSPECIFIED
00 000000 00000000 00000000 00000000
父容器对View没有任何限制,要多大给多大。这种情况一般用于系统内部。 - EXACTLY
01 000000 00000000 00000000 00000000
父容器已经决定了View的精确尺寸,View的最终大小就是此时SpecSize所指定的大小。它对应于match_parent以及具体的数值。 - AT_MOST
10 000000 00000000 00000000 00000000
View想要多大就有多大,但是不能超过SpecSize。它对应于wrap_content。
2.2 MeasureSpec和LayoutParams的对应关系
系统内部是通过MeasureSpec来进行View的测量,但是我们可以使用LayoutParams来更改这个结果。在View测量时,系统会将View的LayoutParams在父容器的约束下转换成对应的MeasureSpec,然后在根据这个MeasureSpec来确定View的最后宽高。注意:MeasureSpec不仅仅由LayoutParams决定,它还有父容器一起决定。
另外,对于DecorView和普通View来说,MeasureSpec的转换过程略有不同。对于DecorView,因为其本身已经是顶级View了,没有父容器,所以其MeasureSpec由窗口尺寸和自身LayoutParams共同确定。
下面看看DecorView的测量过程,具体代码在ViewRootImpl#measureHierarchy方法中,desiredWindowWidth、desiredWindowHeight是Window的尺寸:
childWidthMeasureSpec = getRootMeasureSpec(desiredWindowWidth, lp.width);
childHeightMeasureSpec = getRootMeasureSpec(desiredWindowHeight, lp.height);
performMeasure(childWidthMeasureSpec, childHeightMeasureSpec);
getRootMeasureSpec方法: private static int getRootMeasureSpec(int windowSize, int rootDimension) {
int measureSpec;
switch (rootDimension) {
case ViewGroup.LayoutParams.MATCH_PARENT:
// Window can't resize. Force root view to be windowSize.
measureSpec = MeasureSpec.makeMeasureSpec(windowSize, MeasureSpec.EXACTLY);
break;
case ViewGroup.LayoutParams.WRAP_CONTENT:
// Window can resize. Set max size for root view.
measureSpec = MeasureSpec.makeMeasureSpec(windowSize, MeasureSpec.AT_MOST);
break;
default:
// Window wants to be an exact size. Force root view to be that size.
measureSpec = MeasureSpec.makeMeasureSpec(rootDimension, MeasureSpec.EXACTLY);
break;
}
return measureSpec;
}
- MATCH_PARENT:精确模式,大小为窗口尺寸
- WRAP_CONTENT:最大模式,大小不能超过窗口
- 固定大小:精确模式,大小为LayoutParams中指定的大小。
对普通View来说,View的测量过程由ViewGroup传递而来,先看一下ViewGroup#measureChild方法:
protected void measureChild(View child, int parentWidthMeasureSpec,
        int parentHeightMeasureSpec) {
    final LayoutParams lp = child.getLayoutParams();

    final int childWidthMeasureSpec = getChildMeasureSpec(parentWidthMeasureSpec,
            mPaddingLeft + mPaddingRight, lp.width);
    final int childHeightMeasureSpec = getChildMeasureSpec(parentHeightMeasureSpec,
            mPaddingTop + mPaddingBottom, lp.height);

    child.measure(childWidthMeasureSpec, childHeightMeasureSpec);
}
上面代码会对子View进行measure,在调用之前会通过getChildMeasureSpec来得到子View的MeasureSpec,参数中spec是Parent的spec:
public static int getChildMeasureSpec(int spec, int padding, int childDimension) {
    int specMode = MeasureSpec.getMode(spec);
    int specSize = MeasureSpec.getSize(spec);

    int size = Math.max(0, specSize - padding);

    int resultSize = 0;
    int resultMode = 0;

    switch (specMode) {
    // Parent has imposed an exact size on us
    case MeasureSpec.EXACTLY:
        if (childDimension >= 0) {
            resultSize = childDimension;
            resultMode = MeasureSpec.EXACTLY;
        } else if (childDimension == LayoutParams.MATCH_PARENT) {
            // Child wants to be our size. So be it.
            resultSize = size;
            resultMode = MeasureSpec.EXACTLY;
        } else if (childDimension == LayoutParams.WRAP_CONTENT) {
            // Child wants to determine its own size. It can't be
            // bigger than us.
            resultSize = size;
            resultMode = MeasureSpec.AT_MOST;
        }
        break;

    // Parent has imposed a maximum size on us
    case MeasureSpec.AT_MOST:
        if (childDimension >= 0) {
            // Child wants a specific size... so be it
            resultSize = childDimension;
            resultMode = MeasureSpec.EXACTLY;
        } else if (childDimension == LayoutParams.MATCH_PARENT) {
            // Child wants to be our size, but our size is not fixed.
            // Constrain child to not be bigger than us.
            resultSize = size;
            resultMode = MeasureSpec.AT_MOST;
        } else if (childDimension == LayoutParams.WRAP_CONTENT) {
            // Child wants to determine its own size. It can't be
            // bigger than us.
            resultSize = size;
            resultMode = MeasureSpec.AT_MOST;
        }
        break;

    // Parent asked to see how big we want to be
    case MeasureSpec.UNSPECIFIED:
        if (childDimension >= 0) {
            // Child wants a specific size... let him have it
            resultSize = childDimension;
            resultMode = MeasureSpec.EXACTLY;
        } else if (childDimension == LayoutParams.MATCH_PARENT) {
            // Child wants to be our size... find out how big it should
            // be
            resultSize = View.sUseZeroUnspecifiedMeasureSpec ? 0 : size;
            resultMode = MeasureSpec.UNSPECIFIED;
        } else if (childDimension == LayoutParams.WRAP_CONTENT) {
            // Child wants to determine its own size.... find out how
            // big it should be
            resultSize = View.sUseZeroUnspecifiedMeasureSpec ? 0 : size;
            resultMode = MeasureSpec.UNSPECIFIED;
        }
        break;
    }
    //noinspection ResourceType
    return MeasureSpec.makeMeasureSpec(resultSize, resultMode);
}
| EXACTLY | AT_MOST | UNSPECIFIED | |
|---|---|---|---|
| dp/px | EXACTLY childSize | EXACTLY childSize | EXACTLY childSize |
| match_parent | EXACTLY parentSize | AT_MOST parentSize | UNSPECIFIED 0 |
| wrap_content | AT_MOST parentSize | AT_MOST parentSize | UNSPECIFIED 0 |
3 View的工作流程
View的工作流程指measure、layout、draw三大流程,即测量、布局和绘制。其中,measure确定View的测量宽高,layout确定View的最终宽高和四个顶点的位置,而draw则将View绘制到屏幕上。
3.1 measure过程
3.1.1 View的measure过程
View的measure过程由其measure方法来完成,这是一个final类型的方法,这意味着子类不能重写其方法。在View的measure方法中回去调用View的onMeasure方法,因此只需要看onMeasure的实现即可。
protected void onMeasure(int widthMeasureSpec, int heightMeasureSpec) {
    setMeasuredDimension(getDefaultSize(getSuggestedMinimumWidth(), widthMeasureSpec),
            getDefaultSize(getSuggestedMinimumHeight(), heightMeasureSpec));
}
setMeasuredDimension方法会设置View的测量宽高。我们接着看getDefaultSize和getSuggestedMinimumWidth()。 public static int getDefaultSize(int size, int measureSpec) {
int result = size;
int specMode = MeasureSpec.getMode(measureSpec);
int specSize = MeasureSpec.getSize(measureSpec);
switch (specMode) {
case MeasureSpec.UNSPECIFIED:
result = size;
break;
case MeasureSpec.AT_MOST:
case MeasureSpec.EXACTLY:
result = specSize;
break;
}
return result;
}
protected int getSuggestedMinimumWidth() {
return (mBackground == null) ? mMinWidth : max(mMinWidth, mBackground.getMinimumWidth());
}
getDefaultSize我们只看AT_MOST和EXACTLY的情况,因此可以简单的理解为此方法就是返回的size就是specSize。 至于UNSPECIFIED,一般用于系统内部的测量过程,此时,View的大小为getSuggestedMinimumWidth和getSuggestedMinimumHeight。从源码中可以看出,如果View没有背景,那么View的宽度为mMinWidth(即android:minWidth指定的值);如果View有背景,则宽度为max(mMinWidth, mBackground.getMinimumWidth())。mBackground是一个Drawable对象,其getMinimumWidth方法如下:
public int getMinimumWidth() {
    final int intrinsicWidth = getIntrinsicWidth();
    return intrinsicWidth > 0 ? intrinsicWidth : 0;
}
因此getMinimumWidth返回的就是Drawable的原始宽度,若没有原始宽度则返回0。不是所有的Drawable对象都有原始宽度,ShapeDrawable没有原始宽高,而BitmapDrawable就有。
3.1.2 自定义View为何需要重写onMeasure方法
从getDefaultSize的实现来看,View的宽高从specSize决定,所以**直接继承View的自定义控件需要重写onMeasure方法并设置wrap_content时的自身大小,否则在布局中使用wrap_content相当于使用match_parent**。
这是因为如果View使用wrap_content,那么其specMode对应AT_MOST,且由上面代码可以看出宽高为specSize;在由上面的表得知,此时View的specSize就是parentSize,而parentSize就是父容器可用剩余空间。这种效果和在布局中使用match_parent效果一样。解决办法就是给View指定一个默认的内部宽高,在wrap_content时设置即可。
@Override
protected void onMeasure(int widthMeasureSpec, int heightMeasureSpec) {
    super.onMeasure(widthMeasureSpec, heightMeasureSpec);
    int widthSpecMode = MeasureSpec.getMode(widthMeasureSpec);
    int heightSpecMode = MeasureSpec.getMode(heightMeasureSpec);

    if (widthSpecMode == MeasureSpec.AT_MOST && heightSpecMode == MeasureSpec.AT_MOST) {
        setMeasuredDimension(200, 200);
    } else if (widthSpecMode == MeasureSpec.AT_MOST ) {
        setMeasuredDimension(200, heightMeasureSpec);
    } else if (heightSpecMode == MeasureSpec.AT_MOST) {
        setMeasuredDimension(widthMeasureSpec, 200);
    }
}
3.1.3 ViewGroup的measure过程
对于ViewGroup来说,除了完成自己的measure外,还会遍历调用所有子元素的measure方法,各个子元素再递归执行这个过程。ViewGroup是一个抽象类,因此它并没有重写View的onMeasure方法,这个方法需要具体的ViewGroup类(比如LinearLayout、RelativeLayout等)来实现。下面我们通过LinearLayout来分析。 首先我们看一下LinearLayout#onMeasure方法:
@Override
protected void onMeasure(int widthMeasureSpec, int heightMeasureSpec) {
    if (mOrientation == VERTICAL) {
        measureVertical(widthMeasureSpec, heightMeasureSpec);
    } else {
        measureHorizontal(widthMeasureSpec, heightMeasureSpec);
    }
}
measureVertical方法: void measureVertical(int widthMeasureSpec, int heightMeasureSpec) {
...
// See how tall everyone is. Also remember max width.
for (int i = 0; i < count; ++i) {
final View child = getVirtualChildAt(i);
final boolean useExcessSpace = lp.height == 0 && lp.weight > 0;
if (heightMode == MeasureSpec.EXACTLY && useExcessSpace) {
// Optimization: don't bother measuring children who are only
// laid out using excess space. These views will get measured
// later if we have space to distribute.
final int totalLength = mTotalLength;
mTotalLength = Math.max(totalLength, totalLength + lp.topMargin + lp.bottomMargin);
skippedMeasure = true;
} else {
...
// Determine how big this child would like to be. If this or
// previous children have given a weight, then we allow it to
// use all available space (and we will shrink things later
// if needed).
final int usedHeight = totalWeight == 0 ? mTotalLength : 0;
measureChildBeforeLayout(child, i, widthMeasureSpec, 0,
heightMeasureSpec, usedHeight);
final int childHeight = child.getMeasuredHeight();
...
final int totalLength = mTotalLength;
mTotalLength = Math.max(totalLength, totalLength + childHeight + lp.topMargin +
lp.bottomMargin + getNextLocationOffset(child));
...
}
...
// Add in our padding
mTotalLength += mPaddingTop + mPaddingBottom;
int heightSize = mTotalLength;
// Check against our minimum height
heightSize = Math.max(heightSize, getSuggestedMinimumHeight());
// Reconcile our calculated size with the heightMeasureSpec
int heightSizeAndState = resolveSizeAndState(heightSize, heightMeasureSpec, 0);
heightSize = heightSizeAndState & MEASURED_SIZE_MASK;
...
if (!allFillParent && widthMode != MeasureSpec.EXACTLY) {
maxWidth = alternativeMaxWidth;
}
maxWidth += mPaddingLeft + mPaddingRight;
// Check against our minimum width
maxWidth = Math.max(maxWidth, getSuggestedMinimumWidth());
setMeasuredDimension(resolveSizeAndState(maxWidth, widthMeasureSpec, childState),
heightSizeAndState);
...
}
measureVertical方法会在会判断LinearLayout的heightSpecMode。如果是精确模式且子元素高为0、有权重,则直接设置高度,然后跳过测量;如果是AT_MOST,则需要测量。系统会通过measureChildBeforeLayout--->measureChildWithMargins--->child.measure,这样各个子元素就依次进入measure过程,然后系统会通过mTotalLength变量存储自身测量出来的高度。每测量一个元素,mTotalLength就会增加,增加部分包括子元素的高度以及子元素的在竖直方向上的margin。 子元素测量完成后,LinearLayout会测量自己的大小,其具体过程是通过View#resolveSizeAndState方法来完成的: public static int resolveSizeAndState(int size, int measureSpec, int childMeasuredState) {
final int specMode = MeasureSpec.getMode(measureSpec);
final int specSize = MeasureSpec.getSize(measureSpec);
final int result;
switch (specMode) {
case MeasureSpec.AT_MOST:
if (specSize < size) {
result = specSize | MEASURED_STATE_TOO_SMALL;
} else {
result = size;
}
break;
case MeasureSpec.EXACTLY:
result = specSize;
break;
case MeasureSpec.UNSPECIFIED:
default:
result = size;
}
return result | (childMeasuredState & MEASURED_STATE_MASK);
}
View的measure过程是三大流程中最复杂的一个,measure完成后,可以通过getMeasuredWidth/Height方法来获取View的测量宽高。需要注意,在某些极端情况下,系统会进行多次测量,此时在onMeasure中拿到的测量宽高可能是不准确的,比较好的方式是在onLayout中去获取测量宽高。
3.1.4 Activity中获取View宽高的几种方式
1. Activity/View#onWindowFocusChanged
注意,此方法伴随着Activity的生命周期会被多次回调,具体来说,当Activity得到焦点和失去焦点时会被回调。
@Override
public void onWindowFocusChanged(boolean hasWindowFocus) {
    super.onWindowFocusChanged(hasWindowFocus);
    if (hasWindowFocus) {
        int width = view.getMeasuredWidth();
        int height = view.getMeasuredHeight();
    }
}
2. View#post(Runnable)
使用post可以将一个runnable投递到消息队列的尾部,然后等待Looper调用此runnable,View也初始化好了。
view.post(new Runnable() {
    @Override
    public void run() {
        int width = view.getMeasuredWidth();
        int height = view.getMeasuredHeight();
    }
});
3. ViewTreeObserver#onGlobalLayoutListener
ViewTreeObserver#onGlobalLayoutListener接口会在View树的状态发生改变或者View树内部View可见性发生改变时回调。需要注意的是,伴随着View树的状态改变,此接口会被多次回调,因此可以在适当的时候取消监听。
ViewTreeObserver observer = view.getViewTreeObserver();
observer.addOnGlobalLayoutListener(new ViewTreeObserver.OnGlobalLayoutListener() {
    @Override
    public void onGlobalLayout() {
        view.getViewTreeObserver().removeOnGlobalLayoutListener(this);
        int width = view.getMeasuredWidth();
        int height = view.getMeasuredHeight();
    }
});
4. View#measure
可以手动对View进行measure操作来获取View的宽高。但是此方法比较复杂,且有局限性。但在某些情景下(比如,自定义ViewGroup,需要事先获取子View的宽高)非常适用了。
3.2 layout过程
Layout过程比Measure过程简单多了,ViewGroup的位置被确定后,会在onLayout中遍历所有的子元素并调用其layout方法,在layout方法又会调用onLayout方法。layout方法确定View本身的位置,onLayout方法会确定所有子元素的位置。
3.2.1 View的layout过程
View的layout过程非常简单。
public void layout(int l, int t, int r, int b) {
    if ((mPrivateFlags3 & PFLAG3_MEASURE_NEEDED_BEFORE_LAYOUT) != 0) {
        onMeasure(mOldWidthMeasureSpec, mOldHeightMeasureSpec);
        mPrivateFlags3 &= ~PFLAG3_MEASURE_NEEDED_BEFORE_LAYOUT;
    }

    int oldL = mLeft;
    int oldT = mTop;
    int oldB = mBottom;
    int oldR = mRight;

    boolean changed = isLayoutModeOptical(mParent) ?
            setOpticalFrame(l, t, r, b) : setFrame(l, t, r, b);

    if (changed || (mPrivateFlags & PFLAG_LAYOUT_REQUIRED) == PFLAG_LAYOUT_REQUIRED) {
        onLayout(changed, l, t, r, b);

        if (shouldDrawRoundScrollbar()) {
            if(mRoundScrollbarRenderer == null) {
                mRoundScrollbarRenderer = new RoundScrollbarRenderer(this);
            }
        } else {
            mRoundScrollbarRenderer = null;
        }

        mPrivateFlags &= ~PFLAG_LAYOUT_REQUIRED;

        ListenerInfo li = mListenerInfo;
        if (li != null && li.mOnLayoutChangeListeners != null) {
            ArrayList<OnLayoutChangeListener> listenersCopy =
                    (ArrayList<OnLayoutChangeListener>)li.mOnLayoutChangeListeners.clone();
            int numListeners = listenersCopy.size();
            for (int i = 0; i < numListeners; ++i) {
                listenersCopy.get(i).onLayoutChange(this, l, t, r, b, oldL, oldT, oldR, oldB);
            }
        }
    }

    mPrivateFlags &= ~PFLAG_FORCE_LAYOUT;
    mPrivateFlags3 |= PFLAG3_IS_LAID_OUT;
}
setFrame方法来设定View的四个位置参数,这些参数一旦确定,View在父容器中的位置也就确定了。然后会调用onLayout方法,此方法会让父容器用来确定子元素位置,在View和ViewGroup中都是一个空实现,在各个ViewGroup的子类中会实现。最后,如果View设置有OnLayoutChangeListener监听器,会回调这些监听器的方法。 下面是setFrame的部分代码,这里我们看到有对四个位置参数的赋值操作: 3.2.2 ViewGroup的layout过程
ViewGroup本身的layout过程调用的是super.layout方法,不同的是ViewGroup还要对子元素进行layout操作。但是由于ViewGroup是一个抽象类,所以onLayout在ViewGroup中是一个空实现。我们这里看LinearLayout的方法:
@Override
protected void onLayout(boolean changed, int l, int t, int r, int b) {
    if (mOrientation == VERTICAL) {
        layoutVertical(l, t, r, b);
    } else {
        layoutHorizontal(l, t, r, b);
    }
}

void layoutVertical(int left, int top, int right, int bottom) {
    final int paddingLeft = mPaddingLeft;

    int childTop;
    int childLeft;

    // Where right end of child should go
    final int width = right - left;
    int childRight = width - mPaddingRight;

    // Space available for child
    int childSpace = width - paddingLeft - mPaddingRight;

    final int count = getVirtualChildCount();

    final int majorGravity = mGravity & Gravity.VERTICAL_GRAVITY_MASK;
    final int minorGravity = mGravity & Gravity.RELATIVE_HORIZONTAL_GRAVITY_MASK;

    switch (majorGravity) {
       case Gravity.BOTTOM:
           // mTotalLength contains the padding already
           childTop = mPaddingTop + bottom - top - mTotalLength;
           break;

           // mTotalLength contains the padding already
       case Gravity.CENTER_VERTICAL:
           childTop = mPaddingTop + (bottom - top - mTotalLength) / 2;
           break;

       case Gravity.TOP:
       default:
           childTop = mPaddingTop;
           break;
    }

    for (int i = 0; i < count; i++) {
        final View child = getVirtualChildAt(i);
        if (child == null) {
            childTop += measureNullChild(i);
        } else if (child.getVisibility() != GONE) {
            final int childWidth = child.getMeasuredWidth();
            final int childHeight = child.getMeasuredHeight();

            final LinearLayout.LayoutParams lp =
                    (LinearLayout.LayoutParams) child.getLayoutParams();

            int gravity = lp.gravity;
            if (gravity < 0) {
                gravity = minorGravity;
            }
            final int layoutDirection = getLayoutDirection();
            final int absoluteGravity = Gravity.getAbsoluteGravity(gravity, layoutDirection);
            switch (absoluteGravity & Gravity.HORIZONTAL_GRAVITY_MASK) {
                case Gravity.CENTER_HORIZONTAL:
                    childLeft = paddingLeft + ((childSpace - childWidth) / 2)
                            + lp.leftMargin - lp.rightMargin;
                    break;

                case Gravity.RIGHT:
                    childLeft = childRight - childWidth - lp.rightMargin;
                    break;

                case Gravity.LEFT:
                default:
                    childLeft = paddingLeft + lp.leftMargin;
                    break;
            }

            if (hasDividerBeforeChildAt(i)) {
                childTop += mDividerHeight;
            }

            childTop += lp.topMargin;
            setChildFrame(child, childLeft, childTop + getLocationOffset(child),
                    childWidth, childHeight);
            childTop += childHeight + lp.bottomMargin + getNextLocationOffset(child);

            i += getChildrenSkipCount(child, i);
        }
    }
}
layoutVertical方法,这个方法逻辑还是很清楚的。它会对所有子元素调用setChildFrame方法,其中childTop会不断累加,这就意味着后面的元素被放置在靠下的位置。并且setFrame中传入的width、height两个参数就是这个子元素的测量宽高。 final int childWidth = child.getMeasuredWidth();
final int childHeight = child.getMeasuredHeight();
setChildFrame(child, childLeft, childTop + getLocationOffset(child), childWidth, childHeight);
setChildFrame方法,它仅仅是调用子元素的layout方法。这样layout操作就会传递到子元素中,子元素会继续这么执行,一直到完成整个View树的layout过程。 private void setChildFrame(View child, int left, int top, int width, int height) {
child.layout(left, top, left + width, top + height);
}
3.3 draw过程
draw过程更简单,我们看下View#draw:
public void draw(Canvas canvas) {
    final int privateFlags = mPrivateFlags;
    final boolean dirtyOpaque = (privateFlags & PFLAG_DIRTY_MASK) == PFLAG_DIRTY_OPAQUE &&
            (mAttachInfo == null || !mAttachInfo.mIgnoreDirtyState);
    mPrivateFlags = (privateFlags & ~PFLAG_DIRTY_MASK) | PFLAG_DRAWN;

    /*
     * Draw traversal performs several drawing steps which must be executed
     * in the appropriate order:
     *
     *      1. Draw the background
     *      2. If necessary, save the canvas' layers to prepare for fading
     *      3. Draw view's content
     *      4. Draw children
     *      5. If necessary, draw the fading edges and restore layers
     *      6. Draw decorations (scrollbars for instance)
     */

    // Step 1, draw the background, if needed
    int saveCount;

    if (!dirtyOpaque) {
        drawBackground(canvas);
    }

    // skip step 2 & 5 if possible (common case)
    final int viewFlags = mViewFlags;
    boolean horizontalEdges = (viewFlags & FADING_EDGE_HORIZONTAL) != 0;
    boolean verticalEdges = (viewFlags & FADING_EDGE_VERTICAL) != 0;
    if (!verticalEdges && !horizontalEdges) {
        // Step 3, draw the content
        if (!dirtyOpaque) onDraw(canvas);

        // Step 4, draw the children
        dispatchDraw(canvas);

        // Overlay is part of the content and draws beneath Foreground
        if (mOverlay != null && !mOverlay.isEmpty()) {
            mOverlay.getOverlayView().dispatchDraw(canvas);
        }

        // Step 6, draw decorations (foreground, scrollbars)
        onDrawForeground(canvas);

        // we're done...
        return;
    }

    /*
     * Here we do the full fledged routine...
     * (this is an uncommon case where speed matters less,
     * this is why we repeat some of the tests that have been
     * done above)
     */

    boolean drawTop = false;
    boolean drawBottom = false;
    boolean drawLeft = false;
    boolean drawRight = false;

    float topFadeStrength = 0.0f;
    float bottomFadeStrength = 0.0f;
    float leftFadeStrength = 0.0f;
    float rightFadeStrength = 0.0f;

    // Step 2, save the canvas' layers
    int paddingLeft = mPaddingLeft;

    final boolean offsetRequired = isPaddingOffsetRequired();
    if (offsetRequired) {
        paddingLeft += getLeftPaddingOffset();
    }

    int left = mScrollX + paddingLeft;
    int right = left + mRight - mLeft - mPaddingRight - paddingLeft;
    int top = mScrollY + getFadeTop(offsetRequired);
    int bottom = top + getFadeHeight(offsetRequired);

    if (offsetRequired) {
        right += getRightPaddingOffset();
        bottom += getBottomPaddingOffset();
    }

    final ScrollabilityCache scrollabilityCache = mScrollCache;
    final float fadeHeight = scrollabilityCache.fadingEdgeLength;
    int length = (int) fadeHeight;

    // clip the fade length if top and bottom fades overlap
    // overlapping fades produce odd-looking artifacts
    if (verticalEdges && (top + length > bottom - length)) {
        length = (bottom - top) / 2;
    }

    // also clip horizontal fades if necessary
    if (horizontalEdges && (left + length > right - length)) {
        length = (right - left) / 2;
    }

    if (verticalEdges) {
        topFadeStrength = Math.max(0.0f, Math.min(1.0f, getTopFadingEdgeStrength()));
        drawTop = topFadeStrength * fadeHeight > 1.0f;
        bottomFadeStrength = Math.max(0.0f, Math.min(1.0f, getBottomFadingEdgeStrength()));
        drawBottom = bottomFadeStrength * fadeHeight > 1.0f;
    }

    if (horizontalEdges) {
        leftFadeStrength = Math.max(0.0f, Math.min(1.0f, getLeftFadingEdgeStrength()));
        drawLeft = leftFadeStrength * fadeHeight > 1.0f;
        rightFadeStrength = Math.max(0.0f, Math.min(1.0f, getRightFadingEdgeStrength()));
        drawRight = rightFadeStrength * fadeHeight > 1.0f;
    }

    saveCount = canvas.getSaveCount();

    int solidColor = getSolidColor();
    if (solidColor == 0) {
        final int flags = Canvas.HAS_ALPHA_LAYER_SAVE_FLAG;

        if (drawTop) {
            canvas.saveLayer(left, top, right, top + length, null, flags);
        }

        if (drawBottom) {
            canvas.saveLayer(left, bottom - length, right, bottom, null, flags);
        }

        if (drawLeft) {
            canvas.saveLayer(left, top, left + length, bottom, null, flags);
        }

        if (drawRight) {
            canvas.saveLayer(right - length, top, right, bottom, null, flags);
        }
    } else {
        scrollabilityCache.setFadeColor(solidColor);
    }

    // Step 3, draw the content
    if (!dirtyOpaque) onDraw(canvas);

    // Step 4, draw the children
    dispatchDraw(canvas);

    // Step 5, draw the fade effect and restore layers
    final Paint p = scrollabilityCache.paint;
    final Matrix matrix = scrollabilityCache.matrix;
    final Shader fade = scrollabilityCache.shader;

    if (drawTop) {
        matrix.setScale(1, fadeHeight * topFadeStrength);
        matrix.postTranslate(left, top);
        fade.setLocalMatrix(matrix);
        p.setShader(fade);
        canvas.drawRect(left, top, right, top + length, p);
    }

    if (drawBottom) {
        matrix.setScale(1, fadeHeight * bottomFadeStrength);
        matrix.postRotate(180);
        matrix.postTranslate(left, bottom);
        fade.setLocalMatrix(matrix);
        p.setShader(fade);
        canvas.drawRect(left, bottom - length, right, bottom, p);
    }

    if (drawLeft) {
        matrix.setScale(1, fadeHeight * leftFadeStrength);
        matrix.postRotate(-90);
        matrix.postTranslate(left, top);
        fade.setLocalMatrix(matrix);
        p.setShader(fade);
        canvas.drawRect(left, top, left + length, bottom, p);
    }

    if (drawRight) {
        matrix.setScale(1, fadeHeight * rightFadeStrength);
        matrix.postRotate(90);
        matrix.postTranslate(right, top);
        fade.setLocalMatrix(matrix);
        p.setShader(fade);
        canvas.drawRect(right - length, top, right, bottom, p);
    }

    canvas.restoreToCount(saveCount);

    // Overlay is part of the content and draws beneath Foreground
    if (mOverlay != null && !mOverlay.isEmpty()) {
        mOverlay.getOverlayView().dispatchDraw(canvas);
    }

    // Step 6, draw decorations (foreground, scrollbars)
    onDrawForeground(canvas);
}
上面的代码比较长,但是注释非常清楚,View的绘制过程遵循以下6步:
- 绘制背景
drawBackground(canvas)->background.draw(canvas); - 如果必要,为 fading edge 效果保存图层
- 绘制自己
onDraw(canvas) - 绘制children
dispatchDraw(canvas) - 如果必要,绘制 fading edge 效果并恢复图层
- 绘制装饰(比如foreground、scrollbars)
onDrawForeground(canvas)
其中,如果View本身是透明的,则不需要绘制背景以及自身,所以跳过了1、3两步;其次,如果View本身不需要绘制 fading edge,则跳过2、5两步。
fading edge 效果表现为 View 边缘有一个渐变的效果,效果图如下面的 TextView 所示:
例子中的TextView关键属性如下:

onDraw方法在View是一个空实现,供具体的View来实现draw效果;ViewGroup也更加不会实现该方法,但具体ViewGroup子类会根据自身需要进行重写该方法(比如LinearLayout)。
dispatchDraw方法在View内部也是一个空实现,因为其没有children,ViewGroup会重写该方法,ViewGroup子类不会重写该方法。
注意:View有一个特殊的方法setWillNotDraw。如果View不需要绘制任何内容,那么可以设置这个标记为true,系统会进行相应的优化。默认情况下,View没有开启这个标记位,而ViewGroup会默认开启。 所以,当我们的自定义控件继承至ViewGroup并且本身需要通过onDraw来绘制内容时,需要关闭WILL_NOT_DRAW标记位。
/**
 * If this view doesn't do any drawing on its own, set this flag to
 * allow further optimizations. By default, this flag is not set on
 * View, but could be set on some View subclasses such as ViewGroup.
 *
 * Typically, if you override {@link #onDraw(android.graphics.Canvas)}
 * you should clear this flag.
 *
 * @param willNotDraw whether or not this View draw on its own
 */
public void setWillNotDraw(boolean willNotDraw) {
    setFlags(willNotDraw ? WILL_NOT_DRAW : 0, DRAW_MASK);
}
4 如何让View刷新
View重绘和更新可以使用invalidate()和requestLayout()方法,其主要区别如下:
invalidate()方法只会执行onDraw方法requestLayout()只会执行onMeasure方法和onLayout方法,并不会执行onDraw方法
所以当我们进行View更新时,若仅View的显示内容发生改变且新显示内容不影响View的大小、位置,则只需调用invalidate()方法;若View宽高、位置发生改变且显示内容不变,只需调用requestLayout()方法;若两者均发生改变,则需调用两者,按照View的绘制流程,推荐先调用requestLayout()方法再调用invalidate()方法。
与invalidate()方法类似的还有一个postInvalidate(),两者作用都是刷新View,区别在于:
invalidate方法用于UI线程中重新刷新ViewpostInvalidate方法用于非UI线程中重新刷新View,这里借助了ViewRootHandler来达成目的
ViewRootHandler看着比较陌生,其实我们经常接触到。比如我们调用View.post(Runnable)方法,处理Runnable的就是这个ViewRootHandler了。详细可以参考Android消息机制——主线程的消息循环中的第二个问题。
5 自定义View
5.1 自定义View的分类
自定义View大致可以分为四类:
- 继承View重写onDraw方法
此方法主要用于实现一些不方便通过组合控件的方式来实现的不规则的效果。很显然,这只能通过onDraw绘制实现。采用这种方式需要支持wrap_content,且padding也需要处理。 - 继承ViewGroup重写onMeasure、onLayout
这种方式主要实现组合控件的自定义布局。需要合适的处理ViewGroup的测量、布局这两个过程,并同时处理子元素的测量和布局。 - 继承特定的View
此方法一般用于拓展某种已有的View功能,不需要自己支持wrap_content以及padding。 - 继承特定的ViewGroup
一般用来实现组合控件。采用这种方式不需要自己处理测量和布局两个过程。
5.2 自定义View注意事项
- 让View支持wrap_content
直接继承View或ViewGroup的控件,如果不在onMeasure对wrap_content特殊处理,那么wrap_content无法正常使用。 - 如有必要,让View支持padding
直接继承View的控件,如果不在draw方法中处理paidding,那么padding属性无法起作用。直接继承ViewGroup的控件需要在onMeasure和onLayout中考虑自身的padding和子元素的margin,不然导致失效。 - 如要需要在View中使用Handler,用
post(Runnable)方法代替 - View中如果有线程或者动画,需要在适当的时候停止
如果有线程或者动画需要停止时,可以在onDetachedFromWindow中停止。当包含View的Activity退出或者当前View被remove时,View的此方法会回调。与此方法对应的是onAttachedFromWindow。当包含此View的Activity启动时会回调。同时,当View变得不可见时,我们也需要停止,否则有可能会造成内存泄露。