RemoteViews
RemoteViews在Android中的使用场景有两种:通知栏和桌面小插件。为了更好的分析RemoteViews的内部机制,本章先介绍RemoteViews在通知栏和桌面小部件上的应用。
1 RemoteViews的应用
RemoteViews在实际开发中,主要是用在通知栏和桌面小部件的开发过程中。
通知栏主要是通过NotificationManager的notify方法来实现的,它除了默认效果之外,还可以另外定义布局。
桌面小部件是通过AppWidgetProvider来实现的,AppWidgetProvider本质上是一个广播。
通知栏和桌面小部件的开发过程都会用到RemoteViews,因为它们在更新界面时无法想在Activity里面那样去直接更新View,这是因为二者的界面都运行在其他进程中,准确的说是系统的SystemServer进程。为了跨进程更新界面,RemoteViews提供了一系列set方法,并且这些方法只是View全部方法的子集,而且RemoteViews支持的View类型也是有限的。
下面简单说说RemoteViews在通知栏和桌面小部件中的使用方法。
1.1 RemoteViews在通知栏上的应用
我们知道,通知栏除了默认的效果外还支持自定义布局,下面分别说明这些情况。
1.系统默认的通知样式
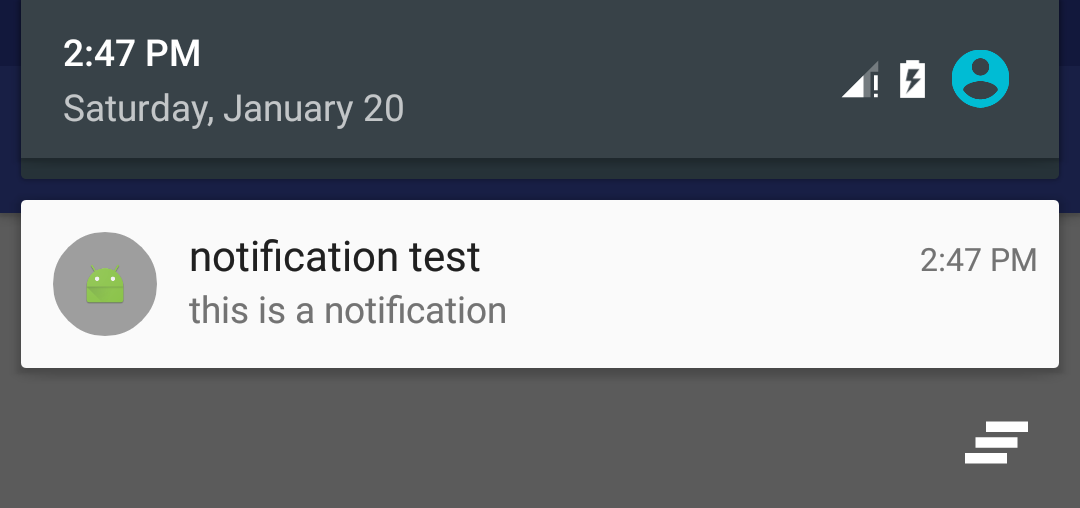
使用下面的代码可以弹出一个系统样式的通知栏:
Intent intent = new Intent(this, NotificationActivity.class);
PendingIntent pendingIntent = PendingIntent.getActivity(this, 0, intent, PendingIntent.FLAG_UPDATE_CURRENT);
NotificationCompat.Builder builder = new NotificationCompat.Builder(this);
builder.setSmallIcon(R.mipmap.ic_launcher)
        .setTicker("hello world")
        .setWhen(System.currentTimeMillis())
        .setContentTitle("notification test")
        .setContentText("this is a notification")
        .setContentIntent(pendingIntent);
Notification notification = builder.build();
notification.flags = Notification.FLAG_AUTO_CANCEL;

NotificationManager notificationManager = (NotificationManager) getSystemService(Context.NOTIFICATION_SERVICE);
notificationManager.notify(1, notification);
2.自定义通知样式
自定义通知样式需要我们提供一个布局文件,然后通过RemoteViews来加载这个布局即可以改变通知的样式,代码如下所示:
Intent intent = new Intent(this, NotificationActivity.class);
PendingIntent pendingIntent = PendingIntent.getActivity(this, 0, intent, PendingIntent.FLAG_UPDATE_CURRENT);
NotificationCompat.Builder builder = new NotificationCompat.Builder(this);

RemoteViews remoteViews = new RemoteViews(getPackageName(), R.layout.item_search_result);
remoteViews.setImageViewResource(R.id.iv_file, R.mipmap.ic_launcher);
remoteViews.setTextViewText(R.id.tv_title, "notification title");
remoteViews.setTextViewText(R.id.tv_desc, "This is a notification");
PendingIntent pendingIntent1 = PendingIntent.getActivity(this, 0, new Intent(this, MainActivity.class), PendingIntent.FLAG_UPDATE_CURRENT);
remoteViews.setOnClickPendingIntent(R.id.iv_file, pendingIntent1);

builder.setSmallIcon(R.mipmap.ic_launcher)
        .setTicker("hello world")
        .setWhen(System.currentTimeMillis())
        .setCustomContentView(remoteViews)
        .setContentIntent(pendingIntent);
Notification notification = builder.build();
notification.flags = Notification.FLAG_AUTO_CANCEL;

NotificationManager notificationManager = (NotificationManager) getSystemService(Context.NOTIFICATION_SERVICE);
notificationManager.notify(2, notification);

我们只需要提供当前应用的包名和布局文件的资源id就可以创建一个RemoteViews。更新RemoteViews里面的View需要通过RemoteViews提供的一系列的方法来更新View。
1.2 RemoteViews在桌面小部件上的应用
AppWidgetProvider是Android中提供的用于实现桌面小部件的类,其本质是一个广播。
桌面小部件的开发步骤可以分为以下几步:
1.定义小部件界面
在res/layout下面新建一个小部件的布局文件。
// res/layout/widget.xml
<?xml version="1.0" encoding="utf-8"?>
<LinearLayout
    xmlns:android="http://schemas.android.com/apk/res/android"
    android:layout_width="match_parent"
    android:layout_height="match_parent">

    <ImageView
        android:id="@+id/iv_app_widget"
        android:layout_width="match_parent"
        android:layout_height="match_parent"
        android:src="@mipmap/ic_launcher"/>

</LinearLayout>
2.定义小部件配置信息
在res/xml下新建appwidget_provider_info.xml文件
<?xml version="1.0" encoding="utf-8"?>
<appwidget-provider
    xmlns:android="http://schemas.android.com/apk/res/android"
    android:initialLayout="@layout/widget"
    android:minHeight="80dp"
    android:minWidth="80dp"
    android:updatePeriodMillis="86400000"/>
3.定义小部件的实现类
这个类需要继承AppWidgetProvider,代码如下:
public class MyAppWidgetProvider extends AppWidgetProvider {

    public static final String CLICK_ACTION = "yorek.demoandtest.remoteview.action.CLICK";

    @Override
    public void onReceive(final Context context, final Intent intent) {
        super.onReceive(context, intent);

        if (!CLICK_ACTION.equals(intent.getAction())) {
            return;
        }

        Toast.makeText(context, "clicked it", Toast.LENGTH_SHORT).show();

        new Thread(new Runnable() {
            @Override
            public void run() {
                Bitmap srcbBitmap = BitmapFactory.decodeResource(context.getResources(), R.mipmap.ic_launcher);
                AppWidgetManager appWidgetManager = AppWidgetManager.getInstance(context);

                for (int i = 0; i < 37; i++) {
                    float degree = (i * 10) % 360;
                    RemoteViews remoteViews = new RemoteViews(context.getPackageName(), R.layout.widget);
                    remoteViews.setImageViewBitmap(R.id.iv_app_widget, rotateBitmap(context, srcbBitmap, degree));

                    Intent clickIntent = new Intent(CLICK_ACTION);
                    PendingIntent pendingIntent = PendingIntent.getBroadcast(context, 0, clickIntent, 0);
                    remoteViews.setOnClickPendingIntent(R.id.iv_app_widget, pendingIntent);

                    appWidgetManager.updateAppWidget(new ComponentName(context, MyAppWidgetProvider.class), remoteViews);
                    SystemClock.sleep(30);
                }
            }
        }).start();
    }

    @Override
    public void onUpdate(Context context, AppWidgetManager appWidgetManager, int[] appWidgetIds) {
        super.onUpdate(context, appWidgetManager, appWidgetIds);

        for (int appWidgetId : appWidgetIds) {
            onWidgetUpdate(context, appWidgetManager, appWidgetId);
        }
    }

    private Bitmap rotateBitmap(Context context, Bitmap bitmap, float degree) {
        Matrix matrix = new Matrix();
        matrix.reset();
        matrix.setRotate(degree);
        return Bitmap.createBitmap(bitmap, 0, 0, bitmap.getWidth(), bitmap.getHeight(), matrix, true);
    }

    private void onWidgetUpdate(Context context, AppWidgetManager appWidgetManager, int appWidgetId) {
        RemoteViews remoteViews = new RemoteViews(context.getPackageName(), R.layout.widget);

        Intent intent = new Intent(CLICK_ACTION);
        PendingIntent pendingIntent = PendingIntent.getBroadcast(context, 0, intent, 0);
        remoteViews.setOnClickPendingIntent(R.id.iv_app_widget, pendingIntent);

        appWidgetManager.updateAppWidget(appWidgetId, remoteViews);
    }
}
当小部件添加到桌面后,会通过
RemoteViews来加载布局文件,当小部件被单击后的旋转效果则是通过不断的更新RemoteViews来实现的。 由此可见,桌面小部件不管是初始化界面还是后续的更新界面都必须使用RemoteViews来完成。
4.在AndroidManifest中声明小部件
桌面小插件本质上还是一个广播,因此必须进行注册。
<receiver android:name=".remoteview.MyAppWidgetProvider">
   <meta-data
       android:name="android.appwidget.provider"
       android:resource="@xml/appwidget_provider_info" />

   <intent-filter>
       <action android:name="yorek.demoandtest.remoteview.action.CLICK" />
       <action android:name="android.appwidget.action.APPWIDGET_UPDATE" />
   </intent-filter>
</receiver>
AppWidgetProvider除了常用的onUpdate方法外,还有onEnabled、onDisabled、onDeteled、onReceive等方法。这些方法会被onReceive根据action进行分发。
onEnabled
当小部件第一次添加到桌面时调用该方法,可添加多次但只在第一次调用onUpdate
当小部件被添加或者每次小部件更新时都会调用,小部件的更新时机由updatePeriodMillis来指定。每个周期小部件会自动更新一次onDeteled
每删除一次桌面小部件就会调用一次onDisabled
当 最后一个 该类型的小部件被删除时就会调用该方法onReceive
这是基类的方法,在小部件中用于分发具体的事件给其他方法
关于AppWidgetProvider中具体事件的分发过程,源码如下:
/**
 * Implements {@link BroadcastReceiver#onReceive} to dispatch calls to the various
 * other methods on AppWidgetProvider.
 *
 * @param context The Context in which the receiver is running.
 * @param intent The Intent being received.
 */
// BEGIN_INCLUDE(onReceive)
public void onReceive(Context context, Intent intent) {
    // Protect against rogue update broadcasts (not really a security issue,
    // just filter bad broacasts out so subclasses are less likely to crash).
    String action = intent.getAction();
    if (AppWidgetManager.ACTION_APPWIDGET_UPDATE.equals(action)) {
        Bundle extras = intent.getExtras();
        if (extras != null) {
            int[] appWidgetIds = extras.getIntArray(AppWidgetManager.EXTRA_APPWIDGET_IDS);
            if (appWidgetIds != null && appWidgetIds.length > 0) {
                this.onUpdate(context, AppWidgetManager.getInstance(context), appWidgetIds);
            }
        }
    } else if (AppWidgetManager.ACTION_APPWIDGET_DELETED.equals(action)) {
        Bundle extras = intent.getExtras();
        if (extras != null && extras.containsKey(AppWidgetManager.EXTRA_APPWIDGET_ID)) {
            final int appWidgetId = extras.getInt(AppWidgetManager.EXTRA_APPWIDGET_ID);
            this.onDeleted(context, new int[] { appWidgetId });
        }
    } else if (AppWidgetManager.ACTION_APPWIDGET_OPTIONS_CHANGED.equals(action)) {
        Bundle extras = intent.getExtras();
        if (extras != null && extras.containsKey(AppWidgetManager.EXTRA_APPWIDGET_ID)
                && extras.containsKey(AppWidgetManager.EXTRA_APPWIDGET_OPTIONS)) {
            int appWidgetId = extras.getInt(AppWidgetManager.EXTRA_APPWIDGET_ID);
            Bundle widgetExtras = extras.getBundle(AppWidgetManager.EXTRA_APPWIDGET_OPTIONS);
            this.onAppWidgetOptionsChanged(context, AppWidgetManager.getInstance(context),
                    appWidgetId, widgetExtras);
        }
    } else if (AppWidgetManager.ACTION_APPWIDGET_ENABLED.equals(action)) {
        this.onEnabled(context);
    } else if (AppWidgetManager.ACTION_APPWIDGET_DISABLED.equals(action)) {
        this.onDisabled(context);
    } else if (AppWidgetManager.ACTION_APPWIDGET_RESTORED.equals(action)) {
        Bundle extras = intent.getExtras();
        if (extras != null) {
            int[] oldIds = extras.getIntArray(AppWidgetManager.EXTRA_APPWIDGET_OLD_IDS);
            int[] newIds = extras.getIntArray(AppWidgetManager.EXTRA_APPWIDGET_IDS);
            if (oldIds != null && oldIds.length > 0) {
                this.onRestored(context, oldIds, newIds);
                this.onUpdate(context, AppWidgetManager.getInstance(context), newIds);
            }
        }
    }
}
// END_INCLUDE(onReceive)
1.3 PendingIntent概述
PendingIntent与Intent的区别在于,PendingIntent是将在某个不确定时刻发生,而Intent是立刻发生。想要给RemoteViews设置点击事件,必须使用PendingIntent,PendingIntent通过send和cancel方法来发送和取消特定的PendingIntent。
PendingIntent支持三种类型,启动Activity、启动Service、发送广播,对应三个方法:
| 方法名 | 含义 |
|---|---|
| getActivity | 获得一个可以启动Activity的PendingIntent |
| getService | 获得一个可以启动Activity的PendingIntent |
| getBroadcast | 获得一个可以发送广播的PendingIntent |
上面这三个方法的参数都是相同的getActivity(Context context, int requestCode, Intent intent, int flags)
- requestCode
表示PendingIntent发送方的请求码,多数情况设置为0即可,另外requestCode会影响到flags的效果。 - flags
类型有:FLAG_ONE_SHOT、FLAG_NO_CREATE、FLAG_CANCEL_CURRENT、FLAG_UPDATE_CURRENT等
flags是用来标记PendingIntent效果的,这里面需要判断PendingIntent是否是相等的。因此,我们先需要了解PendingIntent的匹配规则。
如果两个
PendingIntent它们内部的Intent相同而且requestCode也相同,那么这两个PendingIntent就是相同的。
如果两个Intent的ComponentName和intent-filter都相同,那么这两个Intent就是相等的。需要注意的是,Extras不参与Intent的匹配过程。
flags的含义如下:
FLAG_ONE_SHOT
PendingIntent只能使用一次,然后就会被自动取消,后续还有相同的PendingIntent的send就会调用失败。FLAG_NO_CREATE
PendingIntent不会主动创建,如果当前PendingIntent不存在,那么getActivity等方法会返回null,即获取PendingIntent失败。FLAG_CANCEL_CURRENT
如果当前PendingIntent已经存在,那么它们会被cancel,然后系统会创建一个新的PendingIntent。FLAG_UPDATE_CURRENT
当前PendingIntent已经存在,那么它们都会被更新,即它们的Intent中的extra data会被替换成新的。
结合通知的发送,捋一下上面这些标记位:
- 如果
NotificationManager.notify的id是同一个值,那么不管PendingIntent是否匹配,后面的通知都会直接替换前面的通知。 - 如果
notify的id值不同,那么PendingIntent不匹配时,这些通知之间不会干扰; - 如果
notify的id值不同且PendingIntent匹配时- FLAG_ONE_SHOT
后续通知中的PendingIntent会和第一条保持一致,包括其中的extra data;点击任何一条通知后,剩下的通知匀无法打开,当所有的通知都被清除后,会再次重复这个过程。 - FLAG_CANCEL_CURRENT
只有最新的通知可以打开,之前弹出的通知均无法打开 - FLAG_UPDATE_CURRENT
之前弹出的通知中的PendingIntent都会更新,最终它们和最新的一体通知保持完全一致,包括其中的extra data,并且这些通知都是可以打开的。
- FLAG_ONE_SHOT
2 RemoteViews的内部机制
RemoteViews的作用是 在其他进程中显示并更新View界面。
RemoteViews不能支持所有的View类型,它所支持的所有类型如下:
- FrameLayout、LinerLayout、RelativeLayout、GridLayout
- AnalogClock、Button、Chronometer、ImageButton、ImageView、ProgressBar、TextView、ViewFilpper、ListView、GridView、StackView、AdapterViewFlipper以及ViewStub
因为RemoteViews运行在系统进程中,所以没有提供一系列findViewById方法,无法直接访问里面的View元素,因此RemoteViews所提供的一系列set方法。下面是常见的方法:
| 方法名 | 作用 |
|---|---|
| setTextViewText(int viewId, CharSequence text) | 设置TextView的文本 |
| setTextViewTextSize(int viewId, int units, float size) | 设置TextView的文本大小 |
| setTextColor(int viewId, @ColorInt int color) | 设置TextView的文本颜色 |
| setImageViewResource(int viewId, int srcId) | 设置ImageView的图片资源 |
| setImageViewBitmap(int viewId, Bitmap bitmap) | 设置TextView的图片 |
| setInt(int viewId, String methodName, int value) | 反射调用View对象的参数类型为int的方法 |
| setLong(int viewId, String methodName, long value) | 反射调用View对象的参数类型为long的方法 |
| setOnClickPendingIntent(int viewId, PendingIntent pendingIntent) | 为view添加点击事件,事件类型只能为PendingIntent |
RemoteViews的大部分set方法的确是通过反射来完成的。
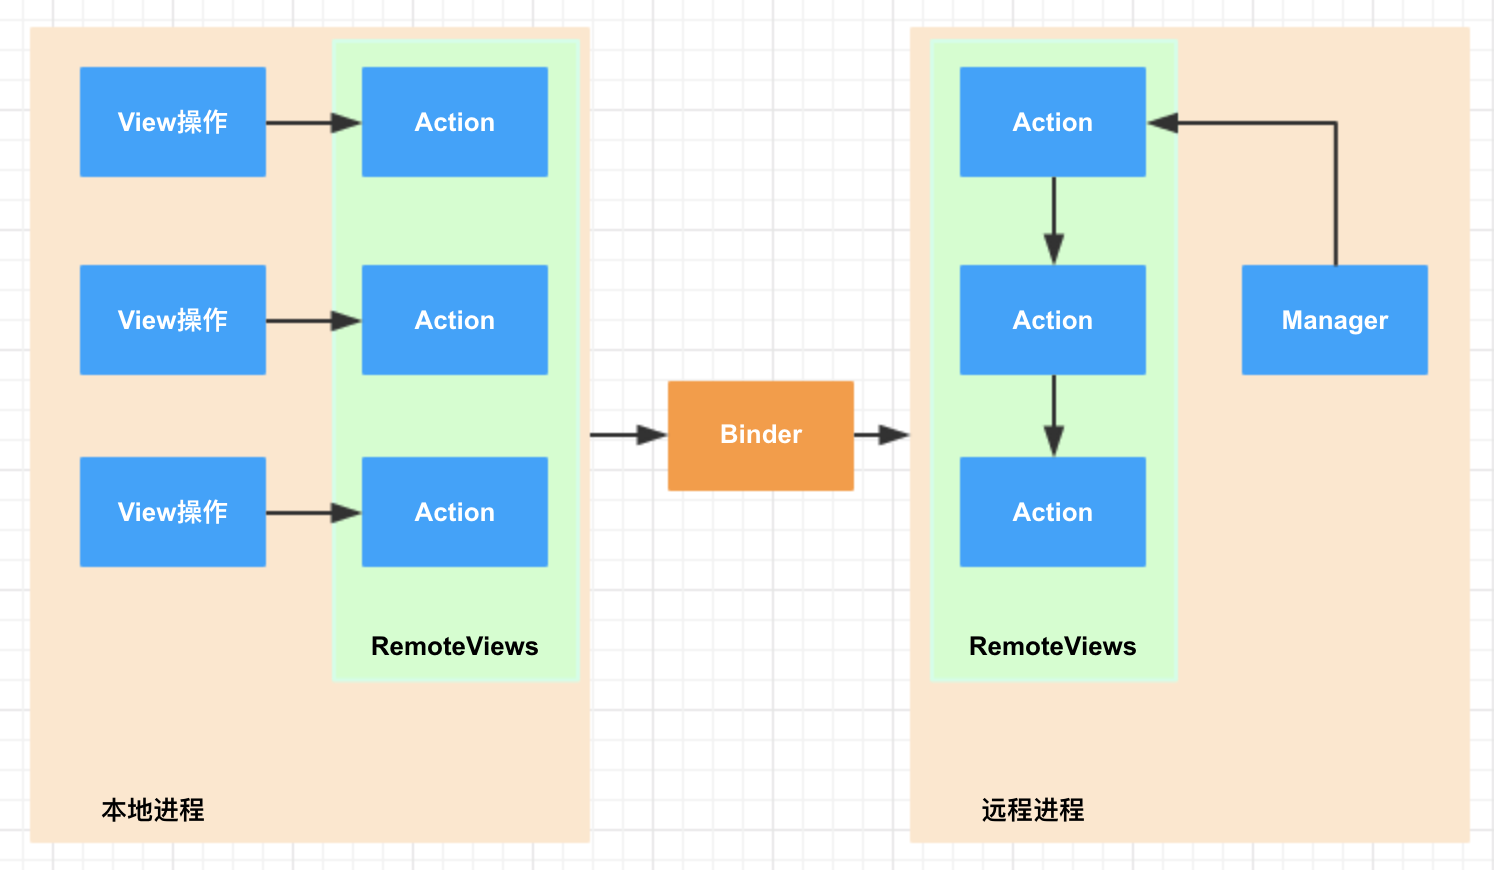
下面我们来分析一下RemoteViews的工作过程。RemoteViews会通过Binder传递到SystemServer进程,这是因为RemoteViews实现了Parcelable接口,因此它可以进行跨进程传输。系统会根据RemoteViews中的包名等信息去得到该应用的资源。然后通过LayoutInflater去加载RemoteViews中的布局文件。在SystemServer进程中加载后的布局文件是一个普通的View,只不过相对于我们的进程它是一个RemoteViews。接着系统会对View执行一系列界面更新任务,这些任务就是之前我们通过set方法来提交的。set方法对View所做的更新并不是立刻执行的,在RemoteViews内部会纪录所有的更新操作,具体的执行时机要等到RemoteViews被加载以后才能执行,这样RemoteViews就可以在SystemServer进程中显示了。
系统并没有通过Binder去直接支持View的跨进程访问,而是提供了一个Action的概念,Action代表一个View操作,Action同样实现了Parcelable接口。首先系统会将View操作封装到Action对象并将这些对象跨进程传输到远程进程,接着在远程进程中执行Action的操作。在我们的应用中每调用一次set方法,RemoteViews中就会添加一个对应的Action对象,当我们通过NotificationManager和AppWidgetManager提交更新时,这些Action对象就会传输到远程进程中并在远程进程中依次执行。远程进程通过RemoteViews的apply方法进行View的更新操作,RemoteViews#apply方法内部会去遍历所有的Action对象并调用它们的apply方法,具体的View更新操作是由Action对象的apply方法来完成的。
2.1 RemoteViews的创建
RemoteViews的创建比较简单,只是保存了创建RemoteViews的应用信息(ApplicationInfo)以及布局资源的id,并没有做实质性的工作:
public RemoteViews(String packageName, int layoutId) {
    this(getApplicationInfo(packageName, UserHandle.myUserId()), layoutId);
}

protected RemoteViews(ApplicationInfo application, int layoutId) {
    mApplication = application;
    mLayoutId = layoutId;
    mBitmapCache = new BitmapCache();
    // setup the memory usage statistics
    mMemoryUsageCounter = new MemoryUsageCounter();
    recalculateMemoryUsage();
}
2.2 RemoteViews的样式、点击事件设置
我们只看看上面表格中列出的这些方法,首先从setTextViewText的方法执行顺序说起:
public void setTextViewText(int viewId, CharSequence text) {
    setCharSequence(viewId, "setText", text);
}

public void setCharSequence(int viewId, String methodName, CharSequence value) {
    addAction(new ReflectionAction(viewId, methodName, ReflectionAction.CHAR_SEQUENCE, value));
}
我们看到,setTextViewText方法最后只是将参数包装成了一个ReflectionAction,然后调用了addAction方法。
addAction方法只是将Action加入到了mActions这个列表中,保存了起来。
private void addAction(Action a) {
    if (hasLandscapeAndPortraitLayouts()) {
        throw new RuntimeException("RemoteViews specifying separate landscape and portrait" +
                " layouts cannot be modified. Instead, fully configure the landscape and" +
                " portrait layouts individually before constructing the combined layout.");
    }
    if (mActions == null) {
        mActions = new ArrayList<Action>();
    }
    mActions.add(a);

    // update the memory usage stats
    a.updateMemoryUsageEstimate(mMemoryUsageCounter);
}
这些Action会在RemoteViews#apply方法里面去执行:
public View apply(Context context, ViewGroup parent, OnClickHandler handler) {
   RemoteViews rvToApply = getRemoteViewsToApply(context);

   View result = inflateView(context, rvToApply, parent);
   loadTransitionOverride(context, handler);

   rvToApply.performApply(result, parent, handler);

   return result;
}

private View inflateView(Context context, RemoteViews rv, ViewGroup parent) {
    // RemoteViews may be built by an application installed in another
    // user. So build a context that loads resources from that user but
    // still returns the current users userId so settings like data / time formats
    // are loaded without requiring cross user persmissions.
    final Context contextForResources = getContextForResources(context);
    Context inflationContext = new ContextWrapper(context) {
        @Override
        public Resources getResources() {
            return contextForResources.getResources();
        }
        @Override
        public Resources.Theme getTheme() {
            return contextForResources.getTheme();
        }
        @Override
        public String getPackageName() {
            return contextForResources.getPackageName();
        }
    };

    LayoutInflater inflater = (LayoutInflater)
            context.getSystemService(Context.LAYOUT_INFLATER_SERVICE);

    // Clone inflater so we load resources from correct context and
    // we don't add a filter to the static version returned by getSystemService.
    inflater = inflater.cloneInContext(inflationContext);
    inflater.setFilter(this);
    View v = inflater.inflate(rv.getLayoutId(), parent, false);
    v.setTagInternal(R.id.widget_frame, rv.getLayoutId());
    return v;
}
从上面的代码可以看出,系统会通过LayoutInflater加载RemoteViews中的布局文件,RemoteViews中的布局文件可以通过getLayoutId方法获得,加载完成后会通过performApply去执行一些更新操作。该方法代码如下:
private void performApply(View v, ViewGroup parent, OnClickHandler handler) {
   if (mActions != null) {
       handler = handler == null ? DEFAULT_ON_CLICK_HANDLER : handler;
       final int count = mActions.size();
       for (int i = 0; i < count; i++) {
           Action a = mActions.get(i);
           a.apply(v, parent, handler);
       }
   }
}
这段代码的作用就是遍历mActions,并执行每个Action的apply方法。因此,Action的apply方法就是真正操作View的地方。
2.3 RemoteViews的渲染
在AppWidgetManager#upadteAppWidget方法内部,它们确实是通过RemoteViews的apply和reapply方法来加载或者更新界面的,两者的区别在于前者会加载布局并更新界面,后者只会更新界面。Notification和AppWidget在初始化的时候会调用apply方法,而在后续更新界面时会调用reapply方法。
我们看一下Notification中的RemoteViews更新问题,代码在BaseStatusBar#updateNotificationViews方法中:
private void updateNotificationViews(Entry entry, StatusBarNotification sbn) {
   final RemoteViews contentView = entry.cachedContentView;
   final RemoteViews bigContentView = entry.cachedBigContentView;
   final RemoteViews headsUpContentView = entry.cachedHeadsUpContentView;
   final RemoteViews publicContentView = entry.cachedPublicContentView;

   // Reapply the RemoteViews
   contentView.reapply(mContext, entry.getContentView(), mOnClickHandler);
   if (bigContentView != null && entry.getExpandedContentView() != null) {
       bigContentView.reapply(sbn.getPackageContext(mContext),
               entry.getExpandedContentView(),
               mOnClickHandler);
   }
   View headsUpChild = entry.getHeadsUpContentView();
   if (headsUpContentView != null && headsUpChild != null) {
       headsUpContentView.reapply(sbn.getPackageContext(mContext),
               headsUpChild, mOnClickHandler);
   }
   if (publicContentView != null && entry.getPublicContentView() != null) {
       publicContentView.reapply(sbn.getPackageContext(mContext),
               entry.getPublicContentView(), mOnClickHandler);
   }
   // update the contentIntent
   mNotificationClicker.register(entry.row, sbn);

   entry.row.onNotificationUpdated(entry);
   entry.row.resetHeight();
}
RemoteViews的reapply方法来更新界面。 接着看一下AppWidget的更新,在AppWidgetHostView#updateAppWidget方法中:
// Prepare a local reference to the remote Context so we're ready to
// inflate any requested LayoutParams.
mRemoteContext = getRemoteContext();
int layoutId = remoteViews.getLayoutId();

// If our stale view has been prepared to match active, and the new
// layout matches, try recycling it
if (content == null && layoutId == mLayoutId) {
    try {
        remoteViews.reapply(mContext, mView, mOnClickHandler);
        content = mView;
        recycled = true;
        if (LOGD) Log.d(TAG, "was able to recycle existing layout");
    } catch (RuntimeException e) {
        exception = e;
    }
}

// Try normal RemoteView inflation
if (content == null) {
    try {
        content = remoteViews.apply(mContext, this, mOnClickHandler);
        if (LOGD) Log.d(TAG, "had to inflate new layout");
    } catch (RuntimeException e) {
        exception = e;
    }
}
RemoteViews的reapply方法来实现的。 2.4 Action子类的具体实现
在了解RemoteViews的作用机制后,我们回过头来看Action的子类的具体实现。
在这之前,我们先看看RemoteViews常用方法对应哪些具体的Action:
| RemoteViews支持的方法 | 对应的Action |
|---|---|
| setTextViewText(int viewId, CharSequence text) | ReflectionAction |
| setTextViewTextSize(int viewId, int units, float size) | TextViewSizeAction |
| setTextColor(int viewId, @ColorInt int color) | ReflectionAction |
| setImageViewResource(int viewId, int srcId) | ReflectionAction |
| setImageViewBitmap(int viewId, Bitmap bitmap) | BitmapReflectionAction |
| setInt(int viewId, String methodName, int value) | ReflectionAction |
| setLong(int viewId, String methodName, long value) | ReflectionAction |
| setOnClickPendingIntent(int viewId, PendingIntent pendingIntent) | SetOnClickPendingIntent |
我们首先看看ReflectionAction的具体实现。这些Action的实现都在RemoteViews的内部。
private final class ReflectionAction extends Action {
    ...
    String methodName;
    int type;
    Object value;

    ReflectionAction(int viewId, String methodName, int type, Object value) {
        this.viewId = viewId;
        this.methodName = methodName;
        this.type = type;
        this.value = value;
    }
    ...
    @Override
    public void apply(View root, ViewGroup rootParent, OnClickHandler handler) {
        final View view = root.findViewById(viewId);
        if (view == null) return;

        Class<?> param = getParameterType();
        if (param == null) {
            throw new ActionException("bad type: " + this.type);
        }

        try {
            getMethod(view, this.methodName, param).invoke(view, wrapArg(this.value));
        } catch (ActionException e) {
            throw e;
        } catch (Exception ex) {
            throw new ActionException(ex);
        }
    }
    ...
}
很显然,这是通过反射调用View里面的API来完成更新View的操作的。
接着,我们看一下TextViewSizeAction的实现:
private class TextViewSizeAction extends Action {
    public TextViewSizeAction(int viewId, int units, float size) {
        this.viewId = viewId;
        this.units = units;
        this.size = size;
    }
    ...
    @Override
    public void apply(View root, ViewGroup rootParent, OnClickHandler handler) {
        final TextView target = (TextView) root.findViewById(viewId);
        if (target == null) return;
        target.setTextSize(units, size);
    }
    ...
    int units;
    float size;
}
TextView#setTextSize(int, float)方法来完成目的。这里不用反射的原因是,该方法有两个参数,所以无法复用ReflectionAction。 既然可以直接调用View的对应方法,为什么不为大多数常用的方法提供一个Action呢?
一个可能的原因是:为大多数常用方法单独提供Action,这实在是工作量太大了,既然大多数属性都可以反射调用,那就反射好了。
然后是BitmapReflectionAction的实现:
private class BitmapReflectionAction extends Action {
    int bitmapId;
    Bitmap bitmap;
    String methodName;

    BitmapReflectionAction(int viewId, String methodName, Bitmap bitmap) {
        this.bitmap = bitmap;
        this.viewId = viewId;
        this.methodName = methodName;
        bitmapId = mBitmapCache.getBitmapId(bitmap);
    }
    ...
    @Override
    public void apply(View root, ViewGroup rootParent,
            OnClickHandler handler) throws ActionException {
        ReflectionAction ra = new ReflectionAction(viewId, methodName, ReflectionAction.BITMAP,
                bitmap);
        ra.apply(root, rootParent, handler);
    }
    ...
}
我们发现,其只是对传入的bitmap进行了缓存处理,然后就调用了ReflectionAction的实现。
最后看一下SetOnClickPendingIntent的实现:
private class SetOnClickPendingIntent extends Action {
    public SetOnClickPendingIntent(int id, PendingIntent pendingIntent) {
        this.viewId = id;
        this.pendingIntent = pendingIntent;
    }
    ...
    @Override
    public void apply(View root, ViewGroup rootParent, final OnClickHandler handler) {
        final View target = root.findViewById(viewId);
        if (target == null) return;

        // If the view is an AdapterView, setting a PendingIntent on click doesn't make much
        // sense, do they mean to set a PendingIntent template for the AdapterView's children?
        if (mIsWidgetCollectionChild) {
            Log.w(LOG_TAG, "Cannot setOnClickPendingIntent for collection item " +
                    "(id: " + viewId + ")");
            ApplicationInfo appInfo = root.getContext().getApplicationInfo();

            // We let this slide for HC and ICS so as to not break compatibility. It should have
            // been disabled from the outset, but was left open by accident.
            if (appInfo != null &&
                    appInfo.targetSdkVersion >= Build.VERSION_CODES.JELLY_BEAN) {
                return;
            }
        }

        // If the pendingIntent is null, we clear the onClickListener
        OnClickListener listener = null;
        if (pendingIntent != null) {
            listener = new OnClickListener() {
                public void onClick(View v) {
                    // Find target view location in screen coordinates and
                    // fill into PendingIntent before sending.
                    final Rect rect = getSourceBounds(v);

                    final Intent intent = new Intent();
                    intent.setSourceBounds(rect);
                    handler.onClickHandler(v, pendingIntent, intent);
                }
            };
        }
        target.setOnClickListener(listener);
    }

    public String getActionName() {
        return "SetOnClickPendingIntent";
    }

    PendingIntent pendingIntent;

    public final static int TAG = 1;
}
这段代码也比较简单,实际上就是对目标View设置了点击事件而已。关于点击事件,RemoteViews中只支持发起PendingIntent。
此外,我们需要注意setOnClickPendingIntent、setPendingIntentTemplate以及setOnClickFillInIntent它们之间的区别和联系:
- 首先,
setOnClickPendingIntent用于给普通View设置单击事件,但是不能给集合(ListView和StackView)中的View设置单击事件。 - 如果要给集合中的item设置点击事件,则必须将
setPendingIntentTemplate和setOnClickFillInIntent组合使用才可以。
RemoteViews在实际使用中的意义在于:可以用来在一个应用中更新另一个应用的某个界面。这样相比AIDL而言效率比较高,但是它仅支持一些常用View,还不支持自定义View。