Android消息机制
Android中的消息机制主要指Handler的运行机制。Handler的使用过程很简单,通过它可以轻松地 将一个任务切换到Handler所在的线程中去执行 。Handler在日常开发中的最常用的作用是通过它更新UI。具体来说是这样的:有时候需要在子线程中进行耗时的IO操作,可能是读取文件或者访问网络等,当耗时操作完成以后可能需要在UI上做一些改变,由于Android开发规范的限制,我们并不能在子线程中访问UI控件,否则就会触发程序异常,这个时候通过Handler就可以将更新UI的操作切换到主线程中执行。因此,本质上来说,Handler并不是专门用于更新UI的,它只是常被开发者用来更新UI。
Handler的运行需要底层的MessageQueue和Looper支撑。MessageQueue的中文翻译为消息队列,顾名思义,其内部可以存储一组Message,以队列的形式提供插入和删除工作,但是其内部实现是一个单链表。Looper会以无限循环的方式在MessageQueue中查找新消息,如有则处理消息,否则阻塞(sè)。Looper中还有一个特殊的概念:ThreadLocal,ThreadLocal可以在不同线程中互不干扰的存储并提供数据。
1 Android消息机制概述
Android消息机制由Handler、Message、MessageQueue、Looper四个要素组成。我们接触最多的就是Handler,因为我们需要通过它在主线程执行UI操作。
UI操作的线程检测在ViewRootImpl#checkThread中。ViewRootImpl对于Activity来说,只有在onResume之后,才会创建ViewRootImpl,在此之后在子线程执行UI操作才会报错。
void checkThread() {
    if (mThread != Thread.currentThread()) {
        throw new CalledFromWrongThreadException(
                "Only the original thread that created a view hierarchy can touch its views.");
    }
}
Handler在创建时会采用当前线程的Looper来构建内部的消息循环模型,如果当前线程没有Looper则会运行时异常Can't create handler inside thread that has not called Looper.prepare()。
public Handler(Callback callback, boolean async) {
    ...
    mLooper = Looper.myLooper();
    if (mLooper == null) {
        throw new RuntimeException(
            "Can't create handler inside thread that has not called Looper.prepare()");
    }
    ...
}
解决办法就是在线程中创建Looper或者在有Looper的线程中创建Handler。至于Activity的Looper在哪创建的,View的post方法为什么可以直接执行等会再后面说。
Handler创建完成之后,其内部的Looper以及MessageQueue就可以和Handler一起工作了。通过Handler的post(Runnable)方法或者send方法发送Message(post的Runnable对象也会被封装成为Message),这个Message会被enqueueMessage到MessageQueue中,然后Looper会一直取这些消息。取到消息后会被Handler的handleMessage处理。由于Looper运行在创建Handler所在的线程,这样Handler中的业务逻辑就被切换到创建Handler所在的线程中去了。
2 Android消息机制分析
本章源码基于Android 7.1 N_MR1
由于Looper离不开ThreadLocal,因此我们先说说ThreadLocal。
2.1 ThreadLocal的工作原理
ThreadLocal是一个线程内部的数据存储类,通过它可以在各个线程中存储不同的数据。在日常开发中用到的地方较少,但在某些特殊情况下,通过ThreadLocal可以轻松实现一些看起来很复杂的功能,比如Android源码中Looper、ActivityThread、AMS等。它一般有两个使用场景:
- 某些数据是以线程为作用域且不同线程具有不同的数据时
- 在复杂逻辑下对象的传递
对于Handler来说,很显然符合第一个使用场景,因为不同线程都有不同的Looper。
ThreadLocal的原理在于:Thread会持有一个ThreadLocal的数组,各种操作都会根据ThreadLocal的一个hashcode去查找对应的value。很显然,不同线程中的数组是不同的,因此各个线程中的数据也不相同。
下面我们深入源码,看一下它在Looper中的用法:
public final class Looper {
    ...
    // sThreadLocal.get() will return null unless you've called prepare().
    static final ThreadLocal<Looper> sThreadLocal = new ThreadLocal<Looper>();
    ...
    private static void prepare(boolean quitAllowed) {
        if (sThreadLocal.get() != null) {
            throw new RuntimeException("Only one Looper may be created per thread");
        }
        sThreadLocal.set(new Looper(quitAllowed));
    }
    ...
    public static @Nullable Looper myLooper() {
        return sThreadLocal.get();
    }
    ...
}
从上面的代码可以看出,ThreadLocal的使用方法非常简单,主要是其get/set方法。下面我们看一下其ThreadLocal.set()方法的内部实现:
public void set(T value) {
    Thread t = Thread.currentThread();
    ThreadLocalMap map = getMap(t);
    if (map != null)
        map.set(this, value);
    else
        createMap(t, value);
}
ThreadLocal.ThreadLocalMap threadLocals = null;,getMap(Thread)返回的就是这个成员。如果map不为空,则以当前线程为key设置值;否则,先创建ThreadLocalMap,然后再设置值。 ThreadLocalMap的set/get方法稍后再说,我们先看看createMap方法。此方法会直接创建ThreadLocalMap对象,并保存第一对kv到ThreadLocalMap内部的一个Entry[] table数组上,然后将创建的ThreadLocalMap对象保存到当前线程的threadLocals变量上:
// ThreadLocal.createMap
void createMap(Thread t, T firstValue) {
    t.threadLocals = new ThreadLocalMap(this, firstValue);
}

/**
  * The initial capacity -- MUST be a power of two.
  */
private static final int INITIAL_CAPACITY = 16;

ThreadLocalMap(ThreadLocal firstKey, Object firstValue) {
    table = new Entry[INITIAL_CAPACITY];
    int i = firstKey.threadLocalHashCode & (INITIAL_CAPACITY - 1);
    table[i] = new Entry(firstKey, firstValue);
    size = 1;
    setThreshold(INITIAL_CAPACITY);
}
线程中所有的ThreadLocal都会保存到Entry[] table数组上,保存位置 i 与ThreadLocal.threadLocalHashCode的生成有关。
由于INITIAL_CAPACITY默认是16,且在扩容时会double,所以table的长度一直都是2的倍数。在这种前提下,第13行中 i 的计算就等价于 firstKey.threadLocalHashCode % INITIAL_CAPACITY,也就是一个取模运算。位运算显然比%运算更快,这是一个小细节。因此,table中元素是否分布均匀就取决于firstKey.threadLocalHashCode生成的hashcode了。
下面我们看一下ThreadLocal#threadLocalHashCode:
ThreadLocal.java
private final int threadLocalHashCode = nextHashCode();
private static AtomicInteger nextHashCode = new AtomicInteger();

/**
  * The difference between successively generated hash codes - turns
  * implicit sequential thread-local IDs into near-optimally spread
  * multiplicative hash values for power-of-two-sized tables.
  */
private static final int HASH_INCREMENT = 0x61c88647;

private static int nextHashCode() {
    return nextHashCode.getAndAdd(HASH_INCREMENT);
}
下面我们看看LocalThread作为key,是怎么样在LocalThreadMap中进行操作的。从源码可以知道LocalThread的get/set/remove方法都是调用的LocalThreadMap的对应方法。且在get/set方法中,如果当前线程的ThreadLocalMap没有创建,则会创建并初始化ThreadLocalMap,这样ThreadLocal就会在当前线程拥有一个副本了。
那么,我们一个个来看:
首先是LocalThread.set方法对应的ThreadLocalMap.set方法:
private void set(ThreadLocal<?> key, Object value) {

    // We don't use a fast path as with get() because it is at
    // least as common to use set() to create new entries as
    // it is to replace existing ones, in which case, a fast
    // path would fail more often than not.

    Entry[] tab = table;
    int len = tab.length;
    int i = key.threadLocalHashCode & (len-1);

    for (Entry e = tab[i];
            e != null;
            e = tab[i = nextIndex(i, len)]) {
        ThreadLocal<?> k = e.get();

        if (k == key) {
            e.value = value;
            return;
        }

        if (k == null) {
            replaceStaleEntry(key, value, i);
            return;
        }
    }

    tab[i] = new Entry(key, value);
    int sz = ++size;
    if (!cleanSomeSlots(i, sz) && sz >= threshold)
        rehash();
}
在上面的set方法中,首先处理threadLocalHashCode得到i,然后在table[]里面找出可以替换的或者在i上插入要保存的值。这里如果i上发现有别的key(hash碰撞),就依次往后面挪,一直到找到同一个key进行取代或者找到一个空的位置保存值。
然后是LocalThread.get方法对应的ThreadLocalMap.getEntry方法:
private Entry getEntry(ThreadLocal<?> key) {
    int i = key.threadLocalHashCode & (table.length - 1);
    Entry e = table[i];
    if (e != null && e.get() == key)
        return e;
    else
        return getEntryAfterMiss(key, i, e);
}

private Entry getEntryAfterMiss(ThreadLocal<?> key, int i, Entry e) {
    Entry[] tab = table;
    int len = tab.length;

    while (e != null) {
        ThreadLocal<?> k = e.get();
        if (k == key)
            return e;
        if (k == null)
            expungeStaleEntry(i);
        else
            i = nextIndex(i, len);
        e = tab[i];
    }
    return null;
}
在getEntry方法中首先还是处理threadLocalHashCode得到i,然后判断这个位置是不是要取的值。如果不是的话,还是要处理hash碰撞的问题,解决方法就是依次往后面挪。
最后就是ThreadLocalMap.remove方法了:
private void remove(ThreadLocal<?> key) {
    Entry[] tab = table;
    int len = tab.length;
    int i = key.threadLocalHashCode & (len-1);
    for (Entry e = tab[i];
            e != null;
            e = tab[i = nextIndex(i, len)]) {
        if (e.get() == key) {
            e.clear();
            expungeStaleEntry(i);
            return;
        }
    }
}
同样还是先处理threadLocalHashCode得到i,然后判断hash碰撞来往后面挪,找到对应的key后进行清除。
从ThreadLocal的get/set/remove可以看出,它们所操作的对象都是当前线程的threadLocals对象的Entry[] table数组,Entry是保存着ThreadLocal与对应value的键值对。保存的首选位置都是ThreadLocal.threadLocalHashCode & (len-1),若发生哈希碰撞,则采用线性探测再散列的方法。
此外,不同线程访问同一个ThreadLocal,实际上是访问的自己线程内部的以ThreadLocal为key的value,这就是ThreadLocal可以在多个线程中互不干扰地存储和修改数据的原理了。
2.2 Message源码解析
Message这个类我们已经用的很熟悉了,所以我们这里重点说说Message的复用机制。(在IPC机制的Messenger中也描述过与Message)
public final class Message implements Parcelable {
    public int what;
    public int arg1;
    public int arg2;
    public Object obj;

    /*package*/ static final int FLAG_IN_USE = 1 << 0;
    /*package*/ Runnable callback;

    // sometimes we store linked lists of these things
    /*package*/ Message next;

    private static final Object sPoolSync = new Object();
    private static Message sPool;
    private static int sPoolSize = 0;

    private static final int MAX_POOL_SIZE = 50;
    ...
}
Handler#post(Runnable)会将Runnable封装成一个Message,post出来的Runnable就被赋值给callback变量。 next、sPool、MAX_POOL_SIZE、sPoolSize都与Message的复用有关,其数据结构是一个单链表。 下面我们看看obtain方法:
/**
 * Return a new Message instance from the global pool. Allows us to
 * avoid allocating new objects in many cases.
 */
public static Message obtain() {
    synchronized (sPoolSync) {
        if (sPool != null) {
            Message m = sPool;
            sPool = m.next;
            m.next = null;
            m.flags = 0; // clear in-use flag
            sPoolSize--;
            return m;
        }
    }
    return new Message();
}
这里对Message的复用做了同步处理,如果Message池不为空,将sPool指针后移一个,将原来的头结点m返回,同时计数减1。这是非常熟悉的单链表操作。如果没有可以复用的,那么就创建一个新的Message。其他的obtain方法的重载都会调用此方法,然后将传入参数重新赋值。
Tip
所以Message的获取最好还是obtain,这样可以用到缓存池里面的缓存对象。
然后看一下回收相关的操作:
private static boolean gCheckRecycle = true;

/** @hide */
public static void updateCheckRecycle(int targetSdkVersion) {
    if (targetSdkVersion < Build.VERSION_CODES.LOLLIPOP) {
        gCheckRecycle = false;
    }
}

/**
 * Return a Message instance to the global pool.
 * <p>
 * You MUST NOT touch the Message after calling this function because it has
 * effectively been freed.  It is an error to recycle a message that is currently
 * enqueued or that is in the process of being delivered to a Handler.
 * </p>
 */
public void recycle() {
    if (isInUse()) {
        if (gCheckRecycle) {
            throw new IllegalStateException("This message cannot be recycled because it "
                    + "is still in use.");
        }
        return;
    }
    recycleUnchecked();
}

/**
 * Recycles a Message that may be in-use.
 * Used internally by the MessageQueue and Looper when disposing of queued Messages.
 */
void recycleUnchecked() {
    // Mark the message as in use while it remains in the recycled object pool.
    // Clear out all other details.
    flags = FLAG_IN_USE;
    what = 0;
    arg1 = 0;
    arg2 = 0;
    obj = null;
    replyTo = null;
    sendingUid = -1;
    when = 0;
    target = null;
    callback = null;
    data = null;

    synchronized (sPoolSync) {
        if (sPoolSize < MAX_POOL_SIZE) {
            next = sPool;
            sPool = this;
            sPoolSize++;
        }
    }
}
recycle方法调用recycleUnchecked方法。 recycleUnchecked方法将会清除除了标记位之后的所有信息,然后添加到Message池中,计数自增。
如果Message的flags为FLAG_IN_USE,recycle会return,而不会执行recycleUnchecked。也就是说Message在obtain时标志位会复位,然后如果其要被回收,第一次走recycle方法时,isInUse()返回false,这使得recycleUnchecked可以执行,此后标志位会变成FLAG_IN_USE。在Message没有重新obtain之前,继续执行recycle将不会执行recycleUnchecked。这就保证了Message池中的对象都是不同的。
2.3 MessageQueue工作原理
MessageQueue主要包含两个操作:插入和读取,其对应的方法是enqueueMessage和next。MessageQueue其内部是通过单链表来维护消息队列的,这是因为enqueueMessage时会根据Message.when来插入,基于这样的特点采用单链表效率比较高。
首先我们看一下enqueueMessage方法:
boolean enqueueMessage(Message msg, long when) {
    if (msg.target == null) {
        throw new IllegalArgumentException("Message must have a target.");
    }
    ...
    synchronized (this) {
        ...
        msg.markInUse();
        msg.when = when;
        Message p = mMessages;
        boolean needWake;
        if (p == null || when == 0 || when < p.when) {
            // New head, wake up the event queue if blocked.
            msg.next = p;
            mMessages = msg;
            needWake = mBlocked;
        } else {
            // Inserted within the middle of the queue.  Usually we don't have to wake
            // up the event queue unless there is a barrier at the head of the queue
            // and the message is the earliest asynchronous message in the queue.
            needWake = mBlocked && p.target == null && msg.isAsynchronous();
            Message prev;
            for (;;) {
                prev = p;
                p = p.next;
                if (p == null || when < p.when) {
                    break;
                }
                if (needWake && p.isAsynchronous()) {
                    needWake = false;
                }
            }
            msg.next = p; // invariant: p == prev.next
            prev.next = msg;
        }

        // We can assume mPtr != 0 because mQuitting is false.
        if (needWake) {
            nativeWake(mPtr);
        }
    }
    return true;
}
enqueueMessage方法就是单链表的插入操作,分为头结点以及非头结点两个部分插入,这里不做过多解释了。 接着看next方法的逻辑:
Message next() {
    // Return here if the message loop has already quit and been disposed.
    // This can happen if the application tries to restart a looper after quit
    // which is not supported.
    final long ptr = mPtr;
    if (ptr == 0) {
        return null;
    }

    int pendingIdleHandlerCount = -1; // -1 only during first iteration
    int nextPollTimeoutMillis = 0;
    for (;;) {
        if (nextPollTimeoutMillis != 0) {
            Binder.flushPendingCommands();
        }

        nativePollOnce(ptr, nextPollTimeoutMillis);

        synchronized (this) {
            // Try to retrieve the next message.  Return if found.
            final long now = SystemClock.uptimeMillis();
            Message prevMsg = null;
            Message msg = mMessages;
            if (msg != null && msg.target == null) {
                // Stalled by a barrier.  Find the next asynchronous message in the queue.
                do {
                    prevMsg = msg;
                    msg = msg.next;
                } while (msg != null && !msg.isAsynchronous());
            }
            if (msg != null) {
                if (now < msg.when) {
                    // Next message is not ready.  Set a timeout to wake up when it is ready.
                    nextPollTimeoutMillis = (int) Math.min(msg.when - now, Integer.MAX_VALUE);
                } else {
                    // Got a message.
                    mBlocked = false;
                    if (prevMsg != null) {
                        prevMsg.next = msg.next;
                    } else {
                        mMessages = msg.next;
                    }
                    msg.next = null;
                    if (DEBUG) Log.v(TAG, "Returning message: " + msg);
                    msg.markInUse();
                    return msg;
                }
            } else {
                // No more messages.
                nextPollTimeoutMillis = -1;
            }

            // Process the quit message now that all pending messages have been handled.
            if (mQuitting) {
                dispose();
                return null;
            }
            ...
        }
        ...
    }
}
next方法的重点是第12行开始的for(;;)循环,如果MessageQueue中有可以立刻处理的Message,那么会返回这条消息并且从链表中移除。否则,会以Message.when等待一段时间后尝试返回;或者一直阻塞在这里直到有新的Message到达。
在上面的方法中,如果Message还没有到要处理的时间或者没有新Message,那么会一直不同的
for(;;)吗?
这是不可能的,因为这样做就特别消耗CPU资源了?所以,这里就涉及到Linux pipe/epoll机制了。简单说就是在主线程的MessageQueue没有消息时,便阻塞在第17行的nativePollOnce()方法里,此时主线程会释放CPU资源进入休眠状态,直到下个消息到达或者有事务发生,通过往pipe管道写端写入数据来唤醒主线程工作。这里采用的epoll机制,是一种IO多路复用机制,可以同时监控多个描述符,当某个描述符就绪(读或写就绪),则立刻通知相应程序进行读或写操作,本质同步I/O,即读写是阻塞的。所以说,主线程大多数时候都是处于休眠状态,并不会消耗大量CPU资源。
关于epoll/pipe的讲解:epoll 或者 kqueue 的原理是什么? - 蓝形参的回答 - 知乎
2.4 Looper工作原理
Looper在Android消息机制中扮演着消息循环的角色,它会一直从MessageQueue中取Message;若没有消息则会阻塞。
在一个没有Looper存在的线程中创建Handler就会报错,我们可以使用prepare()方法在当前线程创建一个Looper,接着通过Looper.loop()来开启消息循环。Looper除了prepare()之外,还有专门为主线程准备的prepareMainLooper()方法,其本质也是通过prepare来实现的。
Looper也是可以退出的,其提供了quit和quitSafely两个方法。前者会直接退出Looper;而后者只是设定一个退出标记,直到消息队列中已有的事情处理完毕才安全退出。quit和quitSafely都是调用了MessageQueue中的quit(boolean safe)方法。Looper退出后,使用Handler发送Message会失败并返回false。在子线程中,如果手动为其创建了Looper,那么在所有事情处理完毕之后应该调用quit方法来终止消息循环,否则该子线程会一直处于等待状态;而如果退出Looper之后,线程就会立刻终止,因此建议在不需要的时候终止Looper。
Looper的关键代码如下:
Looper.java
public final class Looper {
    ...
    static final ThreadLocal<Looper> sThreadLocal = new ThreadLocal<Looper>();
    private static Looper sMainLooper;  // guarded by Looper.class

    final MessageQueue mQueue;
    final Thread mThread;
    ...
     /** Initialize the current thread as a looper.
      * This gives you a chance to create handlers that then reference
      * this looper, before actually starting the loop. Be sure to call
      * {@link #loop()} after calling this method, and end it by calling
      * {@link #quit()}.
      */
    public static void prepare() {
        prepare(true);
    }

    private static void prepare(boolean quitAllowed) {
        if (sThreadLocal.get() != null) {
            throw new RuntimeException("Only one Looper may be created per thread");
        }
        sThreadLocal.set(new Looper(quitAllowed));
    }

    /**
     * Initialize the current thread as a looper, marking it as an
     * application's main looper. The main looper for your application
     * is created by the Android environment, so you should never need
     * to call this function yourself.  See also: {@link #prepare()}
     */
    public static void prepareMainLooper() {
        prepare(false);
        synchronized (Looper.class) {
            if (sMainLooper != null) {
                throw new IllegalStateException("The main Looper has already been prepared.");
            }
            sMainLooper = myLooper();
        }
    }

    /**
     * Run the message queue in this thread. Be sure to call
     * {@link #quit()} to end the loop.
     */
    public static void loop() {
        final Looper me = myLooper();
        if (me == null) {
            throw new RuntimeException("No Looper; Looper.prepare() wasn't called on this thread.");
        }
        final MessageQueue queue = me.mQueue;

        // Make sure the identity of this thread is that of the local process,
        // and keep track of what that identity token actually is.
        Binder.clearCallingIdentity();
        final long ident = Binder.clearCallingIdentity();

        for (;;) {
            Message msg = queue.next(); // might block
            if (msg == null) {
                // No message indicates that the message queue is quitting.
                return;
            }

            // This must be in a local variable, in case a UI event sets the logger
            final Printer logging = me.mLogging;
            if (logging != null) {
                logging.println(">>>>> Dispatching to " + msg.target + " " +
                        msg.callback + ": " + msg.what);
            }

            final long traceTag = me.mTraceTag;
            if (traceTag != 0 && Trace.isTagEnabled(traceTag)) {
                Trace.traceBegin(traceTag, msg.target.getTraceName(msg));
            }
            try {
                msg.target.dispatchMessage(msg);
            } finally {
                if (traceTag != 0) {
                    Trace.traceEnd(traceTag);
                }
            }

            if (logging != null) {
                logging.println("<<<<< Finished to " + msg.target + " " + msg.callback);
            }

            // Make sure that during the course of dispatching the
            // identity of the thread wasn't corrupted.
            final long newIdent = Binder.clearCallingIdentity();
            if (ident != newIdent) {
                Log.wtf(TAG, "Thread identity changed from 0x"
                        + Long.toHexString(ident) + " to 0x"
                        + Long.toHexString(newIdent) + " while dispatching to "
                        + msg.target.getClass().getName() + " "
                        + msg.callback + " what=" + msg.what);
            }

            msg.recycleUnchecked();
        }
    }

    private Looper(boolean quitAllowed) {
        mQueue = new MessageQueue(quitAllowed);
        mThread = Thread.currentThread();
    }

    /**
     * Quits the looper.
     * <p>
     * Causes the {@link #loop} method to terminate without processing any
     * more messages in the message queue.
     * </p><p>
     * Any attempt to post messages to the queue after the looper is asked to quit will fail.
     * For example, the {@link Handler#sendMessage(Message)} method will return false.
     * </p><p class="note">
     * Using this method may be unsafe because some messages may not be delivered
     * before the looper terminates.  Consider using {@link #quitSafely} instead to ensure
     * that all pending work is completed in an orderly manner.
     * </p>
     *
     * @see #quitSafely
     */
    public void quit() {
        mQueue.quit(false);
    }

    /**
     * Quits the looper safely.
     * <p>
     * Causes the {@link #loop} method to terminate as soon as all remaining messages
     * in the message queue that are already due to be delivered have been handled.
     * However pending delayed messages with due times in the future will not be
     * delivered before the loop terminates.
     * </p><p>
     * Any attempt to post messages to the queue after the looper is asked to quit will fail.
     * For example, the {@link Handler#sendMessage(Message)} method will return false.
     * </p>
     */
    public void quitSafely() {
        mQueue.quit(true);
    }
}
Looper最重要的方法是loop方法,只有调用了此方法,消息循环系统才会真正开始运行。loop是一个死循环,唯一跳出循环的条件是MessageQueue#next返回null。而当Looper调用quit或者quitSafely时,Looper会调用MessageQueue的quit方法,此方法会将mQuitting设为true,所以在MessageQueue的next方法循环中会返回null。当没有Message时,loop方法会阻塞在queue.next()处。若来了新Message,Looper会调用msg.target.dispatchMessage(msg)将Message交给msg.target的dispatchMessage方法处理。而msg.target是一个Handler,这样Handler发送的消息最后又会被Handler自己处理。但这里不同的的是,Handler发送消息的线程一般是子线程,而Handler定义的线程是在主线程,这样就成功地将代码逻辑切换到指定的线程中去执行了。
在Looper调用msg.target.dispatchMessage(msg)处理完Message之后,在loop方法的最后(第99行)会调用Message.recycleUnchecked方法将Message放入缓存池,等待复用。
2.5 Handler工作原理
Handler的主要功能是发送消息以及处理消息。发送消息可以通过send和post的一系列方法来发送,下面我们看看这些代码:
private static Message getPostMessage(Runnable r) {
    Message m = Message.obtain();
    m.callback = r;
    return m;
}

private static Message getPostMessage(Runnable r, Object token) {
    Message m = Message.obtain();
    m.obj = token;
    m.callback = r;
    return m;
}

public final boolean post(Runnable r)
{
   return  sendMessageDelayed(getPostMessage(r), 0);
}

public final boolean postAtTime(Runnable r, long uptimeMillis)
{
    return sendMessageAtTime(getPostMessage(r), uptimeMillis);
}

public final boolean postAtTime(Runnable r, Object token, long uptimeMillis)
{
    return sendMessageAtTime(getPostMessage(r, token), uptimeMillis);
}

public final boolean postDelayed(Runnable r, long delayMillis)
{
    return sendMessageDelayed(getPostMessage(r), delayMillis);
}

public final boolean postAtFrontOfQueue(Runnable r)
{
    return sendMessageAtFrontOfQueue(getPostMessage(r));
}

public final boolean sendMessage(Message msg)
{
    return sendMessageDelayed(msg, 0);
}

public final boolean sendEmptyMessage(int what)
{
    return sendEmptyMessageDelayed(what, 0);
}

public final boolean sendEmptyMessageDelayed(int what, long delayMillis) {
    Message msg = Message.obtain();
    msg.what = what;
    return sendMessageDelayed(msg, delayMillis);
}

public final boolean sendEmptyMessageAtTime(int what, long uptimeMillis) {
    Message msg = Message.obtain();
    msg.what = what;
    return sendMessageAtTime(msg, uptimeMillis);
}

public final boolean sendMessageDelayed(Message msg, long delayMillis)
{
    if (delayMillis < 0) {
        delayMillis = 0;
    }
    return sendMessageAtTime(msg, SystemClock.uptimeMillis() + delayMillis);
}

public boolean sendMessageAtTime(Message msg, long uptimeMillis) {
    MessageQueue queue = mQueue;
    if (queue == null) {
        RuntimeException e = new RuntimeException(
                this + " sendMessageAtTime() called with no mQueue");
        Log.w("Looper", e.getMessage(), e);
        return false;
    }
    return enqueueMessage(queue, msg, uptimeMillis);
}

public final boolean sendMessageAtFrontOfQueue(Message msg) {
    MessageQueue queue = mQueue;
    if (queue == null) {
        RuntimeException e = new RuntimeException(
            this + " sendMessageAtTime() called with no mQueue");
        Log.w("Looper", e.getMessage(), e);
        return false;
    }
    return enqueueMessage(queue, msg, 0);
}

private boolean enqueueMessage(MessageQueue queue, Message msg, long uptimeMillis) {
    msg.target = this;
    if (mAsynchronous) {
        msg.setAsynchronous(true);
    }
    return queue.enqueueMessage(msg, uptimeMillis);
}
我们可以看到:
- 通过post发送的Runnable对象都被封装成了Message,Runnable被赋值给
callback属性 - 通过send发送的,若没有Message,那么也被包装成Message。
上面的方法最后都会通过queue.enqueueMessage(msg, uptimeMillis)方法向MessageQueue中插入新消息。这条消息在Looper的loop()方法中从MessageQueue.next方法中获取出来,然后由Looper传递给msg.target.dispatchMessage来处理,这时Handler就进入了处理消息的阶段。
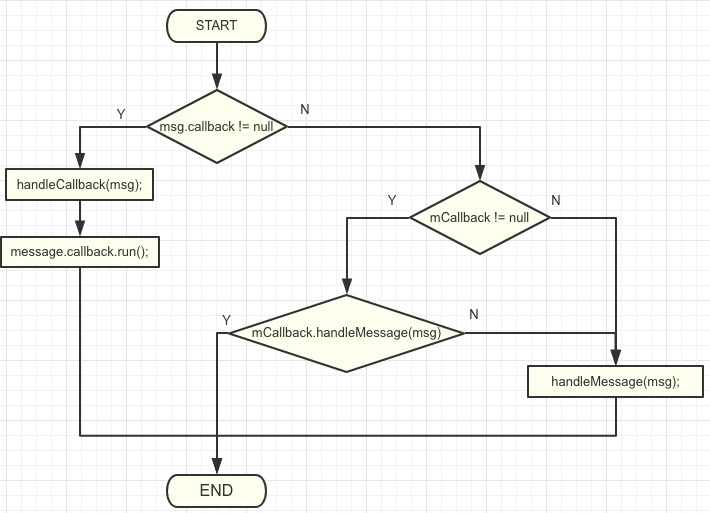
我们看下dispatchMessage方法的实现:
/**
 * Handle system messages here.
 */
public void dispatchMessage(Message msg) {
    if (msg.callback != null) {
        handleCallback(msg);
    } else {
        if (mCallback != null) {
            if (mCallback.handleMessage(msg)) {
                return;
            }
        }
        handleMessage(msg);
    }
}

private static void handleCallback(Message message) {
    message.callback.run();
}

/**
 * Callback interface you can use when instantiating a Handler to avoid
 * having to implement your own subclass of Handler.
 *
 * @param msg A {@link android.os.Message Message} object
 * @return True if no further handling is desired
 */
public interface Callback {
    public boolean handleMessage(Message msg);
}

/**
 * Subclasses must implement this to receive messages.
 */
public void handleMessage(Message msg) {
}
Handler处理消息的过程如下:
- 如果Message的
callback字段不为空,则执行callback的run方法。
这里的callback实际上就是post方法传入的Runnable对象 - 如果
mCallback不为空,就调用mCallback的handleMessage方法处理消息。如果mCallback没有处理,则继续下一步。
Callback接口存在的意义就是可以使用Callback来创建Handler而不需要派生子类。Handler handler = new Handler(callback); - 最后,如果
mCallback为null或者mCallback没有处理消息,Handler的handleMessage会被调用。
Handler的子类为了能够接受Message必须实现这个方法,因此其在Handler里面的实现是空的。
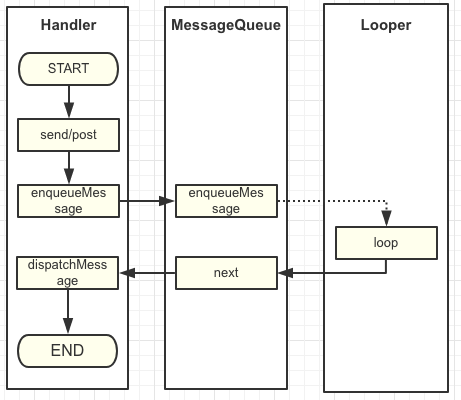
其流程整理如图如下:
以下是Android消息机制的简单描述图。
注意,图中虚线部分不存在这样的调用关系,只是对于一个Message来说,存在这样的先后的逻辑关系。
3 SyncBarrier 与 Asynchronous message
SyncBarrier 的作用在于阻拦同步消息的执行,一般与异步消息一起使用,这使得异步消息先于同步消息执行。
其典型的应用在系统源码 ViewRootImpl 与 Choreographer 中。我们知道在 Android 的绘制流程中,由 ViewRootImpl 向 Choreographer 注册 vsync 信号的回调,当 vsync 信号抵达时,会通知这个回调。
这里面的过程就使用到了消息机制里面的同步屏障与异步消息。限于篇幅,这里不贴绘制流程相关的代码了。
下面直接看看同步屏障与异步消息相关的代码。
先看看设置同步屏障的代码:
android/os/MessageQueue.java
public int postSyncBarrier() {
    return postSyncBarrier(SystemClock.uptimeMillis());
}

private int postSyncBarrier(long when) {
    // Enqueue a new sync barrier token.
    // We don't need to wake the queue because the purpose of a barrier is to stall it.
    synchronized (this) {
        final int token = mNextBarrierToken++;
        final Message msg = Message.obtain();
        msg.markInUse();
        msg.when = when;
        msg.arg1 = token;

        Message prev = null;
        Message p = mMessages;
        if (when != 0) {
            while (p != null && p.when <= when) {
                prev = p;
                p = p.next;
            }
        }
        if (prev != null) { // invariant: p == prev.next
            msg.next = p;
            prev.next = msg;
        } else {
            msg.next = p;
            mMessages = msg;
        }
        return token;
    }
}
这里先 Message.obtain() 获取了一个没有设置 target 字段的 Message,然后将 when 与 token 保存了起来。最后将这个 Message 按照 when 的顺序插入到了 Message 链表中。
这里注意一下,没有设置 target 字段的 Message 就是同步屏障的标志。且我们可以注意到,MessageQueue 在 enqueueMessage 时会检查 Message 的 target 字段是否为空。因此,这里创建同步屏障的 Message 后直接插入到了链表中,而不是调用 MessageQueue 的方法。
再看异步消息的设置方法,该方法比较简单,仅仅设置了标志位而已:
android/os/Message.java
public void setAsynchronous(boolean async) {
    if (async) {
        flags |= FLAG_ASYNCHRONOUS;
    } else {
        flags &= ~FLAG_ASYNCHRONOUS;
    }
}
最后就是我们的重点,我们重新分析一下 MessageQueue.next 方法,来看看同步消息与异步屏障是如何协作的。
android/os/MessageQueue.java
Message next() {
    ...
    for (;;) {
        ...
        synchronized (this) {
            // Try to retrieve the next message.  Return if found.
            final long now = SystemClock.uptimeMillis();
            Message prevMsg = null;
            Message msg = mMessages;
            if (msg != null && msg.target == null) {
                // Stalled by a barrier.  Find the next asynchronous message in the queue.
                do {
                    prevMsg = msg;
                    msg = msg.next;
                } while (msg != null && !msg.isAsynchronous());
            }
            if (msg != null) {
                if (now < msg.when) {
                    // Next message is not ready.  Set a timeout to wake up when it is ready.
                    nextPollTimeoutMillis = (int) Math.min(msg.when - now, Integer.MAX_VALUE);
                } else {
                    // Got a message.
                    mBlocked = false;
                    if (prevMsg != null) {
                        prevMsg.next = msg.next;
                    } else {
                        mMessages = msg.next;
                    }
                    msg.next = null;
                    if (DEBUG) Log.v(TAG, "Returning message: " + msg);
                    msg.markInUse();
                    return msg;
                }
            } else {
                // No more messages.
                nextPollTimeoutMillis = -1;
            }
        }
    ...
}
在取 Message 的时候,会先判断 msg != null && msg.target == null,前面我们说到了这就是同步屏障消息的特点。 因此,当遇到同步屏障的时候,会尝试在 Message 链表中找到异步消息。
这里分两种情况:
1. 若找到了异步消息,则后面就会返回这个消息;
2. 若没有找到,则执行 IdleHandler,并等待下次唤醒。
因此,经过分析可得,当设置了同步屏障之后,消息队列里面的位于屏障之后的同步消息就不会执行了。直到移除同步屏障。
4 主线程的消息循环
Android的主线程就是ActivityThread,主线程的入口方法和Java程序一样也是main。我们看一下这个方法ActivityThread#main:
public static void main(String[] args) {
    ....
    Looper.prepareMainLooper();

    ActivityThread thread = new ActivityThread();
    thread.attach(false);

    if (sMainThreadHandler == null) {
        sMainThreadHandler = thread.getHandler();
    }

    if (false) {
        Looper.myLooper().setMessageLogging(new
                LogPrinter(Log.DEBUG, "ActivityThread"));
    }

    // End of event ActivityThreadMain.
    Trace.traceEnd(Trace.TRACE_TAG_ACTIVITY_MANAGER);
    Looper.loop();

    throw new RuntimeException("Main thread loop unexpectedly exited");
}
main方法中系统会通过Looper.prepareMainLooper()为主线程开启了Looper,Looper创建时还会创建MessageQueue,然后在最后调用了Looper.loop方法开启主线程的消息循环,这样主线程就一直在运行。如果loop()方法因故退出,会抛出运行时异常throw new RuntimeException("Main thread loop unexpectedly exited");。 主线程的消息循环开启后,ActivityThread还有一个Handler来和消息队列进行交互,这个Handler就是ActivityThread.H,它内部定义了一组消息类型,主要包含了四大组件的启动和停止等过程:
final H mH = new H();

private class H extends Handler {
    public static final int LAUNCH_ACTIVITY         = 100;
    public static final int PAUSE_ACTIVITY          = 101;
    public static final int PAUSE_ACTIVITY_FINISHING= 102;
    public static final int STOP_ACTIVITY_SHOW      = 103;
    public static final int STOP_ACTIVITY_HIDE      = 104;
    public static final int SHOW_WINDOW             = 105;
    public static final int HIDE_WINDOW             = 106;
    public static final int RESUME_ACTIVITY         = 107;
    public static final int SEND_RESULT             = 108;
    public static final int DESTROY_ACTIVITY        = 109;
    public static final int BIND_APPLICATION        = 110;
    public static final int EXIT_APPLICATION        = 111;
    public static final int NEW_INTENT              = 112;
    public static final int RECEIVER                = 113;
    public static final int CREATE_SERVICE          = 114;
    public static final int SERVICE_ARGS            = 115;
    public static final int STOP_SERVICE            = 116;

    public static final int CONFIGURATION_CHANGED   = 118;
    public static final int CLEAN_UP_CONTEXT        = 119;
    public static final int GC_WHEN_IDLE            = 120;
    public static final int BIND_SERVICE            = 121;
    public static final int UNBIND_SERVICE          = 122;
    public static final int DUMP_SERVICE            = 123;
    public static final int LOW_MEMORY              = 124;
    public static final int ACTIVITY_CONFIGURATION_CHANGED = 125;
    public static final int RELAUNCH_ACTIVITY       = 126;
    public static final int PROFILER_CONTROL        = 127;
    public static final int CREATE_BACKUP_AGENT     = 128;
    public static final int DESTROY_BACKUP_AGENT    = 129;
    public static final int SUICIDE                 = 130;
    public static final int REMOVE_PROVIDER         = 131;
    public static final int ENABLE_JIT              = 132;
    public static final int DISPATCH_PACKAGE_BROADCAST = 133;
    public static final int SCHEDULE_CRASH          = 134;
    public static final int DUMP_HEAP               = 135;
    public static final int DUMP_ACTIVITY           = 136;
    public static final int SLEEPING                = 137;
    public static final int SET_CORE_SETTINGS       = 138;
    public static final int UPDATE_PACKAGE_COMPATIBILITY_INFO = 139;
    public static final int TRIM_MEMORY             = 140;
    public static final int DUMP_PROVIDER           = 141;
    public static final int UNSTABLE_PROVIDER_DIED  = 142;
    public static final int REQUEST_ASSIST_CONTEXT_EXTRAS = 143;
    public static final int TRANSLUCENT_CONVERSION_COMPLETE = 144;
    public static final int INSTALL_PROVIDER        = 145;
    public static final int ON_NEW_ACTIVITY_OPTIONS = 146;
    public static final int CANCEL_VISIBLE_BEHIND = 147;
    public static final int BACKGROUND_VISIBLE_BEHIND_CHANGED = 148;
    public static final int ENTER_ANIMATION_COMPLETE = 149;
    public static final int START_BINDER_TRACKING = 150;
    public static final int STOP_BINDER_TRACKING_AND_DUMP = 151;
    public static final int MULTI_WINDOW_MODE_CHANGED = 152;
    public static final int PICTURE_IN_PICTURE_MODE_CHANGED = 153;
    public static final int LOCAL_VOICE_INTERACTION_STARTED = 154;

    String codeToString(int code) {
        if (DEBUG_MESSAGES) {
            switch (code) {
                case LAUNCH_ACTIVITY: return "LAUNCH_ACTIVITY";
                case PAUSE_ACTIVITY: return "PAUSE_ACTIVITY";
                case PAUSE_ACTIVITY_FINISHING: return "PAUSE_ACTIVITY_FINISHING";
                case STOP_ACTIVITY_SHOW: return "STOP_ACTIVITY_SHOW";
                case STOP_ACTIVITY_HIDE: return "STOP_ACTIVITY_HIDE";
                case SHOW_WINDOW: return "SHOW_WINDOW";
                case HIDE_WINDOW: return "HIDE_WINDOW";
                case RESUME_ACTIVITY: return "RESUME_ACTIVITY";
                case SEND_RESULT: return "SEND_RESULT";
                case DESTROY_ACTIVITY: return "DESTROY_ACTIVITY";
                case BIND_APPLICATION: return "BIND_APPLICATION";
                ...
            }
        }
        return Integer.toString(code);
    }
    public void handleMessage(Message msg) {
        if (DEBUG_MESSAGES) Slog.v(TAG, ">>> handling: " + codeToString(msg.what));
        switch (msg.what) {
            case LAUNCH_ACTIVITY: {
                Trace.traceBegin(Trace.TRACE_TAG_ACTIVITY_MANAGER, "activityStart");
                final ActivityClientRecord r = (ActivityClientRecord) msg.obj;

                r.packageInfo = getPackageInfoNoCheck(
                        r.activityInfo.applicationInfo, r.compatInfo);
                handleLaunchActivity(r, null, "LAUNCH_ACTIVITY");
                Trace.traceEnd(Trace.TRACE_TAG_ACTIVITY_MANAGER);
            } break;
            case RELAUNCH_ACTIVITY: {
                Trace.traceBegin(Trace.TRACE_TAG_ACTIVITY_MANAGER, "activityRestart");
                ActivityClientRecord r = (ActivityClientRecord)msg.obj;
                handleRelaunchActivity(r);
                Trace.traceEnd(Trace.TRACE_TAG_ACTIVITY_MANAGER);
            } break;
            ...
        }
        Object obj = msg.obj;
        if (obj instanceof SomeArgs) {
            ((SomeArgs) obj).recycle();
        }
        if (DEBUG_MESSAGES) Slog.v(TAG, "<<< done: " + codeToString(msg.what));
    }
    ...
}
ActivityThread通过ApplicationThread和ActivityManagerService(AMS)进行进程间通信,AMS以IPC的方式完成ActivityThread的请求后回调ApplicationThread中的Binder方法,然后ApplicationThread会向H发送消息,H收到消息后会将ApplicationThread中的逻辑切换到ActivityThread中去执行,这个过程就是主线程的消息循环模型。
关于应用于AMS之间的通信,可以查看另外一篇文章四大组件启动过程
5 经常用到的Handler
我们可以在应用中可以使用View.post(Runnable)方法。那么处理这个Message的Handler是谁呢?
是ViewRootImpl的ViewRootHandler。
我们先看View#post:
public boolean post(Runnable action) {
    final AttachInfo attachInfo = mAttachInfo;
    if (attachInfo != null) {
        return attachInfo.mHandler.post(action);
    }

    // Postpone the runnable until we know on which thread it needs to run.
    // Assume that the runnable will be successfully placed after attach.
    getRunQueue().post(action);
    return true;
}
getRunQueue().post(action);处理。对后者来说,getRunQueue()返回的是一个HandlerActionQueue对象,此对象仅仅用来保存这些Runnable。真正执行要调用executeActions(Handler)方法,而这方法被调用是在dispatchAttachedToWindow方法中: void dispatchAttachedToWindow(AttachInfo info, int visibility) {
mAttachInfo = info;
...
// Transfer all pending runnables.
if (mRunQueue != null) {
mRunQueue.executeActions(info.mHandler);
mRunQueue = null;
}
...
}
dispatchAttachedToWindow方法: private void performTraversals() {
...
if (mFirst) {
...
host.dispatchAttachedToWindow(mAttachInfo, 0);
...
} else {
...
}
...
}
ViewRootImpl#performTraversals中被调用的。接着我们在看一下mAttachInfo的相关信息: final View.AttachInfo mAttachInfo;
public ViewRootImpl(Context context, Display display) {
...
mAttachInfo = new View.AttachInfo(mWindowSession, mWindow, display, this, mHandler, this);
...
}
final ViewRootHandler mHandler = new ViewRootHandler();
private final static int MSG_INVALIDATE = 1;
private final static int MSG_INVALIDATE_RECT = 2;
private final static int MSG_DIE = 3;
private final static int MSG_RESIZED = 4;
private final static int MSG_RESIZED_REPORT = 5;
private final static int MSG_WINDOW_FOCUS_CHANGED = 6;
private final static int MSG_DISPATCH_INPUT_EVENT = 7;
private final static int MSG_DISPATCH_APP_VISIBILITY = 8;
private final static int MSG_DISPATCH_GET_NEW_SURFACE = 9;
private final static int MSG_DISPATCH_KEY_FROM_IME = 11;
private final static int MSG_CHECK_FOCUS = 13;
private final static int MSG_CLOSE_SYSTEM_DIALOGS = 14;
private final static int MSG_DISPATCH_DRAG_EVENT = 15;
private final static int MSG_DISPATCH_DRAG_LOCATION_EVENT = 16;
private final static int MSG_DISPATCH_SYSTEM_UI_VISIBILITY = 17;
private final static int MSG_UPDATE_CONFIGURATION = 18;
private final static int MSG_PROCESS_INPUT_EVENTS = 19;
private final static int MSG_CLEAR_ACCESSIBILITY_FOCUS_HOST = 21;
private final static int MSG_INVALIDATE_WORLD = 22;
private final static int MSG_WINDOW_MOVED = 23;
private final static int MSG_SYNTHESIZE_INPUT_EVENT = 24;
private final static int MSG_DISPATCH_WINDOW_SHOWN = 25;
private final static int MSG_REQUEST_KEYBOARD_SHORTCUTS = 26;
private final static int MSG_UPDATE_POINTER_ICON = 27;
final class ViewRootHandler extends Handler {
@Override
public String getMessageName(Message message) {
switch (message.what) {
case MSG_INVALIDATE:
return "MSG_INVALIDATE";
case MSG_INVALIDATE_RECT:
return "MSG_INVALIDATE_RECT";
...
}
return super.getMessageName(message);
}
@Override
public boolean sendMessageAtTime(Message msg, long uptimeMillis) {
if (msg.what == MSG_REQUEST_KEYBOARD_SHORTCUTS && msg.obj == null) {
// Debugging for b/27963013
throw new NullPointerException(
"Attempted to call MSG_REQUEST_KEYBOARD_SHORTCUTS with null receiver:");
}
return super.sendMessageAtTime(msg, uptimeMillis);
}
@Override
public void handleMessage(Message msg) {
switch (msg.what) {
case MSG_INVALIDATE:
((View) msg.obj).invalidate();
break;
case MSG_INVALIDATE_RECT:
final View.AttachInfo.InvalidateInfo info = (View.AttachInfo.InvalidateInfo) msg.obj;
info.target.invalidate(info.left, info.top, info.right, info.bottom);
info.recycle();
break;
...
}
}
}
Activity.runOnUiThread(Runnable)方法最终执行也是在主线程,虽然方法名已经说的很清楚了,但是为什么呢?
Activity.java
final Handler mHandler = new Handler();

@Override
public final void runOnUiThread(Runnable action) {
    if (Thread.currentThread() != mUiThread) {
        mHandler.post(action);
    } else {
        action.run();
    }
}
可以看到,runOnUiThread里面首先对调用的线程做了一个判断:如果不是UI线程,就会调用mHandler.post方法切换到mHandler所在的线程里面去执行;否则在UI线程中,就直接执行了。
mHandler由于是在UI线程中创建的,所以其工作线程显然也是主线程。