Matrix-IOCanary解析
Wiki
目前 IOCanary 部分兼容到了 Android P
在前面总纲中提到了,IOCanary分为四个检测场景:主线程I/O、读写Buffer过小、重复读、Closeable泄漏监控。至于为什么是这四个场景,可以查看如何监控线上I/O操作以及上面matrix wiki中的相关部分。
上面四个场景中,前面三个可以采用native hook的方式收集I/O信息,在close操作时计算并上报。后者可以借StrictMode的东风,这是Android系统底层自带的监控,通过简单的hook可以将CloseGuard#reporter替换成自己的实现,然后在其report函数中完成上报即可。
关于Native Hook的一些知识,可以查看张绍文老师的Native Hook这篇文章。Matrix使用的native hook方案目前是爱奇艺的 xHook 方案,属于 PLT hook。
在Android中I/O的操作最终都会通过native层的open、read、write以及close函数。所以,我们只需要hook这几个函数,然后获取到与函数相关的入参、返回值等,基于这些信息我们就可以进行I/O操作的检测。最后检测完成之后进行上报。这部分内容可以参考Matrix I/O —— 原理简述以及Matrix I/O —— Hook方案介绍
I/O 监控流程图如下:
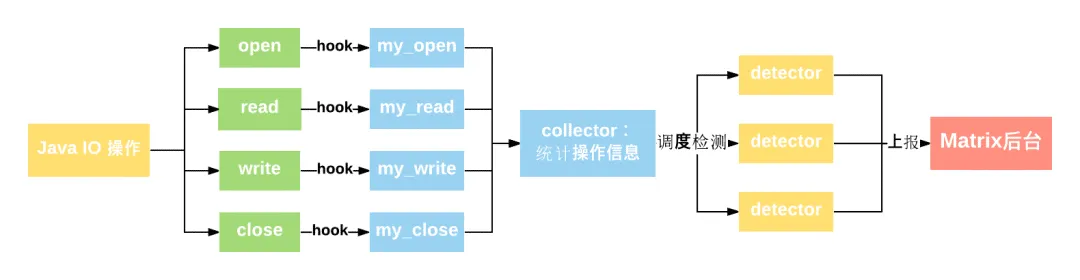
上面通过 Native Hook 可以检测到 主线程I/O、读写Buffer过小、重复读 的问题。还有一项 Closeable泄漏监控 可以通过 Java Hook的方式,具体实现可以查看 Matrix I/O —— Closeable Leak 监控。
Matrix 官方 Wiki 对于 IOCanary 的原理进行了详细的说明,通过文档我们就知道了大致的实现方向。下面我们通过代码对 Wiki 中的内容进行印证。 Talk is cheap, show me the code.
1. IOCanaryPlugin
我们首先看看 IOCanaryPlugin 的初始化、start、stop等函数,发现实现很简单,基本都代理给了 IOCanaryCore 这个类。
matrix/matrix-android/matrix-io-canary/src/main/java/com/tencent/matrix/iocanary/IOCanaryPlugin.java
public class IOCanaryPlugin extends Plugin {
    private static final String TAG = "Matrix.IOCanaryPlugin";

    private final IOConfig     mIOConfig;
    private IOCanaryCore mCore;

    public IOCanaryPlugin(IOConfig ioConfig) {
        mIOConfig = ioConfig;
    }

    @Override
    public void init(Application app, PluginListener listener) {
        super.init(app, listener);
        IOCanaryUtil.setPackageName(app);
        mCore = new IOCanaryCore(this);
    }

    @Override
    public void start() {
        super.start();
        mCore.start();
    }

    @Override
    public void stop() {
        super.stop();
        mCore.stop();
    }

    public IOConfig getConfig() {
        return mIOConfig;
    }
    ...
}
在 IOCanaryCore 中会根据 IOConfig 的配置项进行四个场景的 hook;同时该类还作为四个场景检测出来的问题的 reporter 传递给 hooker。下面是配置 hook 相关的代码,由 IOCanaryCore#start 进行调用:
matrix/matrix-android/matrix-io-canary/src/main/java/com/tencent/matrix/iocanary/core/IOCanaryCore.java
private void initDetectorsAndHookers(IOConfig ioConfig) {
    assert ioConfig != null;

    if (ioConfig.isDetectFileIOInMainThread()
        || ioConfig.isDetectFileIOBufferTooSmall()
        || ioConfig.isDetectFileIORepeatReadSameFile()) {
        IOCanaryJniBridge.install(ioConfig, this);
    }

    //if only detect io closeable leak use CloseGuardHooker is Better
    if (ioConfig.isDetectIOClosableLeak()) {
        mCloseGuardHooker = new CloseGuardHooker(this);
        mCloseGuardHooker.hook();
    }
}
我们可以看到,对于 主线程I/O、读写Buffer过小、重复读 这三种 native hook 的场景,由 IOCanaryJniBridge 进行进一步的 hook,而 Closeable泄漏监控 则由 CloseGuardHooker 进行具体的 hook。
2. IOCanaryJniBridge
2.1 hook流程
IOCanaryJniBridge 负责三种需要 native hook 的检测场景。在 IOCanaryJniBridge#install 操作中,会先加载对应的 so,然后根据配置启动 detector 并设置对应的上报阈值,最后调用 doHook 这个 native 方法进行 native 层面的 hook。
public static void install(IOConfig config, OnJniIssuePublishListener listener) {
    MatrixLog.v(TAG, "install sIsTryInstall:%b", sIsTryInstall);
    if (sIsTryInstall) {
        return;
    }

    //load lib
    if (!loadJni()) {
        MatrixLog.e(TAG, "install loadJni failed");
        return;
    }

    //set listener
    sOnIssuePublishListener = listener;

    try {
        //set config
        if (config != null) {
            if (config.isDetectFileIOInMainThread()) {
                enableDetector(DetectorType.MAIN_THREAD_IO);
                // ms to μs
                setConfig(ConfigKey.MAIN_THREAD_THRESHOLD, config.getFileMainThreadTriggerThreshold() * 1000L);
            }

            if (config.isDetectFileIOBufferTooSmall()) {
                enableDetector(DetectorType.SMALL_BUFFER);
                setConfig(ConfigKey.SMALL_BUFFER_THRESHOLD, config.getFileBufferSmallThreshold());
            }

            if (config.isDetectFileIORepeatReadSameFile()) {
                enableDetector(DetectorType.REPEAT_READ);
                setConfig(ConfigKey.REPEAT_READ_THRESHOLD, config.getFileRepeatReadThreshold());
            }
        }

        //hook
        doHook();

        sIsTryInstall = true;
    } catch (Error e) {
        MatrixLog.printErrStackTrace(TAG, e, "call jni method error");
    }
}

private static boolean loadJni() {
    if (sIsLoadJniLib) {
        return true;
    }

    try {
        System.loadLibrary("io-canary");
    } catch (Exception e) {
        MatrixLog.e(TAG, "hook: e: %s", e.getLocalizedMessage());
        sIsLoadJniLib = false;
        return false;
    }

    sIsLoadJniLib = true;
    return true;
}

/**
  *  enum DetectorType {
  *    kDetectorMainThreadIO = 0,
  *    kDetectorSmallBuffer,
  *    kDetectorRepeatRead
  *  };
  */
private static final class DetectorType {
    static final int MAIN_THREAD_IO = 0;
    static final int SMALL_BUFFER = 1;
    static final int REPEAT_READ = 2;
}
private static native void enableDetector(int detectorType);

/**
  * enum IOCanaryConfigKey {
  *    kMainThreadThreshold = 0,
  *    kSmallBufferThreshold,
  *    kRepeatReadThreshold,
  * };
  */
private static final class ConfigKey {
    static final int MAIN_THREAD_THRESHOLD = 0;
    static final int SMALL_BUFFER_THRESHOLD = 1;
    static final int REPEAT_READ_THRESHOLD = 2;
}

private static native void setConfig(int key, long val);

private static native boolean doHook();
上面的 DetectorType 以及 ConfigKey 的值的定义,与注释中定义在 C 层的枚举一致; config.getFileXX获取到的默认值,也与 C 层的默认值一致。如果在 Java 层修改了 detector 的触发阈值, 那么 C 层检测时会以自定义的值为准。
注意到 IOCanaryJniBridge 中还有一个私有静态类 JavaContext 以及一个私有静态方法 getJavaContext,这两个东西是给 C++ 部分进行调用的。该类中有两个参数 threadName 以及 stack,这会作为底层 detector 进行判断的参数,同时上报 IO 问题时也会带上这两个参数。
private static final class JavaContext {
    private final String stack;
    private final String threadName;

    private JavaContext() {
        stack = IOCanaryUtil.getThrowableStack(new Throwable());
        threadName = Thread.currentThread().getName();
    }
}

/**
    * 声明为private,给c++部分调用!!!不要干掉!!!
    * @return
    */
private static JavaContext getJavaContext() {
    try {
        return new JavaContext();
    } catch (Throwable th) {
        MatrixLog.printErrStackTrace(TAG, th, "get javacontext exception");
    }

    return null;
}
上面就是 Java 层的主要代码,下面我们看看 native 层干的事情,native 层的入口位于 io_canary_jni.cc 中。在加载 so 时,首先被调用的就是 JNI_OnLoad 方法。
在 JNI_OnLoad 方法会持有 Java 层一些方法、成员变量的句柄,供后续使用。相关代码以及对应关系如下:
matrix/matrix-android/matrix-io-canary/src/main/cpp/io_canary_jni.cc
namespace iocanary {
    static jclass kJavaBridgeClass;
    static jmethodID kMethodIDOnIssuePublish;

    static jclass kJavaContextClass;
    static jmethodID kMethodIDGetJavaContext;
    static jfieldID kFieldIDStack;
    static jfieldID kFieldIDThreadName;

    static jclass kIssueClass;
    static jmethodID kMethodIDIssueConstruct;

    static jclass kListClass;
    static jmethodID kMethodIDListConstruct;
    static jmethodID kMethodIDListAdd;

    extern "C" {

        JNIEXPORT jint JNICALL JNI_OnLoad(JavaVM *vm, void *reserved){
            __android_log_print(ANDROID_LOG_DEBUG, kTag, "JNI_OnLoad");
            kInitSuc = false;

            // 获取Java层一些方法、成员变脸的句柄
            if (!InitJniEnv(vm)) {
                return -1;
            }

            // 设置上报回调为OnIssuePublish函数
            iocanary::IOCanary::Get().SetIssuedCallback(OnIssuePublish);

            kInitSuc = true;
            __android_log_print(ANDROID_LOG_DEBUG, kTag, "JNI_OnLoad done");
            return JNI_VERSION_1_6;
        }

        static bool InitJniEnv(JavaVM *vm) {
            kJvm = vm;
            JNIEnv* env = NULL;
            if (kJvm->GetEnv((void**)&env, JNI_VERSION_1_6) != JNI_OK){
                __android_log_print(ANDROID_LOG_ERROR, kTag, "InitJniEnv GetEnv !JNI_OK");
                return false;
            }

            jclass temp_cls = env->FindClass("com/tencent/matrix/iocanary/core/IOCanaryJniBridge");
            if (temp_cls == NULL)  {
                __android_log_print(ANDROID_LOG_ERROR, kTag, "InitJniEnv kJavaBridgeClass NULL");
                return false;
            }
            // IOCanaryJniBridge
            kJavaBridgeClass = reinterpret_cast<jclass>(env->NewGlobalRef(temp_cls));

            jclass temp_java_context_cls = env->FindClass("com/tencent/matrix/iocanary/core/IOCanaryJniBridge$JavaContext");
            if (temp_java_context_cls == NULL)  {
                __android_log_print(ANDROID_LOG_ERROR, kTag, "InitJniEnv kJavaBridgeClass NULL");
                return false;
            }
            // IOCanaryJniBridge$JavaContext
            kJavaContextClass = reinterpret_cast<jclass>(env->NewGlobalRef(temp_java_context_cls));
            // IOCanaryJniBridge$JavaContext.stack
            kFieldIDStack = env->GetFieldID(kJavaContextClass, "stack", "Ljava/lang/String;");
            // IOCanaryJniBridge$JavaContext.threadName
            kFieldIDThreadName = env->GetFieldID(kJavaContextClass, "threadName", "Ljava/lang/String;");
            if (kFieldIDStack == NULL || kFieldIDThreadName == NULL) {
                __android_log_print(ANDROID_LOG_ERROR, kTag, "InitJniEnv kJavaContextClass field NULL");
                return false;
            }

            // IOCanaryJniBridge#onIssuePublish
            kMethodIDOnIssuePublish = env->GetStaticMethodID(kJavaBridgeClass, "onIssuePublish", "(Ljava/util/ArrayList;)V");
            if (kMethodIDOnIssuePublish == NULL) {
                __android_log_print(ANDROID_LOG_ERROR, kTag, "InitJniEnv kMethodIDOnIssuePublish NULL");
                return false;
            }

            // IOCanaryJniBridge#getJavaContext
            kMethodIDGetJavaContext = env->GetStaticMethodID(kJavaBridgeClass, "getJavaContext", "()Lcom/tencent/matrix/iocanary/core/IOCanaryJniBridge$JavaContext;");
            if (kMethodIDGetJavaContext == NULL) {
                __android_log_print(ANDROID_LOG_ERROR, kTag, "InitJniEnv kMethodIDGetJavaContext NULL");
                return false;
            }

            jclass temp_issue_cls = env->FindClass("com/tencent/matrix/iocanary/core/IOIssue");
            if (temp_issue_cls == NULL)  {
                __android_log_print(ANDROID_LOG_ERROR, kTag, "InitJniEnv kIssueClass NULL");
                return false;
            }
            // IOIssue
            kIssueClass = reinterpret_cast<jclass>(env->NewGlobalRef(temp_issue_cls));

            // IOIssue#init
            kMethodIDIssueConstruct = env->GetMethodID(kIssueClass, "<init>", "(ILjava/lang/String;JIJJIJLjava/lang/String;Ljava/lang/String;I)V");
            if (kMethodIDIssueConstruct == NULL) {
                __android_log_print(ANDROID_LOG_ERROR, kTag, "InitJniEnv kMethodIDIssueConstruct NULL");
                return false;
            }

            jclass list_cls = env->FindClass("java/util/ArrayList");
            // ArrayList
            kListClass = reinterpret_cast<jclass>(env->NewGlobalRef(list_cls));
            // ArrayList#init
            kMethodIDListConstruct = env->GetMethodID(list_cls, "<init>", "()V");
            // ArrayList#add
            kMethodIDListAdd = env->GetMethodID(list_cls, "add", "(Ljava/lang/Object;)Z");

            return true;
        }
    }
| C++ | Java |
|---|---|
| kJavaBridgeClass | IOCanaryJniBridge |
| kMethodIDOnIssuePublish | IOCanaryJniBridge#onIssuePublish |
| kJavaContextClass | IOCanaryJniBridge$JavaContext |
| kMethodIDGetJavaContext | IOCanaryJniBridge#getJavaContext |
| kFieldIDStack | IOCanaryJniBridge$JavaContext.stack |
| kFieldIDThreadName | IOCanaryJniBridge$JavaContext.threadName |
| kIssueClass | IOIssue |
| kMethodIDIssueConstruct | IOIssue#init |
| kListClass | ArrayList |
| kMethodIDListConstruct | ArrayList#init |
| kMethodIDListAdd | ArrayList#add |
然后在 Java层 中会进行调用 native 层的 enableDetector 以及 setConfig 函数,后者这个方法就不说了。enableDetector 函数会向 IOCanary 这个单例对象中添加对应的 detector 实例。
// matrix/matrix-android/matrix-io-canary/src/main/cpp/io_canary_jni.cc
JNIEXPORT void JNICALL
Java_com_tencent_matrix_iocanary_core_IOCanaryJniBridge_enableDetector(JNIEnv *env, jclass type, jint detector_type) {
    iocanary::IOCanary::Get().RegisterDetector(static_cast<DetectorType>(detector_type));
}

// matrix/matrix-android/matrix-io-canary/src/main/cpp/core/io_canary.cc
void IOCanary::RegisterDetector(DetectorType type) {
        switch (type) {
            case DetectorType::kDetectorMainThreadIO:
                detectors_.push_back(new FileIOMainThreadDetector());
                break;
            case DetectorType::kDetectorSmallBuffer:
                detectors_.push_back(new FileIOSmallBufferDetector());
                break;
            case DetectorType::kDetectorRepeatRead:
                detectors_.push_back(new FileIORepeatReadDetector());
                break;
            default:
                break;
        }
    }
上面出现的三个 Detector 就是对应三种场景的了,我们后面分析具体检测算法的时候再讨论。下面再看看 Java 调用的 doHook 方法,在该方法的实现中,会调用 xHook 来 hook 对应 so 的对应函数。
至于 hook 点如何确定,可以查看Hook方案介绍,方案中以 Android M 版本为例子,介绍了 hook 点的确定。M 版本上还是比较好确定的。
hook 相关代码如下:
matrix/matrix-android/matrix-io-canary/src/main/cpp/io_canary_jni.cc
const static char* TARGET_MODULES[] = {
    "libopenjdkjvm.so",
    "libjavacore.so",
    "libopenjdk.so"
};
const static size_t TARGET_MODULE_COUNT = sizeof(TARGET_MODULES) / sizeof(char*);
...
JNIEXPORT jboolean JNICALL
Java_com_tencent_matrix_iocanary_core_IOCanaryJniBridge_doHook(JNIEnv *env, jclass type) {
    __android_log_print(ANDROID_LOG_INFO, kTag, "doHook");

    for (int i = 0; i < TARGET_MODULE_COUNT; ++i) {
        const char* so_name = TARGET_MODULES[i];
        __android_log_print(ANDROID_LOG_INFO, kTag, "try to hook function in %s.", so_name);

        void* soinfo = xhook_elf_open(so_name);
        if (!soinfo) {
            __android_log_print(ANDROID_LOG_WARN, kTag, "Failure to open %s, try next.", so_name);
            continue;
        }

        xhook_hook_symbol(soinfo, "open", (void*)ProxyOpen, (void**)&original_open);
        xhook_hook_symbol(soinfo, "open64", (void*)ProxyOpen64, (void**)&original_open64);

        bool is_libjavacore = (strstr(so_name, "libjavacore.so") != nullptr);
        if (is_libjavacore) {
            if (xhook_hook_symbol(soinfo, "read", (void*)ProxyRead, (void**)&original_read) != 0) {
                __android_log_print(ANDROID_LOG_WARN, kTag, "doHook hook read failed, try __read_chk");
                if (xhook_hook_symbol(soinfo, "__read_chk", (void*)ProxyReadChk, (void**)&original_read_chk) != 0) {
                    __android_log_print(ANDROID_LOG_WARN, kTag, "doHook hook failed: __read_chk");
                    xhook_elf_close(soinfo);
                    return JNI_FALSE;
                }
            }

            if (xhook_hook_symbol(soinfo, "write", (void*)ProxyWrite, (void**)&original_write) != 0) {
                __android_log_print(ANDROID_LOG_WARN, kTag, "doHook hook write failed, try __write_chk");
                if (xhook_hook_symbol(soinfo, "__write_chk", (void*)ProxyWriteChk, (void**)&original_write_chk) != 0) {
                    __android_log_print(ANDROID_LOG_WARN, kTag, "doHook hook failed: __write_chk");
                    xhook_elf_close(soinfo);
                    return JNI_FALSE;
                }
            }
        }

        xhook_hook_symbol(soinfo, "close", (void*)ProxyClose, (void**)&original_close);

        xhook_elf_close(soinfo);
    }

    __android_log_print(ANDROID_LOG_INFO, kTag, "doHook done.");
    return JNI_TRUE;
}
在上面的代码中,分别 hook libopenjdkjvm.so、libjavacore.so、libopenjdk.so 中的 open、open64、close函数,此外还会额外 hook libjavacore.so 的 read、__read_chk、write、__write_chk 的方法。这样打开、读写、关闭全流程都可以 hook 到了。hook 之后,调用被 hook 的函数都会先被 matrix 拦截处理。
xHook使用流程
此外,我们还可以看到 xHook 的使用是非常简单的,流程如下:
- 调用
xhook_elf_open打开对应的 so - 调用
xhook_hook_symbolhook 对应的方法 - 调用
xhook_elf_closeclose 资源,防止资源泄漏 - 如果需要还原 hook,也是调用
xhook_hook_symbol进行 hook 点的还原
2.2 统计流程
native 部分的统计流程会分别在 open、read、write 时收集对应信息,然后在 close 时进行统一分析并上报。因此,前面三个操作的逻辑比较简单、清晰。
2.2.1 open
matrix IO 模块目前只检测主线的 IO 问题,当 open 等操作执行成功时,才会进入统计、检测流程。
在 open 操作中,会将入参与出参一起作为参数向下层传递,这里的返回值 ret 实际上是指文件描述符 fd。
/**
 *  Proxy for open: callback to the java layer
 */
//todo astrozhou 解决非主线程打开,主线程操作问题
int ProxyOpen(const char *pathname, int flags, mode_t mode) {
    if(!IsMainThread()) {
        return original_open(pathname, flags, mode);
    }

    int ret = original_open(pathname, flags, mode);

    if (ret != -1) {
        DoProxyOpenLogic(pathname, flags, mode, ret);
    }

    return ret;
}

int ProxyOpen64(const char *pathname, int flags, mode_t mode) {
    if(!IsMainThread()) {
        return original_open64(pathname, flags, mode);
    }

    int ret = original_open64(pathname, flags, mode);

    if (ret != -1) {
        DoProxyOpenLogic(pathname, flags, mode, ret);
    }

    return ret;
}
在捕获到 open 操作后,下面就转入了 IOCanary 的处理逻辑了。在 DoProxyOpenLogic 函数中,首先调用 Java 层的 IOCanaryJniBridge#getJavaContext 方法获取当前的上下文环境 JavaContext,然后将 Java 层的 JavaContext 转为 C 层的 java_context;最后调用了 IOCanary#OnOpen 方法。
static void DoProxyOpenLogic(const char *pathname, int flags, mode_t mode, int ret) {
    JNIEnv* env = NULL;
    kJvm->GetEnv((void**)&env, JNI_VERSION_1_6);
    if (env == NULL || !kInitSuc) {
        __android_log_print(ANDROID_LOG_ERROR, kTag, "ProxyOpen env null or kInitSuc:%d", kInitSuc);
    } else {
        jobject java_context_obj = env->CallStaticObjectMethod(kJavaBridgeClass, kMethodIDGetJavaContext);
        if (NULL == java_context_obj) {
            return;
        }

        jstring j_stack = (jstring) env->GetObjectField(java_context_obj, kFieldIDStack);
        jstring j_thread_name = (jstring) env->GetObjectField(java_context_obj, kFieldIDThreadName);

        char* thread_name = jstringToChars(env, j_thread_name);
        char* stack = jstringToChars(env, j_stack);
        JavaContext java_context(GetCurrentThreadId(), thread_name == NULL ? "" : thread_name, stack == NULL ? "" : stack);
        free(stack);
        free(thread_name);

        iocanary::IOCanary::Get().OnOpen(pathname, flags, mode, ret, java_context);

        env->DeleteLocalRef(java_context_obj);
        env->DeleteLocalRef(j_stack);
        env->DeleteLocalRef(j_thread_name);
    }
}
IOCanary#OnOpen 代理调用了 IOInfoCollector#OnOpen 方法。在后者的实现中,会以 fd 为 key, pathname、java_context 等值组成的对象 IOInfo 作为 value,保存到 info_map_ 这个 map 中。 IOInfo 这个对象里面的字段很多,包含了 IOCanary 对 IO 问题检测的各方面所需的字段,具体里面有什么我们下面遇到再说。 IOCanary#OnOpen 代码如下:
// matrix/matrix-android/matrix-io-canary/src/main/cpp/core/io_canary.cc
void IOCanary::OnOpen(const char *pathname, int flags, mode_t mode,
                        int open_ret, const JavaContext& java_context) {
    collector_.OnOpen(pathname, flags, mode, open_ret, java_context);
}

// matrix/matrix-android/matrix-io-canary/src/main/cpp/core/io_info_collector.cc
void IOInfoCollector::OnOpen(const char *pathname, int flags, mode_t mode
        , int open_ret, const JavaContext& java_context) {
    //__android_log_print(ANDROID_LOG_DEBUG, kTag, "OnOpen fd:%d; path:%s", open_ret, pathname);

    if (open_ret == -1) {
        return;
    }

    if (info_map_.find(open_ret) != info_map_.end()) {
        //__android_log_print(ANDROID_LOG_WARN, kTag, "OnOpen fd:%d already in info_map_", open_ret);
        return;
    }

    std::shared_ptr<IOInfo> info = std::make_shared<IOInfo>(pathname, java_context);
    info_map_.insert(std::make_pair(open_ret, info));
}
至此,open 流程相关的代码我们梳理了一下,就是以 open 操作中的 fd 为 key,对应的 IOInfo 为 value 保存到哈希表中备用。
2.2.2 read/write
read 操作 hook 了 read、__read_chk 两个函数,函数定义如下:
// read() attempts to read up to count bytes from file descriptor fd into the buffer starting at buf.
ssize_t read(int fd, void *buf, size_t count);

// The interface __read_chk() shall function in the same way as the interface read(), except that __read_chk() shall check for buffer overflow before computing a result. If an overflow is anticipated, the function shall abort and the program calling it shall exit.
//
// The parameter buflen specifies the size of the buffer buf. If nbytes exceeds buflen, the function shall abort, and the program calling it shall exit.
//
// The __read_chk() function is not in the source standard; it is only in the binary standard.
ssize_t __read_chk(int fd, void * buf, size_t nbytes, size_t buflen);
因此,读写操作的 buffer_size 都应该对应第三个参数才是。
接着,我们看看代理函数。在读的代理函数中,依旧是只处理主线程的调用。这里面 ret 表示的是本次操作中读取到的字节长度,同时还记录本次读的操作耗时 read_cost_us。收集到入参、出参以及耗时这五项参数后,作为入参调用 IOCanary#OnRead 函数。
matrix/matrix-android/matrix-io-canary/src/main/cpp/io_canary_jni.cc
/**
  *  Proxy for read: callback to the java layer
  */
ssize_t ProxyRead(int fd, void *buf, size_t size) {
    if(!IsMainThread()) {
        return original_read(fd, buf, size);
    }

    int64_t start = GetTickCountMicros();

    size_t ret = original_read(fd, buf, size);

    long read_cost_us = GetTickCountMicros() - start;

    //__android_log_print(ANDROID_LOG_DEBUG, kTag, "ProxyRead fd:%d buf:%p size:%d ret:%d cost:%d", fd, buf, size, ret, read_cost_us);

    iocanary::IOCanary::Get().OnRead(fd, buf, size, ret, read_cost_us);

    return ret;
}

ssize_t ProxyReadChk(int fd, void* buf, size_t count, size_t buf_size) {
    if(!IsMainThread()) {
        return original_read_chk(fd, buf, count, buf_size);
    }

    int64_t start = GetTickCountMicros();

    ssize_t ret = original_read_chk(fd, buf, count, buf_size);

    long read_cost_us = GetTickCountMicros() - start;

    //__android_log_print(ANDROID_LOG_DEBUG, kTag, "ProxyRead fd:%d buf:%p size:%d ret:%d cost:%d", fd, buf, size, ret, read_cost_us);

    iocanary::IOCanary::Get().OnRead(fd, buf, count, ret, read_cost_us);

    return ret;
}
在 IOCanary#OnRead 函数中,还是代理调用了 IOInfoCollector#OnRead 函数:
void IOCanary::OnRead(int fd, const void *buf, size_t size,
                        ssize_t read_ret, long read_cost) {
    collector_.OnRead(fd, buf, size, read_ret, read_cost);
}

void IOInfoCollector::OnRead(int fd, const void *buf, size_t size,
                            ssize_t read_ret, long read_cost) {

    if (read_ret == -1 || read_cost < 0) {
        return;
    }

    if (info_map_.find(fd) == info_map_.end()) {
            //__android_log_print(ANDROID_LOG_DEBUG, kTag, "OnRead fd:%d not in info_map_", fd);
        return;
    }

    CountRWInfo(fd, FileOpType::kRead, size, read_cost);
}
如果 fd 在 map 中,也就是说如果 open 时被捕获到了,那么才会进入 CountRWInfo 这个函数。CountRWInfo 会记录 IOInfo 所代表的文件的累计读写操作次数、累计buffer size、累计操作耗时、单次读写最大耗时、当前连续读写操作耗时、最大连续读写操作耗时、本次操作时间戳、最大操作buffer size、操作类型这些数据,具体看下面代码即可,一目了然。
matrix/matrix-android/matrix-io-canary/src/main/cpp/core/io_info_collector.cc
void IOInfoCollector::CountRWInfo(int fd, const FileOpType &fileOpType, long op_size, long rw_cost) {
    if (info_map_.find(fd) == info_map_.end()) {
        return;
    }

    // 获取系统的当前时间,单位微秒(us)
    const int64_t now = GetSysTimeMicros();

    // 累计读写操作次数累加
    info_map_[fd]->op_cnt_ ++;
    // 累计buffer size
    info_map_[fd]->op_size_ += op_size;
    // 累计文件读写耗时
    info_map_[fd]->rw_cost_us_ += rw_cost;

    // 单次文件读写最大耗时
    if (rw_cost > info_map_[fd]->max_once_rw_cost_time_μs_) {
        info_map_[fd]->max_once_rw_cost_time_μs_ = rw_cost;
    }

    //__android_log_print(ANDROID_LOG_DEBUG, kTag, "CountRWInfo rw_cost:%d max_once_rw_cost_time_:%d current_continual_rw_time_:%d;max_continual_rw_cost_time_:%d; now:%lld;last:%lld",
        //      rw_cost, info_map_[fd]->max_once_rw_cost_time_μs_, info_map_[fd]->current_continual_rw_time_μs_, info_map_[fd]->max_continual_rw_cost_time_μs_, now, info_map_[fd]->last_rw_time_ms_);

    // 连续读写耗时,若两次操作超过阈值(8000us,约为一帧耗时16.6667ms的一半),则不累计
    if (info_map_[fd]->last_rw_time_μs_ > 0 && (now - info_map_[fd]->last_rw_time_μs_) < kContinualThreshold) {
        info_map_[fd]->current_continual_rw_time_μs_ += rw_cost;
    } else {
        info_map_[fd]->current_continual_rw_time_μs_ = rw_cost;
    }

    // 最大连续读写耗时
    if (info_map_[fd]->current_continual_rw_time_μs_ > info_map_[fd]->max_continual_rw_cost_time_μs_) {
        info_map_[fd]->max_continual_rw_cost_time_μs_ = info_map_[fd]->current_continual_rw_time_μs_;
    }
    // 本次读写记录的时间戳
    info_map_[fd]->last_rw_time_μs_ = now;

    // 最大读写操作buffer size
    if (info_map_[fd]->buffer_size_ < op_size) {
        info_map_[fd]->buffer_size_ = op_size;
    }

    // 读写操作类型
    if (info_map_[fd]->op_type_ == FileOpType::kInit) {
        info_map_[fd]->op_type_ = fileOpType;
    }
}
我们可以看到 read 时就将对 IOInfo 里面的字段进行了赋值。实际上对 write 操作的统计也和 read 操作类似,最后也是调用的 CountRWInfo 函数对写操作进行统计,这里不做更多赘述。
2.2.3 close
在文件经过 open、read、write 之后,终于来到了 close。close 时我们会对整个文件生命周期的一些操作进行最后的统计并通知 detector 进行检测上报。
我们先看看 close 的代理方法,如下所示。可以看到,只是调用 IOCanary#OnClose 方法。
matrix/matrix-android/matrix-io-canary/src/main/cpp/io_canary_jni.cc
/**
 *  Proxy for close: callback to the java layer
 */
int ProxyClose(int fd) {
    if(!IsMainThread()) {
        return original_close(fd);
    }

    int ret = original_close(fd);

    //__android_log_print(ANDROID_LOG_DEBUG, kTag, "ProxyClose fd:%d ret:%d", fd, ret);
    iocanary::IOCanary::Get().OnClose(fd, ret);

    return ret;
}
接着看看 IOCanary#OnClose 方法的实现,这里先调用了 IOInfoCollector#OnClose 方法进行最后的统计操作。
具体操作为:通过当前系统时间减去 IOInfo 创建的时间得到的文件操作的生命周期的总时间,以及 stat 函数获取文件的 size。最后从 map 中移除并返回该对象。
然后通过 OfferFileIOInfo 方法将此 IOInfo 提交给检测线程中让各个 detector 进行检测。
// matrix/matrix-android/matrix-io-canary/src/main/cpp/core/io_canary.cc
void IOCanary::OnClose(int fd, int close_ret) {
    std::shared_ptr<IOInfo> info = collector_.OnClose(fd, close_ret);
    if (info == nullptr) {
        return;
    }

    OfferFileIOInfo(info);
}

// matrix/matrix-android/matrix-io-canary/src/main/cpp/core/io_info_collector.cc
std::shared_ptr<IOInfo> IOInfoCollector::OnClose(int fd, int close_ret) {

    if (info_map_.find(fd) == info_map_.end()) {
        //__android_log_print(ANDROID_LOG_DEBUG, kTag, "OnClose fd:%d not in info_map_", fd);
        return nullptr;
    }

    // 系统当前时间减去IOInfo对象初始化的时间,则为整个文件的生命周期时间
    info_map_[fd]->total_cost_μs_ = GetSysTimeMicros() - info_map_[fd]->start_time_μs_;
    // 通过stat函数获取文件的实际尺寸
    info_map_[fd]->file_size_ = GetFileSize(info_map_[fd]->path_.c_str());
    std::shared_ptr<IOInfo> info = info_map_[fd];
    info_map_.erase(fd);

    return info;
}

// matrix/matrix-android/matrix-io-canary/src/main/cpp/comm/io_canary_utils.cc
int GetFileSize(const char* file_path) {
    struct stat stat_buf;
    if (-1 == stat(file_path, &stat_buf)) {
        return -1;
    }
    return stat_buf.st_size;
}
下面我们看看 OfferFileIOInfo 的相关实现,这是 C++ 实现的一个生产者消费者模型。具体代码如下,这里不做过多讲解。
我们看到 Detect 函数,这个函数运行在 IOCanary 初始化时就创建的工作线程中,在取到 IOInfo 之后,就挨个调用 detector 进行检测,并将检测结果添加到 published_issues 这个数组中。最后调用 issued_callback_ 这个函数指针进行上报。实际上这里的 issued_callback_ 就是 io_canary_jni.cc 中的 OnIssuePublish 函数。
// io_canary.h
class IOCanary {
    ...
private:
    ...
    std::deque<std::shared_ptr<IOInfo>> queue_;
    std::mutex queue_mutex_;
    std::condition_variable queue_cv_;
}

// io_canary.cc
// 生产者
void IOCanary::OfferFileIOInfo(std::shared_ptr<IOInfo> file_io_info) {
    std::unique_lock<std::mutex> lock(queue_mutex_);
    queue_.push_back(file_io_info);
    queue_cv_.notify_one();
    lock.unlock();
}

IOCanary::IOCanary() {
    exit_ = false;
    std::thread detect_thread(&IOCanary::Detect, this);
    detect_thread.detach();
}

void IOCanary::Detect() {
    std::vector<Issue> published_issues;
    std::shared_ptr<IOInfo> file_io_info;
    while (true) {
        published_issues.clear();

        // 阻塞直到获取到IOInfo
        int ret = TakeFileIOInfo(file_io_info);

        if (ret != 0) {
            break;
        }

        // 将IOInfo交给各个detector进行检测
        for (auto detector : detectors_) {
            detector->Detect(env_, *file_io_info, published_issues);
        }

        // 若可以上报,则进行上报
        if (issued_callback_ && !published_issues.empty()) {
            issued_callback_(published_issues);
        }

        file_io_info = nullptr;
    }
}

// 消费者
int IOCanary::TakeFileIOInfo(std::shared_ptr<IOInfo> &file_io_info) {
    std::unique_lock<std::mutex> lock(queue_mutex_);

    while (queue_.empty()) {
        queue_cv_.wait(lock);
        if (exit_) {
            return -1;
        }
    }

    file_io_info = queue_.front();
    queue_.pop_front();
    return 0;
}
到目前为止,整个 IOCanary 对主线程 IO 的监控方案我们已经大致了解了。下面接着看看各个 detector 到底检测了些啥。
2.3 检测规则
我们前面说到,native 的部分负责 主线程I/O、读写Buffer过小、重复读 这三个方面的检测。实际上,在跟代码的时候,我们就找到了对应的负责检测的类。
- 主线程I/O
FileIOMainThreadDetector - 读写Buffer过小
FileIOSmallBufferDetector - 重复读
FileIORepeatReadDetector
那么,我们一个个看一下里面的检测规则是不是如 Wiki 所说的那样。
2.3.1 主线程I/O
主线程 I/O ,代码里面判定的规则如下:
- 单次读写最长耗时不得超过13ms
- 或者连续读写最长耗时不得超过500ms
Wiki描述
耗时的 IO 操作不能占据主线程太久。检测条件:
1. 操作线程为主线程
2. 连续读写耗时超过一定阈值或单次 write\read 耗时超过一定阈值
这么看来代码里面的描述与 Wiki 一致,代码如下:
matrix/matrix-android/matrix-io-canary/src/main/cpp/detector/main_thread_detector.cc
void FileIOMainThreadDetector::Detect(const IOCanaryEnv &env, const IOInfo &file_io_info,
                                        std::vector<Issue>& issues) {

    //__android_log_print(ANDROID_LOG_ERROR, "FileIOMainThreadDetector", "Detect  main-thread-id:%d, thread-id:%d max_continual_rw_cost_time_μs_:%d threshold:%d"
        //      , env.GetJavaMainThreadID(), file_io_info.java_context_.thread_id_, file_io_info.max_continual_rw_cost_time_μs_, env.GetMainThreadThreshold());

    if (GetMainThreadId() == file_io_info.java_context_.thread_id_) {
        int type = 0;
        if (file_io_info.max_once_rw_cost_time_μs_ > IOCanaryEnv::kPossibleNegativeThreshold) {
            type = 1;
        }
        if(file_io_info.max_continual_rw_cost_time_μs_ > env.GetMainThreadThreshold()) {
            type |= 2;
        }

        if (type != 0) {
            Issue issue(kType, file_io_info);
            issue.repeat_read_cnt_ = type;  //use repeat to record type
            PublishIssue(issue, issues);
        }
    }
}
2.3.2 读写Buffer过小
读写Buffer过小,代码里面判定的规则如下:
- 文件累计读写次数超过20次
- 且平均读写buffer小于4096
- 且文件最大连续读写耗时大于等于13ms
Wiki描述
Buffer 过小,会导致 read/write 的次数增多,从而影响了性能。检测条件:
1. buffer 小于一定阈值
2. read/write 的次数超过一定的阈值
代码中的判断与 Wiki 中基本类似,除了 Wiki 中没有提到的最大连续读写耗时的条件。检测代码如下:
matrix/matrix-android/matrix-io-canary/src/main/cpp/detector/small_buffer_detector.cc
void FileIOSmallBufferDetector::Detect(const IOCanaryEnv &env, const IOInfo &file_io_info,
                                        std::vector<Issue>& issues) {
    //__android_log_print(ANDROID_LOG_ERROR, "FileIOSmallBufferDetector", "Detect buffer_size:%d threshold:%d op_cnt:%d rw_cost:%d",
        //                  file_io_info.buffer_size_, env.GetSmallBufferThreshold(), file_io_info.op_cnt_, file_io_info.max_continual_rw_cost_time_μs_);

    if (file_io_info.op_cnt_ > env.kSmallBufferOpTimesThreshold && (file_io_info.op_size_ / file_io_info.op_cnt_) < env.GetSmallBufferThreshold()
            && file_io_info.max_continual_rw_cost_time_μs_ >= env.kPossibleNegativeThreshold) {

        PublishIssue(Issue(kType, file_io_info), issues);
    }
}
2.3.3 重复读
重复读的检测相对于上面两个检测来说,就复杂那么一丢丢。原因在于重复读检测的不仅仅是文件的一个生命周期,而是需要保存一次次检测的输入文件,然后再整个应用的生命周期内进行检测。
那么,略过一些准备工作,重复读的核心检测语句,在代码里面判定的规则如下:
- 同一文件两次检测的间隔不超过17ms
- 且文件在同一位置(堆栈判断)读取次数超过5次
Wiki描述
如果频繁地读某个文件,证明这个文件的内容很常被用到,可以通过缓存来提高效率。检测条件如下:
1. 同一线程读某个文件的次数超过一定阈值
代码中的判断与 Wiki 中并不完全匹配。检测代码以及部分注释如下:
matrix/matrix-android/matrix-io-canary/src/main/cpp/detector/repeat_read_detector.cc
RepeatReadInfo::RepeatReadInfo(const std::string &path, const std::string &java_stack,
                                long java_thread_id, long op_size,
                                int file_size) : path_(path), java_stack_(java_stack), java_thread_id_(java_thread_id) ,
                                                                op_size_(op_size), file_size_(file_size), op_timems(GetTickCount()) {
    repeat_cnt_ = 1;
}

bool RepeatReadInfo::operator==(const RepeatReadInfo &target) const {
    return target.path_ == path_
        && target.java_thread_id_ == java_thread_id_
        && target.java_stack_ == java_stack_
        && target.file_size_ == file_size_
        && target.op_size_ == op_size_;
}

void RepeatReadInfo::IncRepeatReadCount() {
    repeat_cnt_ ++;
}

int RepeatReadInfo::GetRepeatReadCount() {
    return repeat_cnt_;
}

std::string RepeatReadInfo::GetStack() {
    return java_stack_;
}

// 检测函数入口
void FileIORepeatReadDetector::Detect(const IOCanaryEnv &env,
                                        const IOInfo &file_io_info,
                                        std::vector<Issue>& issues) {

    // 若没有发现操作记录且最大连续读写耗时小于13ms则直接return;否则以path作为key保存重复读的记录
    const std::string& path = file_io_info.path_;
    if (observing_map_.find(path) == observing_map_.end()) {
        if (file_io_info.max_continual_rw_cost_time_μs_ < env.kPossibleNegativeThreshold) {
            return;
        }

        observing_map_.insert(std::make_pair(path, std::vector<RepeatReadInfo>()));
    }

    std::vector<RepeatReadInfo>& repeat_infos = observing_map_[path];
    // 若当前文件操作为写操作,则不构成读,更不用说重复读了。清空key对应的数组
    if (file_io_info.op_type_ == FileOpType::kWrite) {
        repeat_infos.clear();
        return;
    }

    // 构造RepeatReadInfo对象
    RepeatReadInfo repeat_read_info(file_io_info.path_, file_io_info.java_context_.stack_, file_io_info.java_context_.thread_id_,
                                    file_io_info.op_size_, file_io_info.file_size_);

    // 若key对应的数组为空数组,则说明是首次读操作,肯定不会有重复,直接push后结束
    if (repeat_infos.size() == 0) {
        repeat_infos.push_back(repeat_read_info);
        return;
    }

    // 检查当前时间与栈顶元素的构造时间进行比较,若时间只差超过17ms,则说明不构成重复读操作,清除数组。
    if((GetTickCount() - repeat_infos[repeat_infos.size() - 1].op_timems) > 17) {   //17ms todo astrozhou add to params
        repeat_infos.clear();
    }

    // 从栈中找到与当前对象相等的info,累加重复读次数
    // 注意这里重载了RepeatIOInfo的==操作,java_stack字段也参与了判定,也就是说同一文件不同的使用位置不认为是同一个相等的对象
    bool found = false;
    int repeatCnt;
    for (auto& info : repeat_infos) {
        if (info == repeat_read_info) {
            found = true;

            info.IncRepeatReadCount();

            repeatCnt = info.GetRepeatReadCount();
            break;
        }
    }

    // 若找不到相等对象,则push进数组
    if (!found) {
        repeat_infos.push_back(repeat_read_info);
        return;
    }

    // 检查重复读次数是否超过阈值(5),若超过则进行上报
    if (repeatCnt >= env.GetRepeatReadThreshold()) {
        Issue issue(kType, file_io_info);
        issue.repeat_read_cnt_ = repeatCnt;
        issue.stack = repeat_read_info.GetStack();
        PublishIssue(issue, issues);
    }
}
以上就是 IOCanary 中 C/C++ 部分实现的监控的内容了。剩下的上报部分的源码应该不用进行分析,比较简单了。剩下还有一个 Java 层实现的 Closeable 泄漏监控等待我们去分析。
3. Closeable泄漏监控
接着,我们回到 IOCanaryCore,看看 Closeable 内存泄漏是如何检测的。我们看看最后的的几行代码,看来这里面的诀窍就在 CloseGuardHooker 中:
matrix/matrix-android/matrix-io-canary/src/main/java/com/tencent/matrix/iocanary/core/IOCanaryCore.java
private void initDetectorsAndHookers(IOConfig ioConfig) {
    ...

    //if only detect io closeable leak use CloseGuardHooker is Better
    if (ioConfig.isDetectIOClosableLeak()) {
        mCloseGuardHooker = new CloseGuardHooker(this);
        mCloseGuardHooker.hook();
    }
}
CloseGuardHooker 里面的 hook 点的确定可以看Matrix Wiki -- Closeable Leak 监控的介绍。这里我们直接看结论:
- 利用反射,把 warnIfOpen 那个 ENABLED 值设为 true
- 利用动态代理,把 REPORTER 替换成我定义的 proxy
下面我们看下 CloseGuardHooker 的实现,看看里面是如何操作的。这里直接从 hook 方法开始跟进,代码和注释如下:
matrix/matrix/matrix-android/matrix-io-canary/src/main/java/com/tencent/matrix/iocanary/detect/CloseGuardHooker.java
public final class CloseGuardHooker {
    ...

    /**
     * set to true when a certain thread try hook once; even failed.
     */
    public void hook() {
        MatrixLog.i(TAG, "hook sIsTryHook=%b", mIsTryHook);
        if (!mIsTryHook) {
            boolean hookRet = tryHook();
            MatrixLog.i(TAG, "hook hookRet=%b", hookRet);
            mIsTryHook = true;
        }
    }

    /**
     * TODO comment
     * Use a way of dynamic proxy to hook
     * <p>
     * warn of sth: detectLeakedClosableObjects may be disabled again after this tryHook once called
     *
     * @return
     */
    private boolean tryHook() {
        try {
            Class<?> closeGuardCls = Class.forName("dalvik.system.CloseGuard");
            Class<?> closeGuardReporterCls = Class.forName("dalvik.system.CloseGuard$Reporter");
            // CloseGuard#getReporter方法
            Method methodGetReporter = closeGuardCls.getDeclaredMethod("getReporter");
            // CloseGuard#setReporter方法
            Method methodSetReporter = closeGuardCls.getDeclaredMethod("setReporter", closeGuardReporterCls);
            // CloseGuard#setEnabled方法
            Method methodSetEnabled = closeGuardCls.getDeclaredMethod("setEnabled", boolean.class);

            // 保存原始的reporter对象
            sOriginalReporter = methodGetReporter.invoke(null);

            // 调用CloseGuard#setEnabled方法,设置为true
            methodSetEnabled.invoke(null, true);

            // 开启MatrixCloseGuard,这是类似于CloseGuard的一个东西,但是没有用到
            // open matrix close guard also
            MatrixCloseGuard.setEnabled(true);

            ClassLoader classLoader = closeGuardReporterCls.getClassLoader();
            if (classLoader == null) {
                return false;
            }

            // 将动态代理的对象设置为REPORTER
            methodSetReporter.invoke(null, Proxy.newProxyInstance(classLoader,
                new Class<?>[]{closeGuardReporterCls},
                new IOCloseLeakDetector(issueListener, sOriginalReporter)));

            return true;
        } catch (Throwable e) {
            MatrixLog.e(TAG, "tryHook exp=%s", e);
        }

        return false;
    }
}
然后我们看下 IOCloseLeakDetector 这个类,这是一个典型的动态代理的用法,重点在于其 invoke 方法里面的处理,我们可以根据 method 的方法名以及 args 参数列表来匹配需要 hook 的方法。
IOCloseLeakDetector 里面只 hook 了 report 方法,然后处理了 args[1] 这个 Throwable,将其作为参数进行上报。代码如下:
matrix/matrix-android/matrix-io-canary/src/main/java/com/tencent/matrix/iocanary/detect/IOCloseLeakDetector.java
public class IOCloseLeakDetector extends IssuePublisher implements InvocationHandler {
    ...
    @Override
    public Object invoke(Object proxy, Method method, Object[] args) throws Throwable {
        MatrixLog.i(TAG, "invoke method: %s", method.getName());
        if (method.getName().equals("report")) {
            if (args.length != 2) {
                MatrixLog.e(TAG, "closeGuard report should has 2 params, current: %d", args.length);
                return null;
            }
            if (!(args[1] instanceof Throwable)) {
                MatrixLog.e(TAG, "closeGuard report args 1 should be throwable, current: %s", args[1]);
                return null;
            }
            Throwable throwable = (Throwable) args[1];

            String stackKey = IOCanaryUtil.getThrowableStack(throwable);
            if (isPublished(stackKey)) {
                MatrixLog.d(TAG, "close leak issue already published; key:%s", stackKey);
            } else {
                Issue ioIssue = new Issue(SharePluginInfo.IssueType.ISSUE_IO_CLOSABLE_LEAK);
                ioIssue.setKey(stackKey);
                JSONObject content = new JSONObject();
                try {
                    content.put(SharePluginInfo.ISSUE_FILE_STACK, stackKey);
                } catch (JSONException e) {
//                e.printStackTrace();
                    MatrixLog.e(TAG, "json content error: %s", e);
                }
                ioIssue.setContent(content);
                publishIssue(ioIssue);
                MatrixLog.i(TAG, "close leak issue publish, key:%s", stackKey);
                markPublished(stackKey);
            }


            return null;
        }
        return method.invoke(originalReporter, args);
    }
}
当然框架层很多代码都用了 CloseGuard ,就可以发现比如文件资源没 close , Cursor 没有 close 等等,这个方式不仅仅可以监控文件,一下子满足了好多愿望。
4. Android P 以上版本的兼容
Matrix 目前只兼容到了Android P,也就是 Android 9。 下面对 Android 9 以上版本的适配,做了一定的兼容,当然下面的代码仅仅说明了适配的方向,可能还有一些其他问题需要处理。
对于 Closeable 泄露监控来说,在 Android 10 及上无法兼容的原因是 CloseGuard#getReporter 无法直接通过反射获取, reporter 字段也是无法直接通过反射获取。如果无法获取到原始的 reporter,那么原始的 reporter 在我们 hook 之后就会失效。如果我们狠下决心,这也是可以接受的,但是对于这种情况我们应该尽量避免。
那么我们现在的问题就是如何在高版本上获取到原始的 reporter,那么有办法吗?有的,因为我们前面说到了无法直接通过反射获取,但是可以间接获取到。这里我们可以通过 反射的反射 来获取。实例如下:
private static void doHook() throws Exception {
    Class<?> clazz = Class.forName("dalvik.system.CloseGuard");
    Class<?> reporterClass = Class.forName("dalvik.system.CloseGuard$Reporter");

    Method setEnabledMethod = clazz.getDeclaredMethod("setEnabled", boolean.class);
    setEnabledMethod.invoke(null, true);

    // 直接反射获取reporter
//        Method getReporterMethod = clazz.getDeclaredMethod("getReporter");
//        final Object originalReporter = getReporterMethod.invoke(null);

    // 反射的反射获取
    Method getDeclaredMethodMethod = Class.class.getDeclaredMethod("getDeclaredMethod", String.class, Class[].class);
    Method getReporterMethod = (Method) getDeclaredMethodMethod.invoke(clazz, "getReporter", null);
    final Object originalReporter = getReporterMethod.invoke(null);

    Method setReporterMethod = clazz.getDeclaredMethod("setReporter", reporterClass);
    Object proxy = Proxy.newProxyInstance(
            reporterClass.getClassLoader(),
            new Class<?>[]{reporterClass},
            new InvocationHandler() {
                @Override
                public Object invoke(Object proxy, Method method, Object[] args) throws Throwable {
                    return method.invoke(originalReporter, args);
                }
            }
    );
    setReporterMethod.invoke(null, proxy);
}
对于 native hook 的三种场景来说,Android 9 版本以上无法适配的原因应该是 hook 失效导致的。所以这里研究了一下,发现目前(2021年03月25日) xhook 已经适配了 Android 10。更新了 xhook 的相关代码后,可以在 Android 10 上 hook 到文件的操作了。示例代码如下:
#include <jni.h>
#include <cstddef>
#include <cstring>
#include <android/log.h>
#include <assert.h>
#include <xhook.h>
#include <string>
#include <algorithm>

namespace iocanary {

    static const char* const kTag = "IOCanary.JNI";

    static int (*original_open) (const char *pathname, int flags, mode_t mode);
    static int (*original_open64) (const char *pathname, int flags, mode_t mode);
    static ssize_t (*original_read) (int fd, void *buf, size_t size);
    static ssize_t (*original_read_chk) (int fd, void* buf, size_t count, size_t buf_size);
    static ssize_t (*original_write) (int fd, const void *buf, size_t size);
    static ssize_t (*original_write_chk) (int fd, const void* buf, size_t count, size_t buf_size);
    static int (*original_close) (int fd);

    const static char* TARGET_MODULES[] = {
        ".*/libopenjdkjvm.so$",
        ".*/libjavacore.so$",
        ".*/libopenjdk.so$"
    };
    const static size_t TARGET_MODULE_COUNT = sizeof(TARGET_MODULES) / sizeof(char*);

    extern "C" {

        /**
         *  Proxy for open: callback to the java layer
         */
        //todo astrozhou 解决非主线程打开,主线程操作问题
        int ProxyOpen(const char *pathname, int flags, mode_t mode) {
            int ret = original_open(pathname, flags, mode);
            __android_log_print(ANDROID_LOG_INFO, kTag, "ProxyOpen pathName:%s fd:%d", pathname, ret);
            return ret;
        }

        int ProxyOpen64(const char *pathname, int flags, mode_t mode) {
            int ret = original_open64(pathname, flags, mode);
            __android_log_print(ANDROID_LOG_INFO, kTag, "ProxyOpen64 pathName:%s fd:%d", pathname, ret);
            return ret;
        }

        /**
         *  Proxy for read: callback to the java layer
         */
        ssize_t ProxyRead(int fd, void *buf, size_t size) {
            size_t ret = original_read(fd, buf, size);
            __android_log_print(ANDROID_LOG_INFO, kTag, "ProxyRead fd:%d ret:%d", fd, ret);
            return ret;
        }

        ssize_t ProxyReadChk(int fd, void* buf, size_t count, size_t buf_size) {
            ssize_t ret = original_read_chk(fd, buf, count, buf_size);
            __android_log_print(ANDROID_LOG_INFO, kTag, "ProxyReadChk fd:%d ret:%d", fd, ret);
            return ret;
        }

        /**
         *  Proxy for write: callback to the java layer
         */
        ssize_t ProxyWrite(int fd, const void *buf, size_t size) {
            size_t ret = original_write(fd, buf, size);
            __android_log_print(ANDROID_LOG_INFO, kTag, "ProxyWrite fd:%d ret:%d", fd, ret);
            return ret;
        }

        ssize_t ProxyWriteChk(int fd, const void* buf, size_t count, size_t buf_size) {
            ssize_t ret = original_write_chk(fd, buf, count, buf_size);
            __android_log_print(ANDROID_LOG_INFO, kTag, "ProxyWriteChk fd:%d ret:%d", fd, ret);
            return ret;
        }

        /**
         *  Proxy for close: callback to the java layer
         */
        int ProxyClose(int fd) {
            int ret = original_close(fd);
            __android_log_print(ANDROID_LOG_INFO, kTag, "ProxyClose fd:%d", fd);
            return ret;
        }

        JNIEXPORT jboolean JNICALL
        Java_sample_tencent_matrix_io_NativeHooker_doHook(JNIEnv *env, jclass type) {
            __android_log_print(ANDROID_LOG_INFO, kTag, "doHook");

            for (int i = 0; i < TARGET_MODULE_COUNT; ++i) {
                const char* so_name = TARGET_MODULES[i];
                __android_log_print(ANDROID_LOG_INFO, kTag, "try to hook function in %s.", so_name);

                xhook_enable_debug(1);
                xhook_register(so_name, "open", (void*)ProxyOpen, (void**)&original_open);
                xhook_register(so_name, "open64", (void*)ProxyOpen64, (void**)&original_open64);

                bool is_libjavacore = (strstr(so_name, ".*/libjavacore.so$") != nullptr);
                if (is_libjavacore) {
                    if (xhook_register(so_name, "read", (void*)ProxyRead, (void**)&original_read) != 0) {
                        __android_log_print(ANDROID_LOG_WARN, kTag, "doHook hook read failed, try __read_chk");
                        if (xhook_register(so_name, "__read_chk", (void*)ProxyReadChk, (void**)&original_read_chk) != 0) {
                            __android_log_print(ANDROID_LOG_WARN, kTag, "doHook hook failed: __read_chk");
                            return JNI_FALSE;
                        }
                    }

                    if (xhook_register(so_name, "write", (void*)ProxyWrite, (void**)&original_write) != 0) {
                        __android_log_print(ANDROID_LOG_WARN, kTag, "doHook hook write failed, try __write_chk");
                        if (xhook_register(so_name, "__write_chk", (void*)ProxyWriteChk, (void**)&original_write_chk) != 0) {
                            __android_log_print(ANDROID_LOG_WARN, kTag, "doHook hook failed: __write_chk");
                            return JNI_FALSE;
                        }
                    }
                }

                xhook_register(so_name, "close", (void*)ProxyClose, (void**)&original_close);
            }

            xhook_refresh(0);

            __android_log_print(ANDROID_LOG_INFO, kTag, "doHook done.");
            return JNI_TRUE;
        }
    }
}