Glide v4 源码解析(六)
Tip
本系列文章参考3.7.0版本的guolin - Glide最全解析,并按此思路结合4.9.0版本源码以及使用文档进行更新。
➟ Glide v4.9.0
➟ 中文文档
➟ 英文文档🚀🚀
Glide系列文章目录
- Glide1——Glide v4 的基本使用
- Glide2——从源码的角度理解Glide三步的执行流程
- Glide3——深入探究Glide缓存机制
- Glide4——RequestBuilder中高级点的API以及Target
- Glide5——Glide内置的transform以及自定义BitmapTransformation
- Glide6——Glide利用AppGlideModule、LibraryGlideModule更改默认配置、扩展Glide功能;GlideApp与Glide的区别在哪?
- Glide7——利用OkHttp、自定义Drawable、自定义ViewTarget实现带进度的图片加载功能
- 杂记:从Picasso迁移至Glide
本章的主角是AppGlideModule,全文围绕它的两个方法:
- 负责改变Glide默认配置(比如磁盘、内存缓存的大小和位置等)的
applyOptions方法 - 以及负责扩展Glide功能的
registerComponents方法
相关文档来自Generated API和Configuration。
1. 准备工作
在正式开始之前我们需要确保已经开启了这个功能,如果我们已经kapt了glide的complier,那么可以继承AppGlideModule抽象类并给该类打上@GlideModule注解:
@GlideModule
class MyAppGlideModule : AppGlideModule() {
    override fun applyOptions(context: Context, builder: GlideBuilder) {}

    override fun isManifestParsingEnabled() = super.isManifestParsingEnabled()

    override fun registerComponents(context: Context, glide: Glide, registry: Registry) {}
}
这样在我们rebuild代码后,会生成一个GeneratedAppGlideModuleImpl类,然后Glide初始化的时候会反射实例化该类,并调用该类的isManifestParsingEnabled、applyOptions、registerComponents方法。
上面的代码中,这三个方法都有默认实现,所以这里的MyAppGlideModule也可以这样:
annotation processor的入口代码为GlideAnnotationProcessor.java,不过这部分代码不是重点,我们只需要看processor生成的代码就够了。
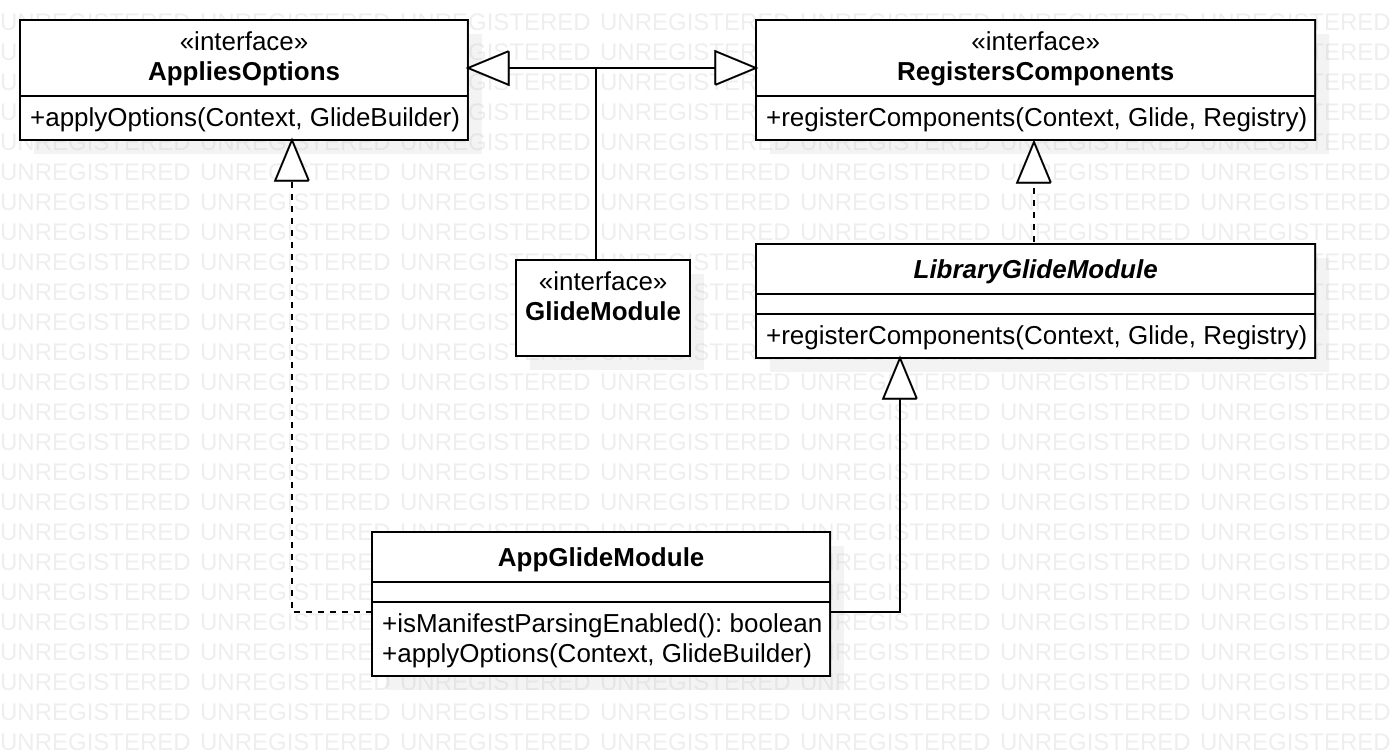
AppGlideModule的两个重要方法其实是AppliesOptions、RegistersComponents两个接口提供的,但是AppGlideModule离RegistersComponents隔了一个抽象类LibraryGlideModule。
这两个货的差别在哪?LibraryGlideModule只实现了RegistersComponents接口,是专门为库准备的。而AppGlideModule显然就是为App准备的。
Libraries must not include
AppGlideModuleimplementations. Doing so will prevent any applications that depend on the library from managing their dependencies or configuring options like Glide’s cache sizes and locations.
In addition, if two libraries includeAppGlideModules, applications will be unable to compile if they depend on both and will be forced to pick one or other other.
This does mean that libraries won’t be able to use Glide’s generated API, but loads with the standardRequestBuilderandRequestOptionswill still work just fine (see the options page for examples).
Avoid AppGlideModule in libraries
显然,Glide这么设计的原因,就是担心使用了Glide的library使宿主app的配置不生效。且如果存在两个这样的library,可能编译失败,然后将被强制选择一个。
AppGlideModule的相关UML图如下:

相当清晰,相当了然。等等,这里突然冒出了一个GlideModule。这是Glide v3的AppGlideModule,又或者说AppGlideModule是Glide v3 GlideModule的改良。注意,在UML图中可以看出GlideModule与AppGlideModule、LibraryGlideModule之间没有直接关系。
在Glide v3中,需要在AndroidManifest.xml文件中通过meta-data进行配置:
<application
...>
<meta-data
android:name="yorek.demoandtest.glide.MyGlideModule"
android:value="GlideModule" />
<activity ... />
</application>
yorek.demoandtest.glide.MyGlideModule代码如下:
class MyGlideModule : GlideModule {
override fun applyOptions(context: Context, builder: GlideBuilder) {}
override fun registerComponents(context: Context, glide: Glide, registry: Registry) {}
}
由于现在已经是Glide v4的时代了,所以GlideModule已经被标记为@Deprecated,顺便接口RegistersComponents、AppliesOptions也被标记为@Deprecated了。且AppGlideModule中的isManifestParsingEnabled方法就是控制Glide是否需要从AndroidManifest中解析GlideModule。
2. Glide初始化流程解析
在经过第1小节之后,我们已经初步了解了GlideModule。现在我们看看Glide到底以怎样的顺序来应用这些GlideModule的。
相关源码其实在Glide2——从源码的角度理解Glide三步的执行流程中提到过。调用Glide.with方法就会完成Glide单例的创建,代码在initializeGlide方法中。该方法的作用就是获取各种GlideModule,并调用对应的方法。
@SuppressWarnings("deprecation")
private static void initializeGlide(@NonNull Context context, @NonNull GlideBuilder builder) {
Context applicationContext = context.getApplicationContext();
// 如果有配置@GlideModule注解,那么会反射构造kapt生成的GeneratedAppGlideModuleImpl类
GeneratedAppGlideModule annotationGeneratedModule = getAnnotationGeneratedGlideModules();
// 如果Impl存在,且允许解析manifest文件
// 则遍历manifest中的meta-data,解析出所有的GlideModule类
List<com.bumptech.glide.module.GlideModule> manifestModules = Collections.emptyList();
if (annotationGeneratedModule == null || annotationGeneratedModule.isManifestParsingEnabled()) {
manifestModules = new ManifestParser(applicationContext).parse();
}
// 根据Impl的黑名单,剔除manifest中的GlideModule类
if (annotationGeneratedModule != null
&& !annotationGeneratedModule.getExcludedModuleClasses().isEmpty()) {
Set<Class<?>> excludedModuleClasses =
annotationGeneratedModule.getExcludedModuleClasses();
Iterator<com.bumptech.glide.module.GlideModule> iterator = manifestModules.iterator();
while (iterator.hasNext()) {
com.bumptech.glide.module.GlideModule current = iterator.next();
if (!excludedModuleClasses.contains(current.getClass())) {
continue;
}
if (Log.isLoggable(TAG, Log.DEBUG)) {
Log.d(TAG, "AppGlideModule excludes manifest GlideModule: " + current);
}
iterator.remove();
}
}
if (Log.isLoggable(TAG, Log.DEBUG)) {
for (com.bumptech.glide.module.GlideModule glideModule : manifestModules) {
Log.d(TAG, "Discovered GlideModule from manifest: " + glideModule.getClass());
}
}
// 如果Impl存在,那么设置为该类的RequestManagerFactory; 否则,设置为null
// Impl的getRequestManagerFactory()方法默认会返回kapt生成的GeneratedRequestManagerFactory对象
// 此对象的build方法就是直接new一个GlideRequests
RequestManagerRetriever.RequestManagerFactory factory =
annotationGeneratedModule != null
? annotationGeneratedModule.getRequestManagerFactory() : null;
builder.setRequestManagerFactory(factory);
// 依次调用manifest中GlideModule类的applyOptions方法,将配置写到builder里
for (com.bumptech.glide.module.GlideModule module : manifestModules) {
module.applyOptions(applicationContext, builder);
}
// 写入Impl的配置
// 也就是说Impl配置的优先级更高,如果有冲突的话
if (annotationGeneratedModule != null) {
annotationGeneratedModule.applyOptions(applicationContext, builder);
}
// 调用GlideBuilder.build方法创建Glide
Glide glide = builder.build(applicationContext);
// 依次调用manifest中GlideModule类的registerComponents方法,来替换Glide的默认配置
for (com.bumptech.glide.module.GlideModule module : manifestModules) {
module.registerComponents(applicationContext, glide, glide.registry);
}
// 调用Impl中替换Glide配置的方法
if (annotationGeneratedModule != null) {
annotationGeneratedModule.registerComponents(applicationContext, glide, glide.registry);
}
// 注册内存管理的回调,因为Glide实现了ComponentCallbacks2接口
applicationContext.registerComponentCallbacks(glide);
// 保存glide实例到静态变量中
Glide.glide = glide;
}
在上面的initializeGlide方法没有什么难度,注意一下@GlideModule注解修饰的类的优先级高于meta-data的配置的类。
下面贴一下反射构造GeneratedAppGlideModuleImpl对象的getAnnotationGeneratedGlideModules()方法和从AndroidManifest中解析meta-data的ManifestParser对象:
@Nullable
@SuppressWarnings({"unchecked", "deprecation", "TryWithIdenticalCatches"})
private static GeneratedAppGlideModule getAnnotationGeneratedGlideModules() {
GeneratedAppGlideModule result = null;
try {
Class<GeneratedAppGlideModule> clazz =
(Class<GeneratedAppGlideModule>)
Class.forName("com.bumptech.glide.GeneratedAppGlideModuleImpl");
result = clazz.getDeclaredConstructor().newInstance();
} catch (ClassNotFoundException e) {
if (Log.isLoggable(TAG, Log.WARN)) {
Log.w(TAG, "Failed to find GeneratedAppGlideModule. You should include an"
+ " annotationProcessor compile dependency on com.github.bumptech.glide:compiler"
+ " in your application and a @GlideModule annotated AppGlideModule implementation or"
+ " LibraryGlideModules will be silently ignored");
}
// These exceptions can't be squashed across all versions of Android.
} catch (InstantiationException e) {
throwIncorrectGlideModule(e);
} catch (IllegalAccessException e) {
throwIncorrectGlideModule(e);
} catch (NoSuchMethodException e) {
throwIncorrectGlideModule(e);
} catch (InvocationTargetException e) {
throwIncorrectGlideModule(e);
}
return result;
}
private static void throwIncorrectGlideModule(Exception e) {
throw new IllegalStateException("GeneratedAppGlideModuleImpl is implemented incorrectly."
+ " If you've manually implemented this class, remove your implementation. The Annotation"
+ " processor will generate a correct implementation.", e);
}
@Deprecated
public final class ManifestParser {
private static final String TAG = "ManifestParser";
private static final String GLIDE_MODULE_VALUE = "GlideModule";
private final Context context;
public ManifestParser(Context context) {
this.context = context;
}
@SuppressWarnings("deprecation")
public List<GlideModule> parse() {
if (Log.isLoggable(TAG, Log.DEBUG)) {
Log.d(TAG, "Loading Glide modules");
}
List<GlideModule> modules = new ArrayList<>();
try {
ApplicationInfo appInfo = context.getPackageManager()
.getApplicationInfo(context.getPackageName(), PackageManager.GET_META_DATA);
if (appInfo.metaData == null) {
if (Log.isLoggable(TAG, Log.DEBUG)) {
Log.d(TAG, "Got null app info metadata");
}
return modules;
}
if (Log.isLoggable(TAG, Log.VERBOSE)) {
Log.v(TAG, "Got app info metadata: " + appInfo.metaData);
}
for (String key : appInfo.metaData.keySet()) {
if (GLIDE_MODULE_VALUE.equals(appInfo.metaData.get(key))) {
modules.add(parseModule(key));
if (Log.isLoggable(TAG, Log.DEBUG)) {
Log.d(TAG, "Loaded Glide module: " + key);
}
}
}
} catch (PackageManager.NameNotFoundException e) {
throw new RuntimeException("Unable to find metadata to parse GlideModules", e);
}
if (Log.isLoggable(TAG, Log.DEBUG)) {
Log.d(TAG, "Finished loading Glide modules");
}
return modules;
}
@SuppressWarnings("deprecation")
private static GlideModule parseModule(String className) {
Class<?> clazz;
try {
clazz = Class.forName(className);
} catch (ClassNotFoundException e) {
throw new IllegalArgumentException("Unable to find GlideModule implementation", e);
}
Object module = null;
try {
module = clazz.getDeclaredConstructor().newInstance();
// These can't be combined until API minimum is 19.
} catch (InstantiationException e) {
throwInstantiateGlideModuleException(clazz, e);
} catch (IllegalAccessException e) {
throwInstantiateGlideModuleException(clazz, e);
} catch (NoSuchMethodException e) {
throwInstantiateGlideModuleException(clazz, e);
} catch (InvocationTargetException e) {
throwInstantiateGlideModuleException(clazz, e);
}
if (!(module instanceof GlideModule)) {
throw new RuntimeException("Expected instanceof GlideModule, but found: " + module);
}
return (GlideModule) module;
}
private static void throwInstantiateGlideModuleException(Class<?> clazz, Exception e) {
throw new RuntimeException("Unable to instantiate GlideModule implementation for " + clazz, e);
}
}
上面两段代码都很简单,不做过多赘述。
Glide的创建发生在applyOptions之后,registerComponents之后。也好理解,因为applyOptions是更改配置,肯定是初始化时就要确定的;而registerComponents针对的运行时的功能扩展,而且需要调用Glide对象的方法,所以在Glide创建之后调用。
在initializeGlide方法的第54行中调用了builder.build(applicationContext)方法创建了Glide对象。我们看看GlideBuilder.build方法:
@NonNull
Glide build(@NonNull Context context) {
if (sourceExecutor == null) {
sourceExecutor = GlideExecutor.newSourceExecutor();
}
if (diskCacheExecutor == null) {
diskCacheExecutor = GlideExecutor.newDiskCacheExecutor();
}
if (animationExecutor == null) {
animationExecutor = GlideExecutor.newAnimationExecutor();
}
if (memorySizeCalculator == null) {
memorySizeCalculator = new MemorySizeCalculator.Builder(context).build();
}
if (connectivityMonitorFactory == null) {
connectivityMonitorFactory = new DefaultConnectivityMonitorFactory();
}
if (bitmapPool == null) {
int size = memorySizeCalculator.getBitmapPoolSize();
if (size > 0) {
bitmapPool = new LruBitmapPool(size);
} else {
bitmapPool = new BitmapPoolAdapter();
}
}
if (arrayPool == null) {
arrayPool = new LruArrayPool(memorySizeCalculator.getArrayPoolSizeInBytes());
}
if (memoryCache == null) {
memoryCache = new LruResourceCache(memorySizeCalculator.getMemoryCacheSize());
}
if (diskCacheFactory == null) {
diskCacheFactory = new InternalCacheDiskCacheFactory(context);
}
if (engine == null) {
engine =
new Engine(
memoryCache,
diskCacheFactory,
diskCacheExecutor,
sourceExecutor,
GlideExecutor.newUnlimitedSourceExecutor(),
GlideExecutor.newAnimationExecutor(),
isActiveResourceRetentionAllowed);
}
if (defaultRequestListeners == null) {
defaultRequestListeners = Collections.emptyList();
} else {
defaultRequestListeners = Collections.unmodifiableList(defaultRequestListeners);
}
RequestManagerRetriever requestManagerRetriever =
new RequestManagerRetriever(requestManagerFactory);
return new Glide(
context,
engine,
memoryCache,
bitmapPool,
arrayPool,
requestManagerRetriever,
connectivityMonitorFactory,
logLevel,
defaultRequestOptions.lock(),
defaultTransitionOptions,
defaultRequestListeners,
isLoggingRequestOriginsEnabled);
}
可以看到,build方法基本对每一个参数都进行了null判断,如果为null则使用默认的参数。那么,这些参数什么时候不为空呢?当在AppliesOptions接口的实现(也就是各种GlideModule)中通过传入参数GlideBuilder来设置后,这里build时就不会为null了。
比如,我们可以在MyAppGlideModule中调用GlideBuilder.setDiskCache来使diskCacheFactory为我们指定的值,下面的代码可以将Glide磁盘缓存位置换到externalCacheDir中。
@GlideModule
class MyAppGlideModule : AppGlideModule() {
override fun applyOptions(context: Context, builder: GlideBuilder) {
builder.setDiskCache(ExternalPreferredCacheDiskCacheFactory(context))
}
}
Glide v4中默认的图片格式是ARGB_8888,可以通过BaseRequestOptions.format方法来指定为RGB_565或ARGB_8888格式——DecodeFormat。
3. 探索kapt生成文件
为了更好的看到Glide中annotation processor的作用,我们先AppGlideModule、LibraryGlideModule以及GlideModule各来一个:
@GlideModule
@Excludes(value = [MyGlideModule::class])
class MyAppGlideModule : AppGlideModule()
@GlideModule
class MyLibraryGlideModule : LibraryGlideModule()
class MyGlideModule : GlideModule {
   override fun applyOptions(context: Context, builder: GlideBuilder) {}
   override fun registerComponents(context: Context, glide: Glide, registry: Registry) {}
}
在AndroidManifest文件中配置好MyGlideModule之后,我们先rebuild一下,看一下生成的GeneratedAppGlideModuleImpl文件:
@SuppressWarnings("deprecation")
final class GeneratedAppGlideModuleImpl extends GeneratedAppGlideModule {
  private final MyAppGlideModule appGlideModule;

  GeneratedAppGlideModuleImpl() {
    appGlideModule = new MyAppGlideModule();
    if (Log.isLoggable("Glide", Log.DEBUG)) {
      Log.d("Glide", "Discovered AppGlideModule from annotation: yorek.demoandtest.glide.MyAppGlideModule");
      Log.d("Glide", "Discovered LibraryGlideModule from annotation: yorek.demoandtest.glide.MyLibraryGlideModule");
    }
  }

  @Override
  public void applyOptions(@NonNull Context context, @NonNull GlideBuilder builder) {
    appGlideModule.applyOptions(context, builder);
  }

  @Override
  public void registerComponents(@NonNull Context context, @NonNull Glide glide,
      @NonNull Registry registry) {
    new MyLibraryGlideModule().registerComponents(context, glide, registry);
    appGlideModule.registerComponents(context, glide, registry);
  }

  @Override
  public boolean isManifestParsingEnabled() {
    return appGlideModule.isManifestParsingEnabled();
  }

  @Override
  @NonNull
  public Set<Class<?>> getExcludedModuleClasses() {
    return Collections.emptySet();
  }

  @Override
  @NonNull
  GeneratedRequestManagerFactory getRequestManagerFactory() {
    return new GeneratedRequestManagerFactory();
  }
}
代码很简单,属于AppGlideModule的三个方法基本都是调用的MyAppGlideModule的三个方法。在此基础上,每个LibraryGlideModule的registerComponents方法都会在GeneratedAppGlideModuleImpl.registerComponents方法中被调用。
另外,我们关注一下最后两个方法,这两个方法都是基类GeneratedAppGlideModule额外提供了的,代码如下所示:
abstract class GeneratedAppGlideModule extends AppGlideModule {
  /**
   * This method can be removed when manifest parsing is no longer supported.
   */
  @NonNull
  abstract Set<Class<?>> getExcludedModuleClasses();

  @Nullable
  RequestManagerRetriever.RequestManagerFactory getRequestManagerFactory() {
    return null;
  }
}
getRequestManagerFactory在子类的实现是固定的,就是return new GeneratedRequestManagerFactory();。annotation compiler的代码在AppModuleGenerator.java#L154:
ClassName generatedRequestManagerFactoryClassName =
    ClassName.get(
        RequestManagerFactoryGenerator.GENERATED_REQUEST_MANAGER_FACTORY_PACKAGE_NAME,
        RequestManagerFactoryGenerator.GENERATED_REQUEST_MANAGER_FACTORY_SIMPLE_NAME);

builder.addMethod(
    MethodSpec.methodBuilder("getRequestManagerFactory")
        .addAnnotation(Override.class)
        .addAnnotation(nonNull())
        .returns(generatedRequestManagerFactoryClassName)
        .addStatement("return new $T()", generatedRequestManagerFactoryClassName)
        .build());
3.1 @Excludes
GeneratedAppGlideModuleImpl.getExcludedModuleClasses()的实现,与@Excludes注解有关,使用该注解可以让Glide忽略指定的GlideModule或LibraryGlideModule。@Excludes注解只能用在AppGlideModules上,下面的例子将会让Glide忽略掉MyLibraryGlideModule、MyGlideModule的配置:
@GlideModule
@Excludes(value = [MyLibraryGlideModule::class, MyGlideModule::class])
class MyAppGlideModule : AppGlideModule()
此时rebuild之后,生成的GeneratedAppGlideModuleImpl文件的相关方法如下:
@Override
public void registerComponents(@NonNull Context context, @NonNull Glide glide,
    @NonNull Registry registry) {
    // 注意,没有new MyLibraryGlideModule().registerComponents(context, glide, registry);了
    appGlideModule.registerComponents(context, glide, registry);
}

@Override
@NonNull
public Set<Class<?>> getExcludedModuleClasses() {
    Set<Class<?>> excludedClasses = new HashSet<Class<?>>();
    excludedClasses.add(yorek.demoandtest.glide.MyGlideModule.class);
    excludedClasses.add(yorek.demoandtest.glide.MyLibraryGlideModule.class);
    return excludedClasses;
}
然后在Glide初始化的时候,在方法返回结果set里面的GlideModule将会从集合中移除。
3.2 @GlideExtension
@GlideExtension注解修饰的类可以扩展Glide的API。该类必须是工具类的形式,里面的方法必须都是静态的,除了私有的空实现的构造器。
Application可以实现多个@GlideExtension注解类,Library也可以实现任意数量的@GlideExtension注解类。Glide在编译时,一旦发现一个AppGlideModule,所有可用的GlideExtension都会合并,并生成单个的API文件。任何冲突都会导致Glide注解生成器的编译错误。
GlideExtension注解类可以定义两种扩展方法:
@GlideOption——为RequestOptions添加自定义的配置,扩展RequestOptions的静态方法。常见作用有:- 定义在整个应用程序中经常使用的一组选项
-
添加新选项,通常与Glide的com.bumptech.glide.load.Option一起使用。
-
@GlideType——为新资源类型(GIFs、SVG等)添加支持,扩展RequestManager的静态方法
下面的来自于官方文档GlideExtension的示例:
@GlideExtension
object MyAppExtension {
    // Size of mini thumb in pixels.
    private const val MINI_THUMB_SIZE = 100

    private val DECODE_TYPE_GIF = RequestOptions.decodeTypeOf(GifDrawable::class.java).lock()

    @GlideOption
    @JvmStatic
    fun miniThumb(options: BaseRequestOptions<*>): BaseRequestOptions<*> {
        return options
            .fitCenter()
            .override(MINI_THUMB_SIZE)
    }

    @GlideType(GifDrawable::class)
    @JvmStatic
    fun asGifTest(requestBuilder: RequestBuilder<GifDrawable>): RequestBuilder<GifDrawable> {
        return requestBuilder
            .transition(DrawableTransitionOptions())
            .apply(DECODE_TYPE_GIF)
    }
}
这里为RequestOptions扩展了miniThumb方法,为RequestManager扩展了asGifTest方法。所以我们可以这样使用:
注意这里使用的不再是Glide,而是GlideApp。GlideApp是专门用来处理这种扩展API的。
在Glide初始化的时候,会将GeneratedAppGlideModuleImpl.getRequestManagerFactory()方法返回的GeneratedRequestManagerFactory作为requestManagerFactory参数,这样创建RequestManager时都会调用GeneratedRequestManagerFactory.build方法生成GlideRequests。
GlideRequests继承至RequestManager,里面包含了@GlideType注解修饰的API:
GlideRequests.java
public class GlideRequests extends RequestManager {
  public GlideRequests(@NonNull Glide glide, @NonNull Lifecycle lifecycle,
                       @NonNull RequestManagerTreeNode treeNode, @NonNull Context context) {
    super(glide, lifecycle, treeNode, context);
  }
  ...
  /**
   * @see MyAppExtension#asGifTest(RequestBuilder)
   */
  @NonNull
  @CheckResult
  public GlideRequest<GifDrawable> asGifTest() {
    return (GlideRequest<GifDrawable>) MyAppExtension.asGifTest(this.as(GifDrawable.class));
  }
  ...
}
GlideRequest则继承至RequestBuilder,包含了@GlideOption提供的API:
GlideRequest.java
public class GlideRequest<TranscodeType> extends RequestBuilder<TranscodeType> implements Cloneable {
  /**
   * @see MyAppExtension#miniThumb(BaseRequestOptions)
   */
  @SuppressWarnings("unchecked")
  @CheckResult
  @NonNull
  public GlideRequest<TranscodeType> miniThumb() {
    return (GlideRequest<TranscodeType>) MyAppExtension.miniThumb(this);
  }
}
此外,如果需要使用到RequestOptions,要使用Generated API生成的GlideOptions。
总的来说,如果想使用Generated API,注意一下三个类的关系
RequestManager->GlideRequestsRequestBuilder->GlideRequestRequestOptions->GlideOptions
OK,理论知识到这为止,下面的两节为AppGlideModule的两个方法的应用。
4. 使用applyOptions更改默认配置
使用applyOptions更改默认配置主要通过GlideBuilder的一些set方法实现的,这里我们演示一个易验证的配置——diskCacheFactory:
@GlideModule
@Excludes(value = [MyLibraryGlideModule::class, MyGlideModule::class])
class MyAppGlideModule : AppGlideModule() {
    override fun applyOptions(context: Context, builder: GlideBuilder) {
        builder.setDiskCache(ExternalPreferredCacheDiskCacheFactory(context))
    }
}
ExternalPreferredCacheDiskCacheFactory是ExternalCacheDiskCacheFactory的替代类。 ExternalCacheDiskCacheFactory的存储路径为${getExternalCacheDir()}/image_manager_disk_cache。而ExternalPreferredCacheDiskCacheFactory的改进在于,如果外置存储不可用,会fallback到内置存储。
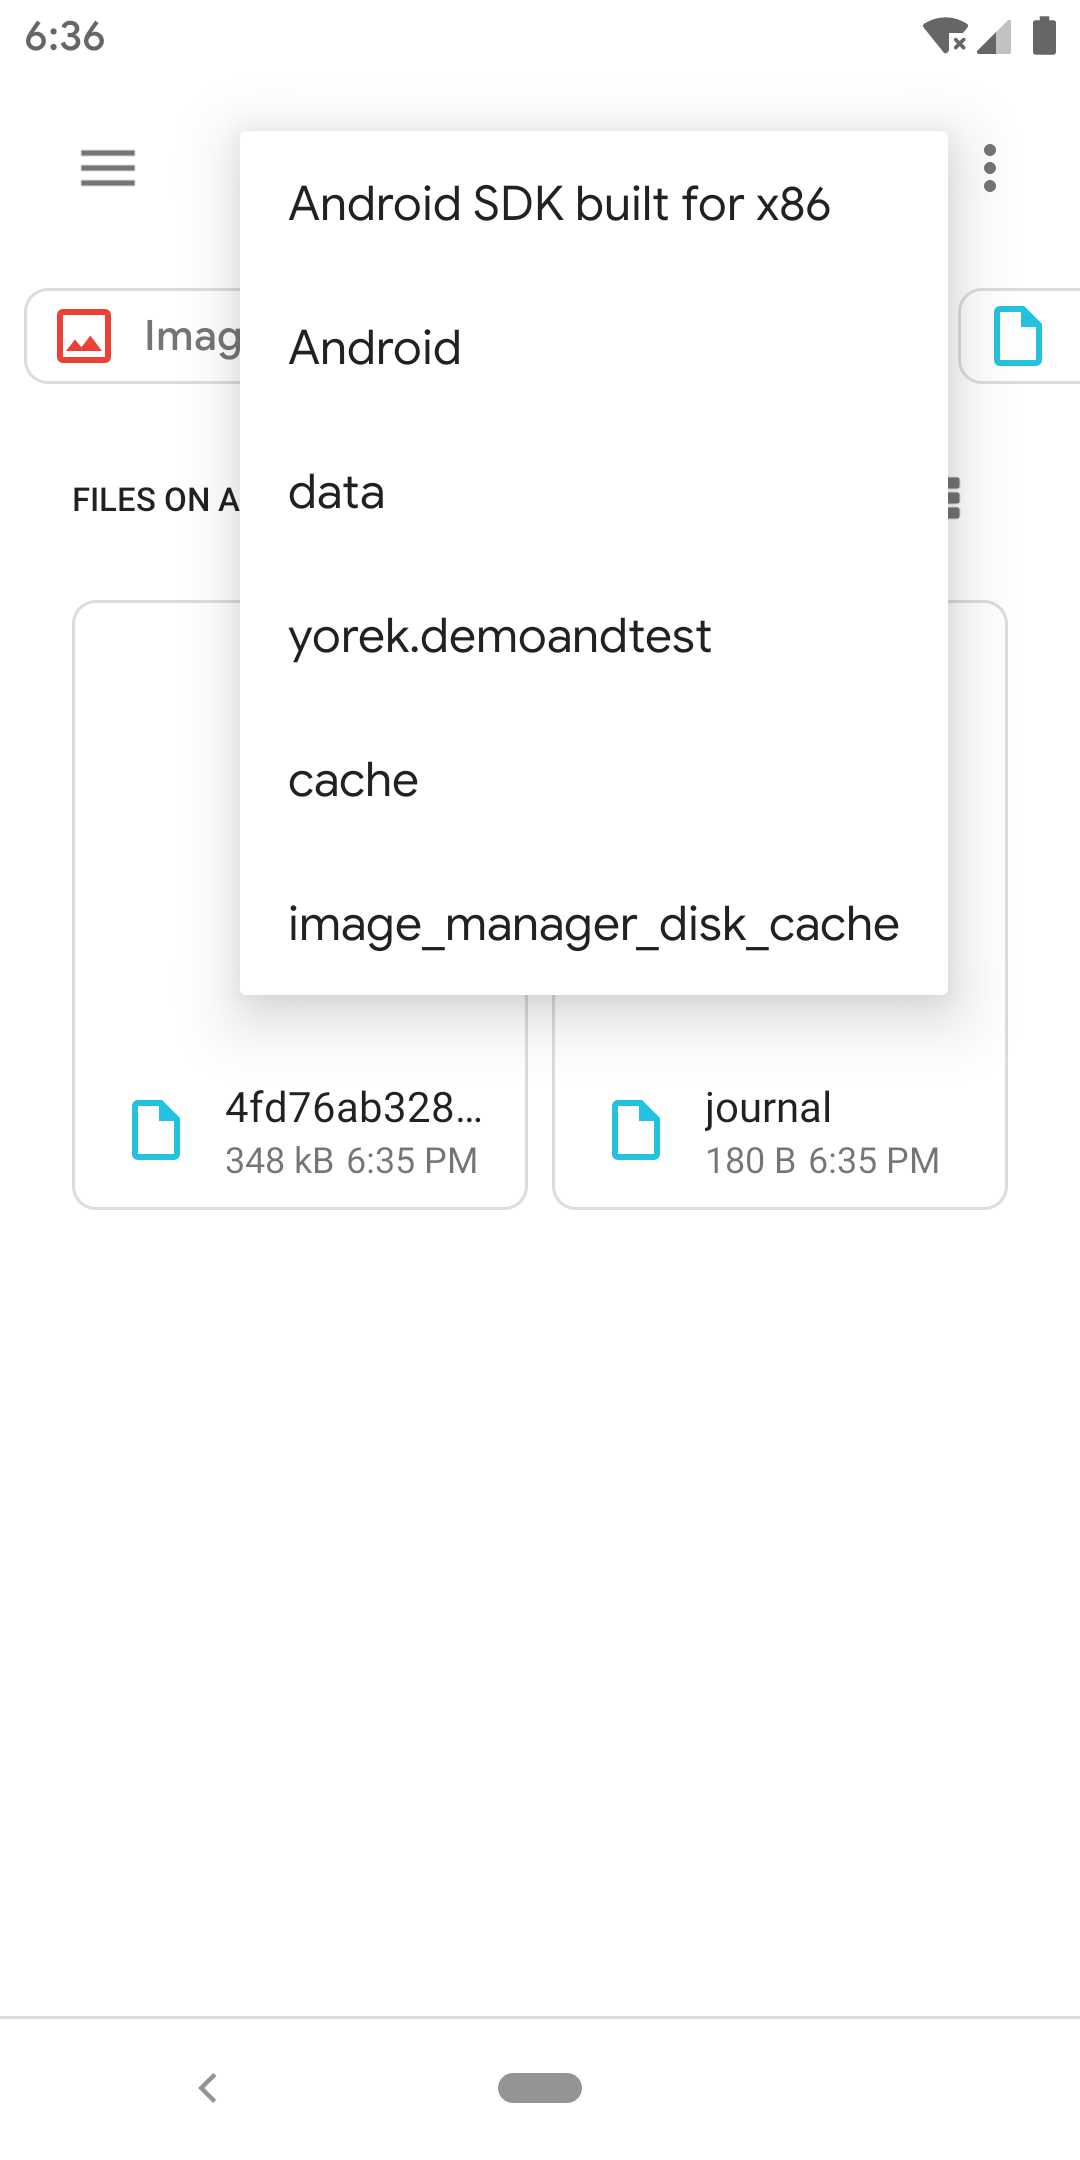
我们卸载app后重新运行,并加载图片,然后可以在${getExternalCacheDir()}/image_manager_disk_cache目录下找到缓存的图片了。

5. 使用registerComponents扩展Glide功能
registerComponents能让我们扩展Glide的功能,这个功能比较高级,而且难度也比较大。正确的实现此方法,需要我们了解一下Glide内部各种Registry。
Both Applications and Libraries can register a number of components that extend Glides functionality. Available components include:
1.ModelLoaders to load custom Models (Urls, Uris, arbitrary POJOs) and Data (InputStreams, FileDescriptors). 2.ResourceDecoders to decode new Resources (Drawables, Bitmaps) or new types of Data (InputStreams, FileDescriptors). 3.Encoders to write Data (InputStreams, FileDescriptors) to Glide’s disk cache. 4.ResourceTranscoders to convert Resources (BitmapResource) into other types of Resources (DrawableResource). 5.ResourceEncoders to write Resources (BitmapResource, DrawableResource) to Glide’s disk cache.Components are registered using the
Registryclass in theregisterComponents()method ofAppGlideModulesandLibraryGlideModules。
Registering Components
我们在前文的分析中知道了,Glide加载网络图片默认使用的是HttpUrlConnection,我们想把这个位置的实现替换成OkHttp3或者Volley实现可以吗?显然是可以的,而且官方也提供了这个功能:
用起来很简单,只需要集成一个library即可,非常符合Glide的风格。build.gradle的配置如下:
sync之后,我们看看OkHttp3的library是怎么实现的吧。
根据我们的经验,首先肯定找里面的@GlideModule修饰的类,而且应该是一个LibraryGlideModule类,library里面文件只有几个,我们一找就找到了OkHttpLibraryGlideModule类:
OkHttpLibraryGlideModule.java
@GlideModule
public final class OkHttpLibraryGlideModule extends LibraryGlideModule {
  @Override
  public void registerComponents(@NonNull Context context, @NonNull Glide glide,
      @NonNull Registry registry) {
    registry.replace(GlideUrl.class, InputStream.class, new OkHttpUrlLoader.Factory());
  }
}
BTW,里面还有一个实现了com.bumptech.glide.module.GlideModule接口的废弃类OkHttpGlideModule:
@Deprecated
public class OkHttpGlideModule implements com.bumptech.glide.module.GlideModule {
  @Override
  public void applyOptions(@NonNull Context context, @NonNull GlideBuilder builder) {
    // Do nothing.
  }

  @Override
  public void registerComponents(Context context, Glide glide, Registry registry) {
    registry.replace(GlideUrl.class, InputStream.class, new OkHttpUrlLoader.Factory());
  }
}
这个类我们不需要关心,因为使用了上面的OkHttpLibraryGlideModule,而且我们也无需在AndroidManifest.xml中配置,自然也用不到这个类。
回到OkHttpLibraryGlideModule类中,我们看到registerComponents方法的实现:
对于此项,Glide的默认配置为:
所以我们可以理解为,原本交给HttpGlideUrlLoader.Factory()处理的任务会交给OkHttpUrlLoader.Factory()处理。
OkHttpUrlLoader.Factory的无参构造器会使用DCL单例模式创建一个OkHttpClient()对象,其build方法会返回一个new OkHttpUrlLoader(client):
public static class Factory implements ModelLoaderFactory<GlideUrl, InputStream> {
    private static volatile Call.Factory internalClient;
    private final Call.Factory client;

    private static Call.Factory getInternalClient() {
        if (internalClient == null) {
        synchronized (Factory.class) {
            if (internalClient == null) {
            internalClient = new OkHttpClient();
            }
        }
        }
        return internalClient;
    }

    /**
      * Constructor for a new Factory that runs requests using a static singleton client.
      */
    public Factory() {
        this(getInternalClient());
    }

    /**
      * Constructor for a new Factory that runs requests using given client.
      *
      * @param client this is typically an instance of {@code OkHttpClient}.
      */
    public Factory(@NonNull Call.Factory client) {
        this.client = client;
    }

    @NonNull
    @Override
    public ModelLoader<GlideUrl, InputStream> build(MultiModelLoaderFactory multiFactory) {
        return new OkHttpUrlLoader(client);
    }

    @Override
    public void teardown() {
        // Do nothing, this instance doesn't own the client.
    }
}
OkHttpUrlLoader.buildLoadData方法会返回一个fetcher为OkHttpStreamFetcher的LoadData。当需要进行加载的时候,会调用fetcher的loadData方法:
OkHttpStreamFetcher.java
@Override
public void loadData(@NonNull Priority priority,
    @NonNull final DataCallback<? super InputStream> callback) {
    Request.Builder requestBuilder = new Request.Builder().url(url.toStringUrl());
    for (Map.Entry<String, String> headerEntry : url.getHeaders().entrySet()) {
        String key = headerEntry.getKey();
        requestBuilder.addHeader(key, headerEntry.getValue());
    }
    Request request = requestBuilder.build();
    this.callback = callback;

    call = client.newCall(request);
    call.enqueue(this);
}

@Override
public void onFailure(@NonNull Call call, @NonNull IOException e) {
    if (Log.isLoggable(TAG, Log.DEBUG)) {
        Log.d(TAG, "OkHttp failed to obtain result", e);
    }

    callback.onLoadFailed(e);
}

@Override
public void onResponse(@NonNull Call call, @NonNull Response response) {
    responseBody = response.body();
    if (response.isSuccessful()) {
        long contentLength = Preconditions.checkNotNull(responseBody).contentLength();
        stream = ContentLengthInputStream.obtain(responseBody.byteStream(), contentLength);
        callback.onDataReady(stream);
    } else {
        callback.onLoadFailed(new HttpException(response.message(), response.code()));
    }
}
OkHttpStreamFetcher的实现比HttpUrlFetcher简单多了,而且看起来也没有什么难度。
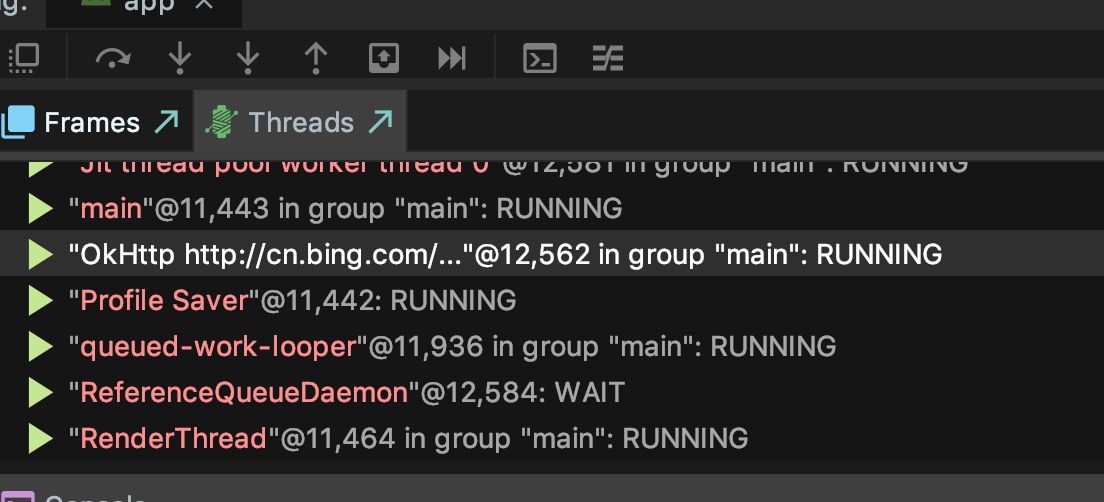
我们删掉app后重新运行,让资源重新从网络获取。在源码打上断点后可以看到Threads中出现了一个OkHttp的OkHttp线程,这就是OkHttp正在加载图片了。关于这OkHttp源码部分可以参考OkHttp3。

如果我们想使用App现有的OkHttpClient而不是默认创建一个新的,我们可以先@Excludes掉OkHttpLibraryGlideModule;然后自己replace时,在OkHttpUrlLoader.Factory(Call.Factory)构造时传入现有的OkHttpClient。
示例如下:
@GlideModule
@Excludes(value = [OkHttpLibraryGlideModule::class, MyLibraryGlideModule::class, MyGlideModule::class])
class MyAppGlideModule : AppGlideModule() {
    override fun applyOptions(context: Context, builder: GlideBuilder) {
        builder.setDiskCache(ExternalPreferredCacheDiskCacheFactory(context))
    }

    override fun registerComponents(context: Context, glide: Glide, registry: Registry) {
        val okHttpClient = OkHttpClient.Builder()
            .connectTimeout(10, TimeUnit.SECONDS)
            .readTimeout(30, TimeUnit.SECONDS)
            .writeTimeout(30, TimeUnit.SECONDS)
            .addNetworkInterceptor(
                HttpLoggingInterceptor {
                    Log.i("MyAppGlideModule", it)
                }.apply {
                    level = HttpLoggingInterceptor.Level.BODY
                }
            ).build()

        registry.replace(GlideUrl::class.java, InputStream::class.java, OkHttpUrlLoader.Factory(okHttpClient))
    }
}
现在我们清除缓存后重新运行一下,可以在控制台看到请求的log:
I/MyAppGlideModule: --> GET http://cn.bing.com/az/hprichbg/rb/Dongdaemun_ZH-CN10736487148_1920x1080.jpg http/1.1
I/MyAppGlideModule: User-Agent: Dalvik/2.1.0 (Linux; U; Android 9; MI 8 Build/PQ3A.190505.002)
I/MyAppGlideModule: Host: cn.bing.com
I/MyAppGlideModule: Connection: Keep-Alive
I/MyAppGlideModule: Accept-Encoding: gzip
I/MyAppGlideModule: --> END GET
I/MyAppGlideModule: <-- 302 http://cn.bing.com/az/hprichbg/rb/Dongdaemun_ZH-CN10736487148_1920x1080.jpg (355ms)
I/MyAppGlideModule: Cache-Control: private
I/MyAppGlideModule: Content-Length: 171
I/MyAppGlideModule: Content-Type: text/html; charset=utf-8
I/MyAppGlideModule: Content-Encoding: gzip
I/MyAppGlideModule: Location: http://cn.bing.com/sa/simg/hpb/LaDigue_EN-CA1115245085_1920x1080.jpg
I/MyAppGlideModule: Vary: Accept-Encoding
I/MyAppGlideModule: X-MSEdge-Ref: Ref A: 553334E70DD044ADA70680DD89A837EF Ref B: BJ1EDGE0315 Ref C: 2019-06-19T16:20:18Z
I/MyAppGlideModule: Set-Cookie: _EDGE_S=F=1&SID=20419E3FBE596AFA1ED993BFBF776BB6; path=/; httponly; domain=bing.com
I/MyAppGlideModule: Set-Cookie: _EDGE_V=1; path=/; httponly; expires=Mon, 13-Jul-2020 16:20:18 GMT; domain=bing.com
I/MyAppGlideModule: Set-Cookie: MUID=360EA7C9E659656F0E3FAA49E7776482; path=/; expires=Mon, 13-Jul-2020 16:20:18 GMT; domain=bing.com
I/MyAppGlideModule: Set-Cookie: MUIDB=360EA7C9E659656F0E3FAA49E7776482; path=/; httponly; expires=Mon, 13-Jul-2020 16:20:18 GMT
I/MyAppGlideModule: Date: Wed, 19 Jun 2019 16:20:18 GMT
I/MyAppGlideModule: <html><head><title>Object moved</title></head><body>
    <h2>Object moved to <a href="http://cn.bing.com/sa/simg/hpb/LaDigue_EN-CA1115245085_1920x1080.jpg">here</a>.</h2>
    </body></html>
I/MyAppGlideModule: <-- END HTTP (185-byte, 171-gzipped-byte body)
I/MyAppGlideModule: --> GET http://cn.bing.com/sa/simg/hpb/LaDigue_EN-CA1115245085_1920x1080.jpg http/1.1
I/MyAppGlideModule: User-Agent: Dalvik/2.1.0 (Linux; U; Android 9; MI 8 Build/PQ3A.190505.002)
I/MyAppGlideModule: Host: cn.bing.com
I/MyAppGlideModule: Connection: Keep-Alive
I/MyAppGlideModule: Accept-Encoding: gzip
I/MyAppGlideModule: --> END GET
I/MyAppGlideModule: <-- 302 Found http://cn.bing.com/sa/simg/hpb/LaDigue_EN-CA1115245085_1920x1080.jpg (120ms)
I/MyAppGlideModule: Cache-Control: private
I/MyAppGlideModule: Content-Length: 183
I/MyAppGlideModule: Content-Type: text/html; charset=utf-8
I/MyAppGlideModule: Content-Encoding: gzip
I/MyAppGlideModule: Location: http://www.bing.com/sa/simg/hpb/LaDigue_EN-CA1115245085_1920x1080.jpg?setmkt=zh-CN
I/MyAppGlideModule: Vary: Accept-Encoding
I/MyAppGlideModule: Server: Microsoft-IIS/10.0
I/MyAppGlideModule: Set-Cookie: SNRHOP=TS=636965580238957830&I=1; domain=.ap.gbl; path=/
I/MyAppGlideModule: X-MSEdge-Ref: Ref A: B88AC920B8AB4DD7B94FCEA619C9A788 Ref B: BJ1EDGE0315 Ref C: 2019-06-19T16:20:18Z
I/MyAppGlideModule: Set-Cookie: _EDGE_S=F=1&SID=06D34DFC46DA62DF30D6407C47F463A4; path=/; httponly; domain=bing.com
I/MyAppGlideModule: Set-Cookie: _EDGE_V=1; path=/; httponly; expires=Mon, 13-Jul-2020 16:20:18 GMT; domain=bing.com
I/MyAppGlideModule: Set-Cookie: MUID=0A47BFC17CD96B5B23C3B2417DF76A0D; path=/; expires=Mon, 13-Jul-2020 16:20:18 GMT; domain=bing.com
I/MyAppGlideModule: Set-Cookie: MUIDB=0A47BFC17CD96B5B23C3B2417DF76A0D; path=/; httponly; expires=Mon, 13-Jul-2020 16:20:18 GMT
I/MyAppGlideModule: Date: Wed, 19 Jun 2019 16:20:18 GMT
I/MyAppGlideModule: <html><head><title>Object moved</title></head><body>
    <h2>Object moved to <a href="http://www.bing.com/sa/simg/hpb/LaDigue_EN-CA1115245085_1920x1080.jpg?setmkt=zh-CN">here</a>.</h2>
    </body></html>
I/MyAppGlideModule: <-- END HTTP (199-byte, 183-gzipped-byte body)
I/MyAppGlideModule: --> GET http://www.bing.com/sa/simg/hpb/LaDigue_EN-CA1115245085_1920x1080.jpg?setmkt=zh-CN http/1.1
I/MyAppGlideModule: User-Agent: Dalvik/2.1.0 (Linux; U; Android 9; MI 8 Build/PQ3A.190505.002)
I/MyAppGlideModule: Host: www.bing.com
I/MyAppGlideModule: Connection: Keep-Alive
I/MyAppGlideModule: Accept-Encoding: gzip
I/MyAppGlideModule: --> END GET
I/MyAppGlideModule: <-- 200 OK http://www.bing.com/sa/simg/hpb/LaDigue_EN-CA1115245085_1920x1080.jpg?setmkt=zh-CN (43ms)
I/MyAppGlideModule: Cache-Control: public, max-age=15552000
I/MyAppGlideModule: Content-Length: 347798
I/MyAppGlideModule: Content-Type: image/jpeg
I/MyAppGlideModule: Last-Modified: Tue, 18 Jun 2019 18:25:12 GMT
I/MyAppGlideModule: Vary: Accept-Encoding
I/MyAppGlideModule: Server: Microsoft-IIS/10.0
I/MyAppGlideModule: X-MSEdge-Ref: Ref A: 13EE5BF269914C8197F2E1D33212A182 Ref B: BJ1EDGE0306 Ref C: 2019-06-19T16:20:19Z
I/MyAppGlideModule: Date: Wed, 19 Jun 2019 16:20:18 GMT
I/MyAppGlideModule: <-- END HTTP (binary 347798-byte body omitted)
本章内容到此为止,目前我们已经掌握了Glide中各个注解的作用,知道了如何替换默认配置、扩展Glide功能。此外,还把annotation processor生成的6个文件全部探索了一遍,知道了GlideApp和Glide的区别,以后看到这些东西再也不慌了。