Glide v4 源码解析(五)
Tip
本系列文章参考3.7.0版本的guolin - Glide最全解析,并按此思路结合4.9.0版本源码以及使用文档进行更新。
➟ Glide v4.9.0
➟ 中文文档
➟ 英文文档🚀🚀
Glide系列文章目录
- Glide1——Glide v4 的基本使用
- Glide2——从源码的角度理解Glide三步的执行流程
- Glide3——深入探究Glide缓存机制
- Glide4——RequestBuilder中高级点的API以及Target
- Glide5——Glide内置的transform以及自定义BitmapTransformation
- Glide6——Glide利用AppGlideModule、LibraryGlideModule更改默认配置、扩展Glide功能;GlideApp与Glide的区别在哪?
- Glide7——利用OkHttp、自定义Drawable、自定义ViewTarget实现带进度的图片加载功能
- 杂记:从Picasso迁移至Glide
本章要解析的是Glide的transform方法、内置的BitmapTransformation以及自定义BitmapTransformation。
transform方法能够对原始资源进行裁剪,然后返回裁剪后的图片,比如圆角、圆形等。
1. 引入问题
本章中我们通过下面的示例代码来引入问题,并介绍相应的源码。
示例代码
布局文件:ImageView宽高都是wrap_content,看看Glide如何充分表现
<?xml version="1.0" encoding="utf-8"?>
<android.support.constraint.ConstraintLayout
    xmlns:android="http://schemas.android.com/apk/res/android"
    xmlns:app="http://schemas.android.com/apk/res-auto"
    android:layout_width="match_parent"
    android:layout_height="match_parent">

    <ImageView
        android:id="@+id/ivGlide"
        android:layout_width="wrap_content"
        android:layout_height="wrap_content"
        app:layout_constraintStart_toStartOf="parent"
        app:layout_constraintTop_toTopOf="parent"/>

    <android.support.design.widget.FloatingActionButton
        android:id="@+id/fab"
        android:layout_width="wrap_content"
        android:layout_height="wrap_content"
        android:layout_margin="24dp"
        android:src="@drawable/btn_camera"
        app:layout_constraintEnd_toEndOf="parent"
        app:layout_constraintBottom_toBottomOf="parent"/>

</android.support.constraint.ConstraintLayout>
代码:测试的可选项为代码中被注释的两行代码
...
import com.bumptech.glide.request.target.Target as GlideTarget

class GlideFragment : Fragment() {
    ...
    override fun onViewCreated(view: View, savedInstanceState: Bundle?) {
        super.onViewCreated(view, savedInstanceState)
        fab.setOnClickListener {
            load()
        }
    }

    private fun load() {
        Glide.with(this)
            .load(URL)
//            .dontTransform()
//            .override(GlideTarget.SIZE_ORIGINAL, GlideTarget.SIZE_ORIGINAL)
            .into(ivGlide)
    }

    companion object {
        // 540*258  1080/(759-243)-(540/258)=0
        private const val URL = "https://www.baidu.com/img/bd_logo1.png"
    }
}
可以看到,整个例子非常简单,点击一下FAB就会调用load方法加载网路图片。注意这里ImageView的宽高都是wrap_content。
下面4张图分别是以下配置开启时的效果(下面分析时会称为例1、例2、例3、例4):
- 直接加载
- 只使用
dontTransform - 只使用
override dontTransform和override同时

可以很明显的看到,显示的图片也有所差异,ImageView的宽高有所差异。
如果没有调用override(Target.SIZE_ORIGINAL, Target.SIZE_ORIGINAL),ImageView宽度会是match_parent的效果,且如果dontTransform(),那么高度也是match_parent效果。调用了override之后会显示的图片的真实尺寸。
那么,我们到源码中看看这个位置到底是怎么回事。
首先dontTransform()方法实现在BaseRequestOptions文件中,该方法的意思就是不使用任何transform:
public T dontTransform() {
  if (isAutoCloneEnabled) {
    return clone().dontTransform();
  }

  transformations.clear();
  fields &= ~TRANSFORMATION;
  isTransformationRequired = false;
  fields &= ~TRANSFORMATION_REQUIRED;
  isTransformationAllowed = false;
  fields |= TRANSFORMATION_ALLOWED;
  isScaleOnlyOrNoTransform = true;
  return selfOrThrowIfLocked();
}
这里首先清空了map transformations,然后设置了一些标志位。这些标志位后面看到再说。
然后是override方法,该方法的意思是只加载指定宽高的像素的图片,方法实现只是保存了参数,待后面使用:
@NonNull
@CheckResult
public T override(int width, int height) {
  if (isAutoCloneEnabled) {
    return clone().override(width, height);
  }

  this.overrideWidth = width;
  this.overrideHeight = height;
  fields |= OVERRIDE;

  return selfOrThrowIfLocked();
}
在配置完参数后,调用into方法开始加载图片。整个加载流程非常冗长,详情可以看本系列文章第二篇。所以我们这里只挑选相关的代码,其他的会一笔带过。
先是RequestBuilder.into(ImageView)的实现,该方法会默认进行一些transform的配置:
@NonNull
public ViewTarget<ImageView, TranscodeType> into(@NonNull ImageView view) {
  Util.assertMainThread();
  Preconditions.checkNotNull(view);

  BaseRequestOptions<?> requestOptions = this;
  if (!requestOptions.isTransformationSet()
      && requestOptions.isTransformationAllowed()
      && view.getScaleType() != null) {
    // Clone in this method so that if we use this RequestBuilder to load into a View and then
    // into a different target, we don't retain the transformation applied based on the previous
    // View's scale type.
    switch (view.getScaleType()) {
      case CENTER_CROP:
        requestOptions = requestOptions.clone().optionalCenterCrop();
        break;
      case CENTER_INSIDE:
        requestOptions = requestOptions.clone().optionalCenterInside();
        break;
      case FIT_CENTER:
      case FIT_START:
      case FIT_END:
        requestOptions = requestOptions.clone().optionalFitCenter();
        break;
      case FIT_XY:
        requestOptions = requestOptions.clone().optionalCenterInside();
        break;
      case CENTER:
      case MATRIX:
      default:
        // Do nothing.
    }
  }

  return into(
      glideContext.buildImageViewTarget(view, transcodeClass),
      /*targetListener=*/ null,
      requestOptions,
      Executors.mainThreadExecutor());
}
在上面代码第7行的判断语句!requestOptions.isTransformationSet(),判断的是fields是否含有标记位TRANSFORMATION。
第8行判断语句requestOptions.isTransformationAllowed()判断的是isTransformationAllowed。
对于这两个判断条件,如果我们调用了dontTransform()方法(例2、例4),那么显然条件1满足,但是条件2就不满足了。否则(例1、例3),这两个条件都是满足的,也就意味着Glide会有一个默认的transform。默认的transform会根据ImageView的ScaleType有不同的取值。
ScaleType与默认的transform之间关系如下表:
| ScaleType | transform |
|---|---|
| CENTER_CROP | optionalCenterCrop() |
| CENTER_INSIDE | optionalCenterInside() |
| FIT_XY | |
| FIT_CENTER | optionalFitCenter() |
| FIT_START | |
| FIT_END | |
| CENTER | |
| MATRIX |
我们在ImageView.initImageView()方法中可以看到,默认的ScaleType为ScaleType.FIT_CENTER。所以,此时Glide会默认调用optionalFitCenter()方法。
注意,
optionalFitCenter()方法与非optional的fitCenter()方法的差别在于isTransformationRequired参数的值不同。在最后DecodeHelper.getTransformation(Class)方法中,如果找不到可用的transform,且isTransformationRequired为true,就会抛出IllegalArgumentException。
除此之外两者没有别的差别。
optionalFitCenter()方法会针对四种不同类型的数据产生不同的transformation,前面第二篇文章讲到过,这里再列一下:
| 保存的位置 | K | V |
|---|---|---|
| Options.values | DownsampleStrategy.OPTION | DownsampleStrategy.FitCenter() |
| transformations | Bitmap.class | FitCenter() |
| transformations | Drawable.class | DrawableTransformation(FitCenter(), false) |
| transformations | BitmapDrawable.class | DrawableTransformation(FitCenter(), false).asBitmapDrawable() |
| transformations | GifDrawable.class | GifDrawableTransformation(FitCenter()) |
现在可以开始加载图片了,最开始会调用SingleRequest.begin方法,在该方法中会判断需要显示多大尺寸的图片。如果我们指定了override(int, int)(例3、例4),那么就无需ViewTarget参与计算,直接调用onSizeReady(int, int)开始下一步;否则(例1、例2)就要计算了:
SingleRequest.java
@Override
public synchronized void begin() {
  if (model == null) {
    if (Util.isValidDimensions(overrideWidth, overrideHeight)) {
      width = overrideWidth;
      height = overrideHeight;
    }
    return;
  }

  if (status == Status.RUNNING) {
    throw new IllegalArgumentException("Cannot restart a running request");
  }

  if (status == Status.COMPLETE) {
    onResourceReady(resource, DataSource.MEMORY_CACHE);
    return;
  }

  // Restarts for requests that are neither complete nor running can be treated as new requests
  // and can run again from the beginning.

  status = Status.WAITING_FOR_SIZE;
  if (Util.isValidDimensions(overrideWidth, overrideHeight)) {
    onSizeReady(overrideWidth, overrideHeight);
  } else {
    target.getSize(this);
  }

  if ((status == Status.RUNNING || status == Status.WAITING_FOR_SIZE)
      && canNotifyStatusChanged()) {
    target.onLoadStarted(getPlaceholderDrawable());
  }
}
显然,造成示例中图片尺寸差异的一个原因就是这个第27行的target.getSize(this)方法了。对应方法的实现在ViewTarget中,这个请求会转发给内部的SizeDeterminer来完成。我们看一下对应的方法:
ViewTarget.SizeDeterminer
static final class SizeDeterminer {
  void getSize(@NonNull SizeReadyCallback cb) {
    int currentWidth = getTargetWidth();
    int currentHeight = getTargetHeight();
    if (isViewStateAndSizeValid(currentWidth, currentHeight)) {
      cb.onSizeReady(currentWidth, currentHeight);
      return;
    }
    ...
  }

  private int getTargetHeight() {
    int verticalPadding = view.getPaddingTop() + view.getPaddingBottom();
    LayoutParams layoutParams = view.getLayoutParams();
    int layoutParamSize = layoutParams != null ? layoutParams.height : PENDING_SIZE;
    return getTargetDimen(view.getHeight(), layoutParamSize, verticalPadding);
  }

  private int getTargetWidth() {
    int horizontalPadding = view.getPaddingLeft() + view.getPaddingRight();
    LayoutParams layoutParams = view.getLayoutParams();
    int layoutParamSize = layoutParams != null ? layoutParams.width : PENDING_SIZE;
    return getTargetDimen(view.getWidth(), layoutParamSize, horizontalPadding);
  }
}
首先在第3、4行调用方法获取Target的宽高,由于在本例中宽高都是WRAP_CONTENT,而且也没有其他的限制,所以最后调用getTargetDimen时传入的参数都是一样的(viewSize=0, paramSize=WRAP_CONTENT=-2, paddingSize=0)。然后,我们看看getTargetDimen方法的实现:
private int getTargetDimen(int viewSize, int paramSize, int paddingSize) {
  // We consider the View state as valid if the View has non-null layout params and a non-zero
  // layout params width and height. This is imperfect. We're making an assumption that View
  // parents will obey their child's layout parameters, which isn't always the case.
  int adjustedParamSize = paramSize - paddingSize;
  if (adjustedParamSize > 0) {
    return adjustedParamSize;
  }

  // Since we always prefer layout parameters with fixed sizes, even if waitForLayout is true,
  // we might as well ignore it and just return the layout parameters above if we have them.
  // Otherwise we should wait for a layout pass before checking the View's dimensions.
  if (waitForLayout && view.isLayoutRequested()) {
    return PENDING_SIZE;
  }

  // We also consider the View state valid if the View has a non-zero width and height. This
  // means that the View has gone through at least one layout pass. It does not mean the Views
  // width and height are from the current layout pass. For example, if a View is re-used in
  // RecyclerView or ListView, this width/height may be from an old position. In some cases
  // the dimensions of the View at the old position may be different than the dimensions of the
  // View in the new position because the LayoutManager/ViewParent can arbitrarily decide to
  // change them. Nevertheless, in most cases this should be a reasonable choice.
  int adjustedViewSize = viewSize - paddingSize;
  if (adjustedViewSize > 0) {
    return adjustedViewSize;
  }

  // Finally we consider the view valid if the layout parameter size is set to wrap_content.
  // It's difficult for Glide to figure out what to do here. Although Target.SIZE_ORIGINAL is a
  // coherent choice, it's extremely dangerous because original images may be much too large to
  // fit in memory or so large that only a couple can fit in memory, causing OOMs. If users want
  // the original image, they can always use .override(Target.SIZE_ORIGINAL). Since wrap_content
  // may never resolve to a real size unless we load something, we aim for a square whose length
  // is the largest screen size. That way we're loading something and that something has some
  // hope of being downsampled to a size that the device can support. We also log a warning that
  // tries to explain what Glide is doing and why some alternatives are preferable.
  // Since WRAP_CONTENT is sometimes used as a default layout parameter, we always wait for
  // layout to complete before using this fallback parameter (ConstraintLayout among others).
  if (!view.isLayoutRequested() && paramSize == LayoutParams.WRAP_CONTENT) {
    if (Log.isLoggable(TAG, Log.INFO)) {
      Log.i(TAG, "Glide treats LayoutParams.WRAP_CONTENT as a request for an image the size of"
          + " this device's screen dimensions. If you want to load the original image and are"
          + " ok with the corresponding memory cost and OOMs (depending on the input size), use"
          + " .override(Target.SIZE_ORIGINAL). Otherwise, use LayoutParams.MATCH_PARENT, set"
          + " layout_width and layout_height to fixed dimension, or use .override() with fixed"
          + " dimensions.");
    }
    return getMaxDisplayLength(view.getContext());
  }

  // If the layout parameters are < padding, the view size is < padding, or the layout
  // parameters are set to match_parent or wrap_content and no layout has occurred, we should
  // wait for layout and repeat.
  return PENDING_SIZE;
}
在getTargetDimen方法中会通过参数计算Target的尺寸,显然这里我们最后会调用getMaxDisplayLength(view.getContext())来返回View的尺寸。至于为什么wrap_content时会这样做,在注释中说的很清楚了,主要是考虑到加载的资源的不确定性,万一是一个大图片就直接OOM了。而且Glide会打印出log告诉我们一些解决方法,如果我们不满意这种处理方式。
getMaxDisplayLength(Context)会返回Display size宽高的较大者:
// Use the maximum to avoid depending on the device's current orientation.
private static int getMaxDisplayLength(@NonNull Context context) {
  if (maxDisplayLength == null) {
    WindowManager windowManager =
        (WindowManager) context.getSystemService(Context.WINDOW_SERVICE);
    Display display = Preconditions.checkNotNull(windowManager).getDefaultDisplay();
    Point displayDimensions = new Point();
    display.getSize(displayDimensions);
    maxDisplayLength = Math.max(displayDimensions.x, displayDimensions.y);
  }
  return maxDisplayLength;
}
显然,在我们的示例中,最后获取到的宽高都是一样的,在竖屏状态下会是Display的高。
Display#getSize与Display#getRealSize的区别?
Display#getRealSize返回的是屏幕真实的尺寸;而Display#getSize返回的是“可用”的屏幕尺寸,常见的情况是,有NavigationBar就会等于RealSize减去NavigationBar的高度。
获取到了Target的尺寸之后,会调用isViewStateAndSizeValid方法检查是否OK:OK就调用SingleRequest.onSizeReady方法进入下一步了;否则会给ViewTree添加OnPreDrawListener监听器,在onPreDraw方法回调中再次获取一下尺寸。
在经过一系列操作,加载到原始数据之后,会现在DecodePath.decode中对原始data进行decode,这样就得到了Bitmap,但是过程中涉及到Bitmap尺寸的操作。具体经过ByteBufferBitmapDecoder到Downsampler#decodeFromWrappedStreams方法中。里面绝大多数都是计算,这里拿例1来描述计算过程:
- 获取Bitmap的宽高:
sourceWidth=540,sourceHeight=258;获取Target的宽高:targetWidth=targetHeight=1776 - 调用
calculateScaling方法计算inSampleSize、inTargetDensity、inDensity等一系列参数,这里会用到DownsampleStrategy.FitCenter类,该对象在*表格 optionalFitCenter()过程保存的KV*中提到过。其getScaleFactor方法实现就是取target宽高/source宽高的较小者,也就是3.288889,该值由inTargetDensity/inDensity保存。 - 最后计算
expectedWidth=round(540*3.288889)=1776,expectedHeight=round(258*3.288889)=849,并从BitmapPool中获取这么一个宽高的Bitmap设置给Options.inBitmap - 再次进行解码,解码完毕后获得的图片就是1776x849大小的图片了。
如果是dontTransform(例2),DownsampleStrategy会是默认值DownsampleStrategy.CenterOutside。其getScaleFactor方法实现就是取target宽高/source宽高的较大者,也就是6.883721。因此最后解码完毕的图片大小为3717x1776。
如果是override过的(例3、例4),由于不需要缩放,所以返回的就是原始大小的图片。
在decode完毕后,会回到DecodeJob.onResourceDecoded方法中接着进行transform操作:
@Synthetic
@NonNull
<Z> Resource<Z> onResourceDecoded(DataSource dataSource,
    @NonNull Resource<Z> decoded) {
  @SuppressWarnings("unchecked")
  Class<Z> resourceSubClass = (Class<Z>) decoded.get().getClass();
  Transformation<Z> appliedTransformation = null;
  Resource<Z> transformed = decoded;
  if (dataSource != DataSource.RESOURCE_DISK_CACHE) {
    appliedTransformation = decodeHelper.getTransformation(resourceSubClass);
    transformed = appliedTransformation.transform(glideContext, decoded, width, height);
  }
  ...
}
在这里首先判断是不是DataSource.RESOURCE_DISK_CACHE,如果不是才需要进行transform。
But, why? Glide中很重要的概念——resource和data:差别在于resource是已经transform过了的,即transform(data)=resource。所以,我们知道resource已经经过transform过了,自然就不再需要。
对于调用过dontTransform()方法的例子(例2、例4)来说,decodeHelper.getTransformation返回的是一个UnitTransformation,其transform没有干任何有意义的事情,也就是说不进行transform。
对于普通的Glide加载请求(例1、例3)来说,一个URL已经经过一系列Registry的变换,到这里就变成了Bitmap.class,所以在第11行调用的是FitCenter().transform(Context, Resource<Bitmap>, int, int)方法。而FitCenter又是BitmapTransformation的子类,所以先看看BitmapTransformation:
BitmapTransformation.java
public abstract class BitmapTransformation implements Transformation<Bitmap> {

  @NonNull
  @Override
  public final Resource<Bitmap> transform(
      @NonNull Context context, @NonNull Resource<Bitmap> resource, int outWidth, int outHeight) {
    if (!Util.isValidDimensions(outWidth, outHeight)) {
      throw new IllegalArgumentException(
          "Cannot apply transformation on width: " + outWidth + " or height: " + outHeight
              + " less than or equal to zero and not Target.SIZE_ORIGINAL");
    }
    BitmapPool bitmapPool = Glide.get(context).getBitmapPool();
    Bitmap toTransform = resource.get();
    int targetWidth = outWidth == Target.SIZE_ORIGINAL ? toTransform.getWidth() : outWidth;
    int targetHeight = outHeight == Target.SIZE_ORIGINAL ? toTransform.getHeight() : outHeight;
    Bitmap transformed = transform(bitmapPool, toTransform, targetWidth, targetHeight);

    final Resource<Bitmap> result;
    if (toTransform.equals(transformed)) {
      result = resource;
    } else {
      result = BitmapResource.obtain(transformed, bitmapPool);
    }
    return result;
  }

  protected abstract Bitmap transform(
      @NonNull BitmapPool pool, @NonNull Bitmap toTransform, int outWidth, int outHeight);
}
首先做sanity check,然后获取targetWidth、targetHeight。如果我们指定了override(Target.SIZE_ORIGINAL, Target.SIZE_ORIGINAL),这里会是图片的真实尺寸,否则就是Target的尺寸了。
然后调用抽象方法进行transform操作,并返回transform后的结果。显然,transform抽象方法就是子类需要实现的了,所以我们看看FitCenter的方法:
FitCenter.java
public class FitCenter extends BitmapTransformation {
  private static final String ID = "com.bumptech.glide.load.resource.bitmap.FitCenter";
  private static final byte[] ID_BYTES = ID.getBytes(CHARSET);

  @Override
  protected Bitmap transform(@NonNull BitmapPool pool, @NonNull Bitmap toTransform, int outWidth,
      int outHeight) {
    return TransformationUtils.fitCenter(pool, toTransform, outWidth, outHeight);
  }

  @Override
  public boolean equals(Object o) {
    return o instanceof FitCenter;
  }

  @Override
  public int hashCode() {
    return ID.hashCode();
  }

  @Override
  public void updateDiskCacheKey(@NonNull MessageDigest messageDigest) {
    messageDigest.update(ID_BYTES);
  }
}
可以看到FitCenter.transform方法直接调用了TransformationUtils的fitCenter方法。除此之外,需要注意一下equals、hashCode、updateDiskCacheKey方法,这三个方法要重写的原因是因为transform会作为key的组成部分,参与到key的比较、缓存读写时safeKey生成,具体内容可以参考Glide v4 源码解析(三)——深入探究Glide缓存机制。
至于TransformationUtils类,该类里面有很多处理图片的静态方法,内置的几种BitmapTransformation都是调用该工具类里面对应的方法来完成transform功能的。我们只看fitCenter方法:
TransformationUtils.java
public static Bitmap fitCenter(@NonNull BitmapPool pool, @NonNull Bitmap inBitmap, int width,
    int height) {
  if (inBitmap.getWidth() == width && inBitmap.getHeight() == height) {
    if (Log.isLoggable(TAG, Log.VERBOSE)) {
      Log.v(TAG, "requested target size matches input, returning input");
    }
    return inBitmap;
  }
  final float widthPercentage = width / (float) inBitmap.getWidth();
  final float heightPercentage = height / (float) inBitmap.getHeight();
  final float minPercentage = Math.min(widthPercentage, heightPercentage);

  // Round here in case we've decoded exactly the image we want, but take the floor below to
  // avoid a line of garbage or blank pixels in images.
  int targetWidth = Math.round(minPercentage * inBitmap.getWidth());
  int targetHeight = Math.round(minPercentage * inBitmap.getHeight());

  if (inBitmap.getWidth() == targetWidth && inBitmap.getHeight() == targetHeight) {
    if (Log.isLoggable(TAG, Log.VERBOSE)) {
      Log.v(TAG, "adjusted target size matches input, returning input");
    }
    return inBitmap;
  }

  // Take the floor of the target width/height, not round. If the matrix
  // passed into drawBitmap rounds differently, we want to slightly
  // overdraw, not underdraw, to avoid artifacts from bitmap reuse.
  targetWidth = (int) (minPercentage * inBitmap.getWidth());
  targetHeight = (int) (minPercentage * inBitmap.getHeight());

  Bitmap.Config config = getNonNullConfig(inBitmap);
  Bitmap toReuse = pool.get(targetWidth, targetHeight, config);

  // We don't add or remove alpha, so keep the alpha setting of the Bitmap we were given.
  TransformationUtils.setAlpha(inBitmap, toReuse);

  if (Log.isLoggable(TAG, Log.VERBOSE)) {
    Log.v(TAG, "request: " + width + "x" + height);
    Log.v(TAG, "toFit:   " + inBitmap.getWidth() + "x" + inBitmap.getHeight());
    Log.v(TAG, "toReuse: " + toReuse.getWidth() + "x" + toReuse.getHeight());
    Log.v(TAG, "minPct:   " + minPercentage);
  }

  Matrix matrix = new Matrix();
  matrix.setScale(minPercentage, minPercentage);
  applyMatrix(inBitmap, toReuse, matrix);

  return toReuse;
}
该方法最开始会检查尺寸是否需要进行缩放,对于override(Target.SIZE_ORIGINAL, Target.SIZE_ORIGINAL)(例3)来说,显然是不需要的,所以就直接返回了。
否则,对于例1来说,需要继续执行后面的代码显示合适的图片。由于Bitmap的宽高在encode过程中计算出来了,为1776x849,而传入的width、height为1776,显然minPercentage会取widthPercentage,也就意味着会按照屏幕的宽度进行缩放。但widthPercentage为1,所以导致第18行的判断条件为true,因此直接返回了图片。
后面就是纯粹的展示问题了,在DrawableImageViewTarget.setResource方法中会将上面的图片设置到ImageView中,此时ImageView宽高都是0,resource的宽高为1776x849。下面怎么显示就是ImageView决定的了。
下面对四个例子做一个小结:
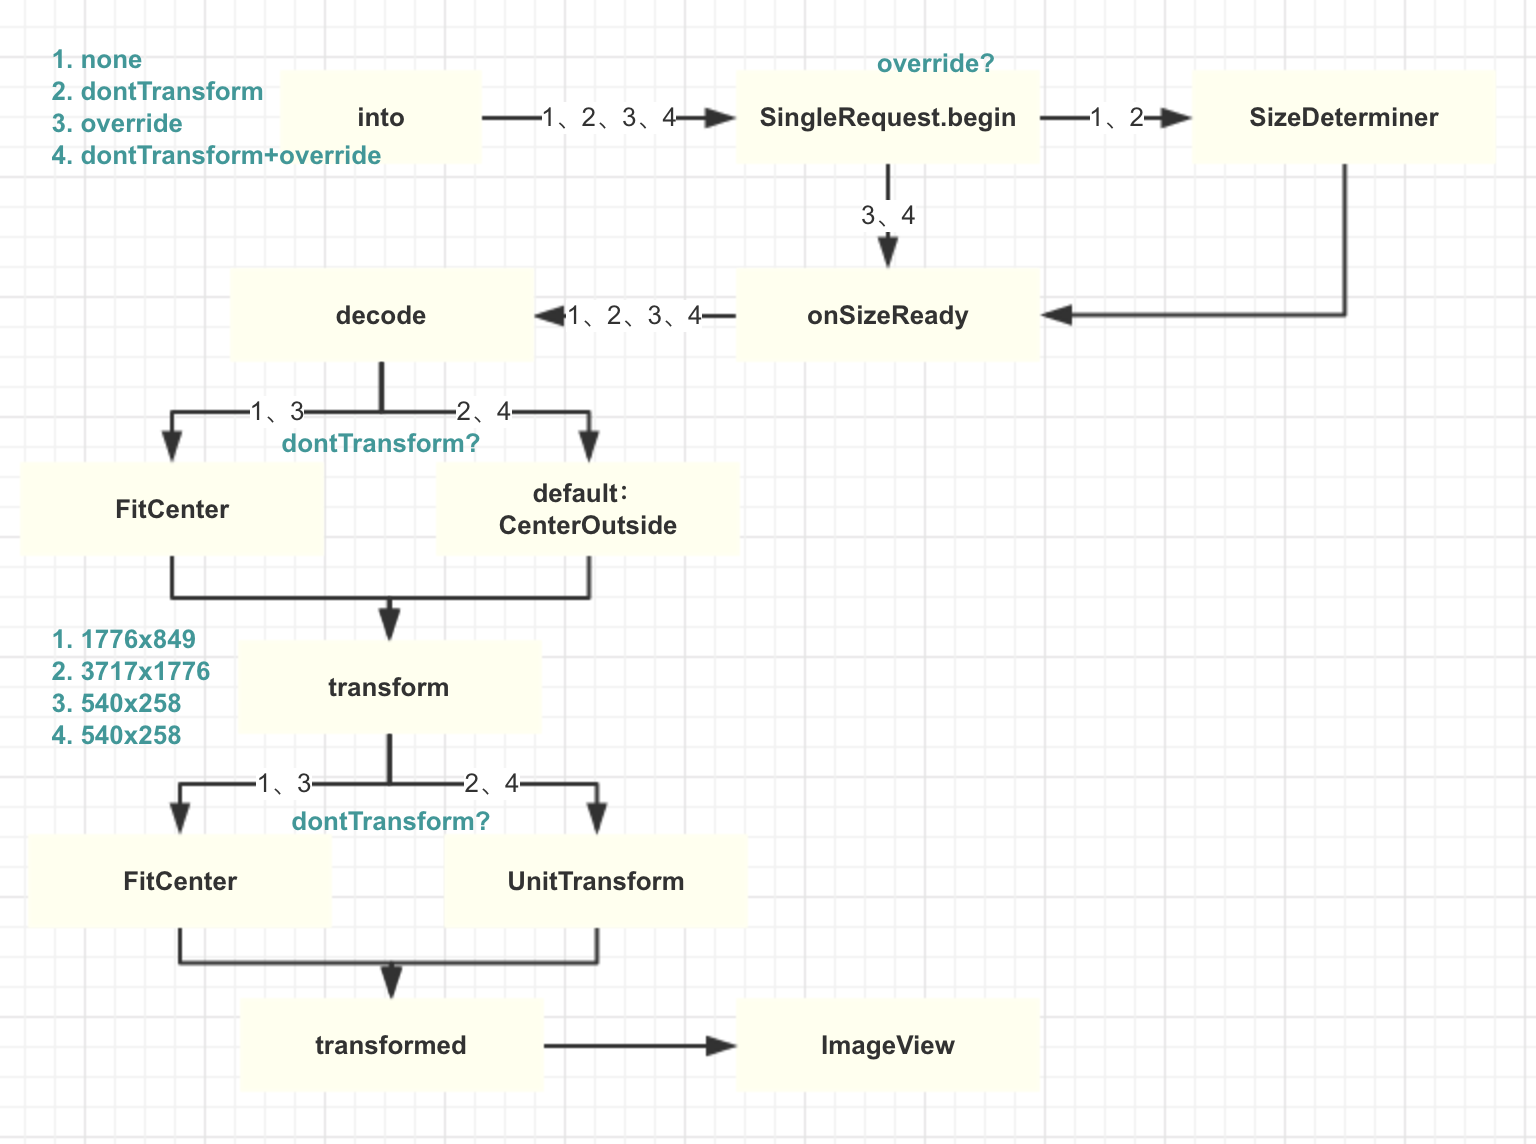
各例子之所以表现各不一样,其原因就在于decode出来的图片的尺寸不一致,而使用wrap_content宽高的ImageView加载这些图片,就会造成这些效果。
2. Glide自带的Transformation
在上一节遇到的FitCenter、CenterOutside这两个BitmapTransformation都是Glide自带的,除了这两个外还有其他四个自带的。这些BitmapTransformation的名称和作用如下:
CenterInside
如果图片的尺小于等于target,图片保持不变;否则会调用fitCenter⬇️⬇️。FitCenter
等比缩放,使得图片的一条边和target相同,另外一边小于给定的target。CenterCrop
首先缩放图片,使图片的宽和给定的宽相等,且图片的高大于给定的高。或者高相等,图片的宽大于给定的宽。然后crop,使较大的一边的像素和给定的相同。这种缩放最终效果显然不是等比缩放。Rotate
旋转BitmapRoundedCorners
圆角,单位是pixelCircleCrop
圆形
前面三个我们非常熟悉了,和ImageView的ScaleType有对应关系,所以下面的示例用来演示一下后面的三个Transformation。
布局文件很简单,一个参照的ImageView + 三个显示对应效果的ImageView:
<?xml version="1.0" encoding="utf-8"?>
<android.support.constraint.ConstraintLayout
    xmlns:android="http://schemas.android.com/apk/res/android"
    xmlns:app="http://schemas.android.com/apk/res-auto"
    android:layout_width="match_parent"
    android:layout_height="match_parent">

    <android.support.constraint.Guideline
        android:id="@+id/guideline"
        android:layout_width="0dp"
        android:layout_height="0dp"
        app:layout_constraintGuide_percent="0.5"
        android:orientation="vertical"/>

    <ImageView
        android:id="@+id/ivGlide1"
        android:layout_width="0dp"
        android:layout_height="wrap_content"
        app:layout_constraintStart_toStartOf="parent"
        app:layout_constraintEnd_toEndOf="@id/guideline"
        app:layout_constraintTop_toTopOf="parent"/>

    <ImageView
        android:id="@+id/ivGlide2"
        android:layout_width="0dp"
        android:layout_height="wrap_content"
        app:layout_constraintStart_toStartOf="@id/guideline"
        app:layout_constraintEnd_toEndOf="parent"
        app:layout_constraintTop_toTopOf="parent"/>

    <ImageView
        android:id="@+id/ivGlide3"
        android:layout_width="0dp"
        android:layout_height="wrap_content"
        app:layout_constraintStart_toStartOf="parent"
        app:layout_constraintEnd_toEndOf="@id/guideline"
        app:layout_constraintTop_toBottomOf="@id/ivGlide1"/>

    <ImageView
        android:id="@+id/ivGlide4"
        android:layout_width="0dp"
        android:layout_height="wrap_content"
        app:layout_constraintStart_toStartOf="@id/guideline"
        app:layout_constraintEnd_toEndOf="parent"
        app:layout_constraintTop_toBottomOf="@id/ivGlide2"/>

    <android.support.design.widget.FloatingActionButton
        android:id="@+id/fab"
        android:layout_width="wrap_content"
        android:layout_height="wrap_content"
        android:layout_margin="24dp"
        android:src="@drawable/btn_camera"
        app:layout_constraintEnd_toEndOf="parent"
        app:layout_constraintBottom_toBottomOf="parent"/>

</android.support.constraint.ConstraintLayout>
源文件也比较简单:
// private const val URL = "http://cn.bing.com/az/hprichbg/rb/Dongdaemun_ZH-CN10736487148_1920x1080.jpg"

Glide.with(this)
    .load(URL)
    .into(ivGlide1)

Glide.with(this)
    .load(URL)
    .transform(FitCenter(), Rotate(180))
    .into(ivGlide2)

Glide.with(this)
    .load(URL)
    .transform(MultiTransformation(FitCenter(), RoundedCorners(303 ushr 1)))
    .into(ivGlide3)

Glide.with(this)
    .load(URL)
    .transform(CircleCrop())
    .into(ivGlide4)
演示效果如下:
看完图后,这三个Transformation的特点一目了然了。注意上面第2、3个加载时,因为ImageView高度为wrap_content,所以需要加上FitCenter,使Bitmap的宽高达到我们的预期(图片宽高为1920*1080,ImageView宽度为540,因此高度为(540/1920*1080=303.75,转为int后为303)),然后在此基础上进行圆角或圆形处理。
Glide使用map保存transformation,所以调用多个
transform方法,只有最后一个才会生效。如果我们想要使用多个transformation,可以使用MultiTransformation类或者transforms(Transformation<Bitmap>...)以及transform(Transformation<Bitmap>...)方法。
3. 自定义BitmapTransformation
如果我们想transform Bitmap,继承BitmapTransformation是最好的方式了。BitmapTransformation为我们处理了一些基础的东西,例如,如果我们的Transformation返回了一个新的Bitmap,BitmapTransformation将负责提取和回收原始的Bitmap。
下面是一个简单的实现:
public class FillSpace extends BitmapTransformation {
    private static final String ID = "com.bumptech.glide.transformations.FillSpace";
    private static final String ID_BYTES = ID.getBytes(STRING_CHARSET_NAME);

    @Override
    public Bitmap transform(BitmapPool pool, Bitmap toTransform, int outWidth, int outHeight) {
        if (toTransform.getWidth() == outWidth && toTransform.getHeight() == outHeight) {
            return toTransform;
        }

        return Bitmap.createScaledBitmap(toTransform, outWidth, outHeight, /*filter=*/ true);
    }

    @Override
    public void equals(Object o) {
      return o instanceof FillSpace;
    }

    @Override
    public int hashCode() {
      return ID.hashCode();
    }

    @Override
    public void updateDiskCacheKey(MessageDigest messageDigest)
        throws UnsupportedEncodingException {
      messageDigest.update(ID_BYTES);
    }
}
上面的例子虽然简单,但是包含了必须实现的方法:
transform是该类存在的意义,作用不用多少equals、hashCode、updateDiskCacheKey三个方法必须实现,因为磁盘缓存和内存缓存都需要这个。详情可以看上一篇文章
此外,如果自定义的BitmapTransformation有构造参数,那么equals、hashCode、updateDiskCacheKey三个方法也需要对构造参数做处理。比如RoundedCorners:
public final class RoundedCorners extends BitmapTransformation {
  private static final String ID = "com.bumptech.glide.load.resource.bitmap.RoundedCorners";
  private static final byte[] ID_BYTES = ID.getBytes(CHARSET);

  private final int roundingRadius;

  /**
   * @param roundingRadius the corner radius (in device-specific pixels).
   * @throws IllegalArgumentException if rounding radius is 0 or less.
   */
  public RoundedCorners(int roundingRadius) {
    Preconditions.checkArgument(roundingRadius > 0, "roundingRadius must be greater than 0.");
    this.roundingRadius = roundingRadius;
  }

  @Override
  protected Bitmap transform(
      @NonNull BitmapPool pool, @NonNull Bitmap toTransform, int outWidth, int outHeight) {
    return TransformationUtils.roundedCorners(pool, toTransform, roundingRadius);
  }

  @Override
  public boolean equals(Object o) {
    if (o instanceof RoundedCorners) {
      RoundedCorners other = (RoundedCorners) o;
      return roundingRadius == other.roundingRadius;
    }
    return false;
  }

  @Override
  public int hashCode() {
    return Util.hashCode(ID.hashCode(),
        Util.hashCode(roundingRadius));
  }

  @Override
  public void updateDiskCacheKey(@NonNull MessageDigest messageDigest) {
    messageDigest.update(ID_BYTES);

    byte[] radiusData = ByteBuffer.allocate(4).putInt(roundingRadius).array();
    messageDigest.update(radiusData);
  }
}