Glide v4 源码解析(三)
Tip
本系列文章参考3.7.0版本的guolin - Glide最全解析,并按此思路结合4.9.0版本源码以及使用文档进行更新。
➟ Glide v4.9.0
➟ 中文文档
➟ 英文文档🚀🚀
Glide系列文章目录
- Glide1——Glide v4 的基本使用
- Glide2——从源码的角度理解Glide三步的执行流程
- Glide3——深入探究Glide缓存机制
- Glide4——RequestBuilder中高级点的API以及Target
- Glide5——Glide内置的transform以及自定义BitmapTransformation
- Glide6——Glide利用AppGlideModule、LibraryGlideModule更改默认配置、扩展Glide功能;GlideApp与Glide的区别在哪?
- Glide7——利用OkHttp、自定义Drawable、自定义ViewTarget实现带进度的图片加载功能
- 杂记:从Picasso迁移至Glide
1. Glide缓存机制
在上一篇文章中比较详细地介绍了Glide.with(xx).load(xx).into(xx)中的很多过程,虽然看完之后理得不是特别清楚。但是没关系,这篇文章开始会一个方面一个方面地进行总结。
本篇文章主要讨论的就是Glide中的缓存问题。Glide缓存机制的流程图如下:
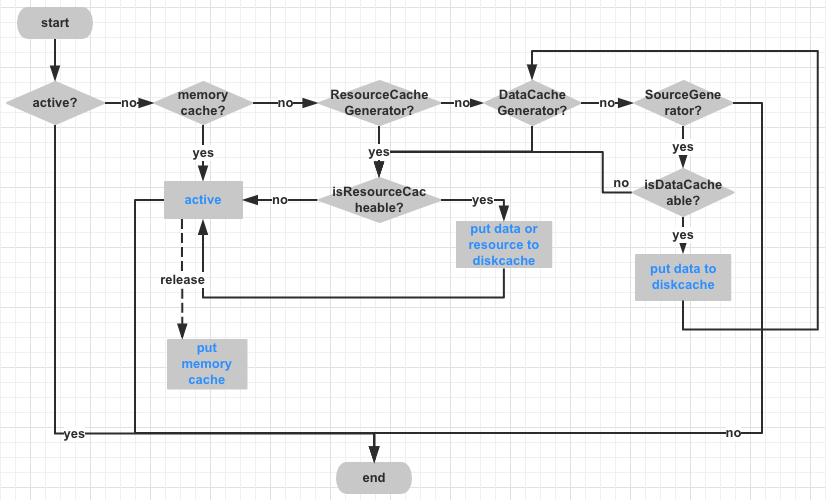
从图中可以看出,Glide的资源状态可以分为四种:
-
active状态资源
Engine.load方法上的注释写到:Active resources are those that have been provided to at least one request and have not yet been released. Once all consumers of a resource have released that resource, the resource then goes to cache. If the resource is ever returned to a new consumer from cache, it is re-added to the active resources. If the resource is evicted from the cache, its resources are recycled and re-used if possible and the resource is discarded. There is no strict requirement that consumers release their resources so active resources are held weakly. -
内存缓存
- data磁盘缓存:原始的没有修改过的数据缓存
- resource磁盘资源:经过解码、transformed后的缓存
Tip
在Glide使用文档-缓存部分中有对Glide的整个缓存体系做出一个总结,前往了解一下还是非常好的。
在文档中有Glide的缓存体系的整体描述,文字摘抄如下:
By default, Glide checks multiple layers of caches before starting a new request for an image:
1. Active resources - Is this image displayed in another View right now? 2. Memory cache - Was this image recently loaded and still in memory? 3. Resource - Has this image been decoded, transformed, and written to the disk cache before? 4. Data - Was the data this image was obtained from written to the disk cache before?The first two steps check to see if the resource is in memory and if so, return the image immediately. The second two steps check to see if the image is on disk and return quickly, but asynchronously.
If all four steps fail to find the image, then Glide will go back to the original source to retrieve the data (the original File, Uri, Url etc).
Caching in Glide
下面开始一边过源码,一遍印证上面的图和概要。
Glide的memory cache和disk cache在Glide创建的时候就确定了。代码在GlideBuilder.build(Context)方法里面。值得一提的是,Glide是单例实现的,在上一章 1.1节 getRetriever(Context) 中我们分析时贴了对应的代码。
memory cache和disk cache在Glide创建时相关代码如下:
GlideBuilder.java
@NonNull
Glide build(@NonNull Context context) {
  if (memoryCache == null) {
    memoryCache = new LruResourceCache(memorySizeCalculator.getMemoryCacheSize());
  }

  if (diskCacheFactory == null) {
    diskCacheFactory = new InternalCacheDiskCacheFactory(context);
  }

  if (engine == null) {
    engine =
        new Engine(
            memoryCache,
            diskCacheFactory,
            ...);
  }

  return new Glide(
      ...
      memoryCache,
      ...);
}
memoryCache和diskCacheFactory如果没有没有在任何GlideMode中进行设置的话,会有一个默认的实现。大部分情况下,我们使用这个默认实现就很好了。
2. memoryCache介绍
memoryCache发生存取操作是在Engine中,但是我们看到memoryCache还被放入了Glide实例中。这是因为Glide实现了ComponentCallbacks2接口,在Glide创建完成后,实例就注册了该接口。这样在内存紧张的时候,可以通知memoryCache释放内存。
Glide.java
@Override
public void onTrimMemory(int level) {
  trimMemory(level);
}

public void trimMemory(int level) {
  // Engine asserts this anyway when removing resources, fail faster and consistently
  Util.assertMainThread();
  // memory cache needs to be trimmed before bitmap pool to trim re-pooled Bitmaps too. See #687.
  memoryCache.trimMemory(level);
  bitmapPool.trimMemory(level);
  arrayPool.trimMemory(level);
}
memoryCache是一个使用LRU(least recently used)算法实现的内存缓存类LruResourceCache,继承至LruCache类,实现了MemoryCache接口。
LruCache定义了LRU相关的操作,而MemoryCache定义的是内存缓存相关的操作。LruResourceCache其相关代码如下:
public class LruResourceCache extends LruCache<Key, Resource<?>> implements MemoryCache {
  ...
  @Override
  protected int getSize(@Nullable Resource<?> item) {
    if (item == null) {
      return super.getSize(null);
    } else {
      return item.getSize();
    }
  }

  @SuppressLint("InlinedApi")
  @Override
  public void trimMemory(int level) {
    if (level >= android.content.ComponentCallbacks2.TRIM_MEMORY_BACKGROUND) {
      // Entering list of cached background apps
      // Evict our entire bitmap cache
      clearMemory();
    } else if (level >= android.content.ComponentCallbacks2.TRIM_MEMORY_UI_HIDDEN
        || level == android.content.ComponentCallbacks2.TRIM_MEMORY_RUNNING_CRITICAL) {
      // The app's UI is no longer visible, or app is in the foreground but system is running
      // critically low on memory
      // Evict oldest half of our bitmap cache
      trimToSize(getMaxSize() / 2);
    }
  }
}
LruCache的实现主要靠LinkedHashMap的一个构造参数:accessOrder。
当该参数为true时,每次调用LinkedHashMap的get(key)或getOrDefault(key, defaultValue)方法都会触发afterNodeAccess(Object)方法,此方法会将对应的node移动到链表的末尾。也就是说LinkedHashMap末尾的数据是最近“最多”使用的。
而LruCache清除内存时都会调用trimToSize(size)方法时,会从头到尾进行清理,这样LRU的特点就体现出来了。
相关代码如下:
LruCache.java
public class LruCache<T, Y> {
  private final Map<T, Y> cache = new LinkedHashMap<>(100, 0.75f, true);
  ...
  public void clearMemory() {
    trimToSize(0);
  }

  protected synchronized void trimToSize(long size) {
    Map.Entry<T, Y> last;
    Iterator<Map.Entry<T, Y>> cacheIterator;
    while (currentSize > size) {
      // 👏👏👏 果然是从头到尾进行遍历的
      cacheIterator  = cache.entrySet().iterator();
      last = cacheIterator.next();
      final Y toRemove = last.getValue();
      currentSize -= getSize(toRemove);
      final T key = last.getKey();
      cacheIterator.remove();
      onItemEvicted(key, toRemove);
    }
  }

  private void evict() {
    trimToSize(maxSize);
  }
}
LinkedHashMap.java
public class LinkedHashMap<K,V>
    extends HashMap<K,V>
    implements Map<K,V>
{
    public LinkedHashMap(int initialCapacity,
                         float loadFactor,
                         boolean accessOrder) {
        super(initialCapacity, loadFactor);
        this.accessOrder = accessOrder;
    }

    public V get(Object key) {
        Node<K,V> e;
        if ((e = getNode(hash(key), key)) == null)
            return null;
        if (accessOrder)
            afterNodeAccess(e);
        return e.value;
    }

    /**
     * {@inheritDoc}
     */
    public V getOrDefault(Object key, V defaultValue) {
       Node<K,V> e;
       if ((e = getNode(hash(key), key)) == null)
           return defaultValue;
       if (accessOrder)
           afterNodeAccess(e);
       return e.value;
    }

    void afterNodeAccess(Node<K,V> e) { // move node to last
        LinkedHashMapEntry<K,V> last;
        if (accessOrder && (last = tail) != e) {
            LinkedHashMapEntry<K,V> p =
                (LinkedHashMapEntry<K,V>)e, b = p.before, a = p.after;
            p.after = null;
            if (b == null)
                head = a;
            else
                b.after = a;
            if (a != null)
                a.before = b;
            else
                last = b;
            if (last == null)
                head = p;
            else {
                p.before = last;
                last.after = p;
            }
            tail = p;
            ++modCount;
        }
    }
}
3. diskCacheFactory介绍
diskCacheFactory顾名思义就是创建DiskCache的Factory,该接口的定义如下:
DiskCache.java
public interface DiskCache {

  interface Factory {
    /** 250 MB of cache. */
    int DEFAULT_DISK_CACHE_SIZE = 250 * 1024 * 1024;
    String DEFAULT_DISK_CACHE_DIR = "image_manager_disk_cache";

    DiskCache build();
  }

  interface Writer {
    boolean write(@NonNull File file);
  }

  File get(Key key);

  void put(Key key, Writer writer);

  void delete(Key key);

  void clear();
}
可以看出DiskCache.Factory的build()方法会创建出一个我们需要的DiskCache。
所以,我们跟着Glide默认实现的InternalCacheDiskCacheFactory类看一下创建出了什么样的DiskCache:
InternalCacheDiskCacheFactory.java
public final class InternalCacheDiskCacheFactory extends DiskLruCacheFactory {

  public InternalCacheDiskCacheFactory(Context context) {
    this(context, DiskCache.Factory.DEFAULT_DISK_CACHE_DIR,
        DiskCache.Factory.DEFAULT_DISK_CACHE_SIZE);
  }

  public InternalCacheDiskCacheFactory(Context context, long diskCacheSize) {
    this(context, DiskCache.Factory.DEFAULT_DISK_CACHE_DIR, diskCacheSize);
  }

  public InternalCacheDiskCacheFactory(final Context context, final String diskCacheName,
                                       long diskCacheSize) {
    super(new CacheDirectoryGetter() {
      @Override
      public File getCacheDirectory() {
        File cacheDirectory = context.getCacheDir();
        if (cacheDirectory == null) {
          return null;
        }
        if (diskCacheName != null) {
          return new File(cacheDirectory, diskCacheName);
        }
        return cacheDirectory;
      }
    }, diskCacheSize);
  }
}
显然,根据上面接口中的定义以及此处第三个构造器中的代码可以看出,默认会创建一个位于250M大小的路径为/data/data/{package}/cache/image_manager_disk_cache/的缓存目录。
下面接着InternalCacheDiskCacheFactory的父类DiskLruCacheFactory的相关代码:
DiskLruCacheFactory.java
public class DiskLruCacheFactory implements DiskCache.Factory {
  private final long diskCacheSize;
  private final CacheDirectoryGetter cacheDirectoryGetter;

  /**
   * Interface called out of UI thread to get the cache folder.
   */
  public interface CacheDirectoryGetter {
    File getCacheDirectory();
  }
  ...
  public DiskLruCacheFactory(CacheDirectoryGetter cacheDirectoryGetter, long diskCacheSize) {
    this.diskCacheSize = diskCacheSize;
    this.cacheDirectoryGetter = cacheDirectoryGetter;
  }

  @Override
  public DiskCache build() {
    File cacheDir = cacheDirectoryGetter.getCacheDirectory();

    if (cacheDir == null) {
      return null;
    }

    if (!cacheDir.mkdirs() && (!cacheDir.exists() || !cacheDir.isDirectory())) {
      return null;
    }

    return DiskLruCacheWrapper.create(cacheDir, diskCacheSize);
  }
}
DiskLruCacheFactory.build()方法会返回一个DiskLruCacheWrapper类的实例,从命名来看磁盘缓存也确实是LRU算法的。我们眼见为实:
DiskLruCacheWrapper.java
public class DiskLruCacheWrapper implements DiskCache {
  private static final String TAG = "DiskLruCacheWrapper";

  private static final int APP_VERSION = 1;
  private static final int VALUE_COUNT = 1;
  private static DiskLruCacheWrapper wrapper;

  private final SafeKeyGenerator safeKeyGenerator;
  private final File directory;
  private final long maxSize;
  private final DiskCacheWriteLocker writeLocker = new DiskCacheWriteLocker();
  private DiskLruCache diskLruCache;

  @SuppressWarnings("deprecation")
  public static DiskCache create(File directory, long maxSize) {
    return new DiskLruCacheWrapper(directory, maxSize);
  }

  @Deprecated
  @SuppressWarnings({"WeakerAccess", "DeprecatedIsStillUsed"})
  protected DiskLruCacheWrapper(File directory, long maxSize) {
    this.directory = directory;
    this.maxSize = maxSize;
    this.safeKeyGenerator = new SafeKeyGenerator();
  }

  private synchronized DiskLruCache getDiskCache() throws IOException {
    if (diskLruCache == null) {
      diskLruCache = DiskLruCache.open(directory, APP_VERSION, VALUE_COUNT, maxSize);
    }
    return diskLruCache;
  }

  @Override
  public File get(Key key) {
    String safeKey = safeKeyGenerator.getSafeKey(key);
    File result = null;
    try {
      final DiskLruCache.Value value = getDiskCache().get(safeKey);
      if (value != null) {
        result = value.getFile(0);
      }
    } catch (IOException e) {
      ...
    }
    return result;
  }
  ...
}
里面果然wrap了一个DiskLruCache,该类主要是为DiskLruCache提供了一个根据Key生成key的SafeKeyGenerator以及写锁DiskCacheWriteLocker。
!!!! warning 注意:Glide中使用的LruCache与Bitmap的缓存与加载一文中提到的不一样;Glide使用的DiskLruCache虽然与文章中提到的DiskLruCache有一定的渊源,但不等同。
OK,现在DiskCache的实现都准备好了,现在看看会在哪里调用factory的build()方法了。
在本文的开头,我们看到了diskCacheFactory只会传入Engine中。在Engine的构造方法中会被包装成为一个LazyDiskCacheProvider,在被需要的时候调用getDiskCache()方法,这样就会调用factory的build()方法返回一个DiskCache了。
Engine.LazyDiskCacheProvider
private static class LazyDiskCacheProvider implements DecodeJob.DiskCacheProvider {

  private final DiskCache.Factory factory;
  private volatile DiskCache diskCache;

  LazyDiskCacheProvider(DiskCache.Factory factory) {
    this.factory = factory;
  }
  ...
  @Override
  public DiskCache getDiskCache() {
    if (diskCache == null) {
      synchronized (this) {
        if (diskCache == null) {
          diskCache = factory.build();
        }
        if (diskCache == null) {
          diskCache = new DiskCacheAdapter();
        }
      }
    }
    return diskCache;
  }
}
而LazyDiskCacheProvider又会在Engine后面的初始化流程中传入DecodeJobFactory。在DecodeJobFactory创建DecodeJob时会传进去。
DecodeJob自身会保存起来,在资源加载完毕并展示后,会进行缓存的存放。同时,DecodeJob也会在DecodeHelper初始化时,设置进去,供ResourceCacheGenerator、DataCacheGenerator读取缓存,供SourceGenerator写入缓存。
4. ActiveResources
在正式开始讨论缓存流程时,还是要先介绍一下ActiveResources的一些源码。
ActiveResources在Engine的构造器中被创建。ActiveResources构建完成后,会启动一个后台优先级级别(THREAD_PRIORITY_BACKGROUND)的线程,在该线程中会调用cleanReferenceQueue()方法一直循环清除ReferenceQueue中的将要被GC的Resource。
ActiveResources.java
final class ActiveResources {
  private final boolean isActiveResourceRetentionAllowed;
  private final Executor monitorClearedResourcesExecutor;
  @VisibleForTesting
  final Map<Key, ResourceWeakReference> activeEngineResources = new HashMap<>();
  private final ReferenceQueue<EngineResource<?>> resourceReferenceQueue = new ReferenceQueue<>();

  private volatile boolean isShutdown;

  ActiveResources(boolean isActiveResourceRetentionAllowed) {
    this(
        isActiveResourceRetentionAllowed,
        java.util.concurrent.Executors.newSingleThreadExecutor(
            new ThreadFactory() {
              @Override
              public Thread newThread(@NonNull final Runnable r) {
                return new Thread(
                    new Runnable() {
                      @Override
                      public void run() {
                        Process.setThreadPriority(Process.THREAD_PRIORITY_BACKGROUND);
                        r.run();
                      }
                    },
                    "glide-active-resources");
              }
            }));
  }

  @VisibleForTesting
  ActiveResources(
      boolean isActiveResourceRetentionAllowed, Executor monitorClearedResourcesExecutor) {
    this.isActiveResourceRetentionAllowed = isActiveResourceRetentionAllowed;
    this.monitorClearedResourcesExecutor = monitorClearedResourcesExecutor;

    monitorClearedResourcesExecutor.execute(
        new Runnable() {
          @Override
          public void run() {
            cleanReferenceQueue();
          }
        });
  }

  @SuppressWarnings("WeakerAccess")
  @Synthetic void cleanReferenceQueue() {
    while (!isShutdown) {
      try {
        ResourceWeakReference ref = (ResourceWeakReference) resourceReferenceQueue.remove();
        cleanupActiveReference(ref);

        // This section for testing only.
        DequeuedResourceCallback current = cb;
        if (current != null) {
          current.onResourceDequeued();
        }
        // End for testing only.
      } catch (InterruptedException e) {
        Thread.currentThread().interrupt();
      }
    }
  }
}
cleanupActiveReference方法马上会说。现在先来看看ActiveResources的保存、删除的方法,这两个方法分别是activate、deactivate。可以看到,这两个方法实现都很简单。activate方法会将参数封装成为一个ResourceWeakReference,然后放入map中,如果对应的key之前有值,那么调用之前值的reset方法进行清除。deactivate方法先在map中移除,然后调用resource的reset方法进行清除。
synchronized void activate(Key key, EngineResource<?> resource) {
  ResourceWeakReference toPut =
      new ResourceWeakReference(
          key, resource, resourceReferenceQueue, isActiveResourceRetentionAllowed);

  ResourceWeakReference removed = activeEngineResources.put(key, toPut);
  if (removed != null) {
    removed.reset();
  }
}

synchronized void deactivate(Key key) {
  ResourceWeakReference removed = activeEngineResources.remove(key);
  if (removed != null) {
    removed.reset();
  }
}
ResourceWeakReference继承至WeakReference,只是保存了Resource的一些属性,此外添加了一个reset方法用来清理资源:
@VisibleForTesting
static final class ResourceWeakReference extends WeakReference<EngineResource<?>> {
  @SuppressWarnings("WeakerAccess") @Synthetic final Key key;
  @SuppressWarnings("WeakerAccess") @Synthetic final boolean isCacheable;

  @Nullable @SuppressWarnings("WeakerAccess") @Synthetic Resource<?> resource;

  @Synthetic
  @SuppressWarnings("WeakerAccess")
  ResourceWeakReference(
      @NonNull Key key,
      @NonNull EngineResource<?> referent,
      @NonNull ReferenceQueue<? super EngineResource<?>> queue,
      boolean isActiveResourceRetentionAllowed) {
    super(referent, queue);
    this.key = Preconditions.checkNotNull(key);
    this.resource =
        referent.isCacheable() && isActiveResourceRetentionAllowed
            ? Preconditions.checkNotNull(referent.getResource()) : null;
    isCacheable = referent.isCacheable();
  }

  void reset() {
    resource = null;
    clear();
  }
}
值得注意的是,这里的构造方法中调用了super(referent, queue)。这样如果referent将要被GC,就会被放入queue中。而ActiveResources.cleanReferenceQueue()方法会一直尝试从queue中获取将要被GC的resource,然后调用其cleanupActiveReference方法。
该方法除了在此时被调用外,还在ActiveResources.get(key)方法中也可能会因为获取到的resource为null而被调用。cleanupActiveReference方法如下:
@Synthetic
void cleanupActiveReference(@NonNull ResourceWeakReference ref) {
  // Fixes a deadlock where we normally acquire the Engine lock and then the ActiveResources lock
  // but reverse that order in this one particular test. This is definitely a bit of a hack...
  synchronized (listener) {
    synchronized (this) {
      activeEngineResources.remove(ref.key);
      // 如果是GC后调用,此时ref.resource肯定为null
      if (!ref.isCacheable || ref.resource == null) {
        return;
      }
      // 走到这,表示是在get方法中被调用,此时会恢复原来的resource
      EngineResource<?> newResource =
          new EngineResource<>(ref.resource, /*isCacheable=*/ true, /*isRecyclable=*/ false);
      newResource.setResourceListener(ref.key, listener);
      // 回调Engine的onResourceReleased方法
      // 这会导致此资源从active变成memory cache状态
      listener.onResourceReleased(ref.key, newResource);
    }
  }
}
5. 缓存加载、存放过程
在了解完上面三种缓存状态资源对应的类后,我们现在看一下缓存加载、存放的过程。由于缓存策略默认为DiskCacheStrategy.AUTOMATIC,所以加载某一种格式的图片不足以覆盖所有的情况,下面会以网络图片URL以及本地图片File这两种常用的方式来讲解缓存的加载、存放过程。
首先,整个加载的过程体现在Engine.load方法中,该方法注释和代码片段如下:
/**
  * Starts a load for the given arguments.
  *
  * <p>Must be called on the main thread.
  *
  * <p>The flow for any request is as follows:
  *
  * <ul>
  *   <li>Check the current set of actively used resources, return the active resource if present,
  *       and move any newly inactive resources into the memory cache.
  *   <li>Check the memory cache and provide the cached resource if present.
  *   <li>Check the current set of in progress loads and add the cb to the in progress load if one
  *       is present.
  *   <li>Start a new load.
  * </ul>
  *
  * <p>Active resources are those that have been provided to at least one request and have not yet
  * been released. Once all consumers of a resource have released that resource, the resource then
  * goes to cache. If the resource is ever returned to a new consumer from cache, it is re-added to
  * the active resources. If the resource is evicted from the cache, its resources are recycled and
  * re-used if possible and the resource is discarded. There is no strict requirement that
  * consumers release their resources so active resources are held weakly.
  *
  * @param width The target width in pixels of the desired resource.
  * @param height The target height in pixels of the desired resource.
  * @param cb The callback that will be called when the load completes.
  */
public synchronized <R> LoadStatus load(...) {
  EngineKey key = keyFactory.buildKey(model, signature, width, height, transformations,
      resourceClass, transcodeClass, options);

  EngineResource<?> active = loadFromActiveResources(key, isMemoryCacheable);
  if (active != null) {
    cb.onResourceReady(active, DataSource.MEMORY_CACHE);
    return null;
  }

  EngineResource<?> cached = loadFromCache(key, isMemoryCacheable);
  if (cached != null) {
    cb.onResourceReady(cached, DataSource.MEMORY_CACHE);
    return null;
  }

  EngineJob<?> current = jobs.get(key, onlyRetrieveFromCache);
  if (current != null) {
    current.addCallback(cb, callbackExecutor);
    return new LoadStatus(cb, current);
  }

  EngineJob<R> engineJob =
      engineJobFactory.build(...);

  DecodeJob<R> decodeJob =
      decodeJobFactory.build(...);

  jobs.put(key, engineJob);

  engineJob.addCallback(cb, callbackExecutor);
  engineJob.start(decodeJob);

  return new LoadStatus(cb, engineJob);
}
上面这个方法我们在前一篇文章讲解整体流程时谈到过,链接如下Glide2-3.3-Engine.load。
从注释和代码中我们知道了缓存首先会判断active状态的resource,然后是memory cache,最后就交给了job。那么毫无疑问,job中会进行disk cache的读操作。
只要是缓存,就离不开Key,所以先看看从active resource和memory cache中取缓存时的Key——EngineKey的组成成分:
EngineKey.java
| 组成 | 注释 |
|---|---|
| model | load的参数 |
| signature | BaseRequestOptions的成员变量,默认会是EmptySignature.obtain()在加载本地resource资源时会变成 ApplicationVersionSignature.obtain(context) |
| width height | 如果没有指定override(int size),那么将得到view的size |
| transformations | 默认会基于ImageView的scaleType设置对应的四个Transformation;如果指定了 transform,那么就基于该值进行设置;详见 BaseRequestOptions.transform(Transformation, boolean) |
| resourceClass | 解码后的资源,如果没有asBitmap、asGif,一般会是Object |
| transcodeClass | 最终要转换成的数据类型,根据as方法确定,加载本地res或者网络URL,都会调用asDrawable,所以为Drawable |
| options | 如果没有设置过transform,此处会根据ImageView的scaleType默认指定一个KV,详见上一文2.2节 |
显然,在多次加载同一个model的过程中,即使有稍许改动(比如View宽高等),Glide都不会认为这是同一个Key。此外,值得一提的是,此Key以及其他的Key覆盖equals、hashCode()、toString()方法的写法非常规范,详细可见Effective-Java-第8、9、10条。
回到Engine.load方法中,active状态的resource和memory cache状态的资源其实都是DataSource.MEMORY_CACHE状态,从缓存加载成功后的回调中可以看到。而且,加载出来的资源都是EngineResource对象,该对象的管理策略采用了引用计数算法。该算法的特点是实现简单,判定效率也很高。
EngineResource类的关键代码如下:
class EngineResource<Z> implements Resource<Z> {
  private final boolean isCacheable;
  private final boolean isRecyclable;
  private final Resource<Z> resource;

  private ResourceListener listener;
  private Key key;
  private int acquired;
  private boolean isRecycled;

  interface ResourceListener {
    void onResourceReleased(Key key, EngineResource<?> resource);
  }

  synchronized void setResourceListener(Key key, ResourceListener listener) {
    this.key = key;
    this.listener = listener;
  }
  ...
  synchronized void acquire() {
    if (isRecycled) {
      throw new IllegalStateException("Cannot acquire a recycled resource");
    }
    ++acquired;
  }

  @SuppressWarnings("SynchronizeOnNonFinalField")
  void release() {
    synchronized (listener) {
      synchronized (this) {
        if (acquired <= 0) {
          throw new IllegalStateException("Cannot release a recycled or not yet acquired resource");
        }
        if (--acquired == 0) {
          listener.onResourceReleased(key, this);
        }
      }
    }
  }
  ...
}
在release后,如果引用计数为0,那么会调用listener.onResourceReleased(key, this)方法通知外界此资源已经释放了。实际上,所有的listener都是Engine对象,在Engine.onResourceReleased方法中会将此资源放入memory cache中,如果可以被缓存的话:
@Override
public synchronized void onResourceReleased(Key cacheKey, EngineResource<?> resource) {
  activeResources.deactivate(cacheKey);
  if (resource.isCacheable()) {
    cache.put(cacheKey, resource);
  } else {
    resourceRecycler.recycle(resource);
  }
}
了解了EngineResource之后,在回到Engine.load方法中开始分析。首先是从active resource和memory cache中进行加载的方法:
@Nullable
private EngineResource<?> loadFromActiveResources(Key key, boolean isMemoryCacheable) {
  if (!isMemoryCacheable) {  // ⚠️
    return null;
  }
  EngineResource<?> active = activeResources.get(key);
  if (active != null) {
    active.acquire();
  }

  return active;
}

private EngineResource<?> loadFromCache(Key key, boolean isMemoryCacheable) {
  if (!isMemoryCacheable) {  // ⚠️
    return null;
  }

  EngineResource<?> cached = getEngineResourceFromCache(key);
  if (cached != null) {
    cached.acquire();
    activeResources.activate(key, cached);
  }
  return cached;
}
这里会首先判断skipMemoryCache(true)是否进行过设置。如果设置过,那么上面的isMemoryCacheable对应就会为false,进而这两个方法直接会返回null。否则,会从缓存中尝试进行加载。
只要命中了缓存,那么该资源的引用计数就会加一。而且,如果命中的是memory cache,那么此资源会被提高到active状态中。
显然,第一次运行的时候是没有任何内存缓存的,现在来到了DecodeJob和EngineJob这里。还是在前一篇文章中提到过,DecoceJob实现了Runnable接口,然后会被EngineJob.start方法提交到对应的线程池中去执行。
所以,直接看DecodeJob.run方法咯,该方法真正实现是runWrapped方法。在此方法中,由于runReason此时初始化了为了RunReason.INITIALIZE,又diskCacheStrategy为默认为DiskCacheStrategy.AUTOMATIC,且没有设置过onlyRetrieveFromCache(true)。所以,decode data的状态依次为INITIALIZE -> RESOURCE_CACHE -> DATA_CACHE -> SOURCE -> FINISHED。对应的DataFectcherGenerator的list依次为ResourceCacheGenerator -> DataCacheGenerator -> SourceGenerator。
DecodeJob.java
private Stage getNextStage(Stage current) {
  switch (current) {
    case INITIALIZE:
      return diskCacheStrategy.decodeCachedResource()
          ? Stage.RESOURCE_CACHE : getNextStage(Stage.RESOURCE_CACHE);
    case RESOURCE_CACHE:
      return diskCacheStrategy.decodeCachedData()
          ? Stage.DATA_CACHE : getNextStage(Stage.DATA_CACHE);
    case DATA_CACHE:
      // Skip loading from source if the user opted to only retrieve the resource from cache.
      return onlyRetrieveFromCache ? Stage.FINISHED : Stage.SOURCE;
    case SOURCE:
    case FINISHED:
      return Stage.FINISHED;
    default:
      throw new IllegalArgumentException("Unrecognized stage: " + current);
  }
}

private DataFetcherGenerator getNextGenerator() {
  switch (stage) {
    case RESOURCE_CACHE:
      return new ResourceCacheGenerator(decodeHelper, this);
    case DATA_CACHE:
      return new DataCacheGenerator(decodeHelper, this);
    case SOURCE:
      return new SourceGenerator(decodeHelper, this);
    case FINISHED:
      return null;
    default:
      throw new IllegalStateException("Unrecognized stage: " + stage);
  }
}

private void runGenerators() {
  currentThread = Thread.currentThread();
  startFetchTime = LogTime.getLogTime();
  boolean isStarted = false;
  while (!isCancelled && currentGenerator != null
      && !(isStarted = currentGenerator.startNext())) {
    stage = getNextStage(stage);
    currentGenerator = getNextGenerator();

    if (stage == Stage.SOURCE) {
      reschedule();
      return;
    }
  }
  // We've run out of stages and generators, give up.
  if ((stage == Stage.FINISHED || isCancelled) && !isStarted) {
    notifyFailed();
  }

  // Otherwise a generator started a new load and we expect to be called back in
  // onDataFetcherReady.
}
在前文中我们看到过ResourceCacheGenerator和DataCacheGenerator的源码,知道了前者负责在cache中查找resource资源,而后者负责data资源。
当在两个cache generator中都找不到时,会交给SourceGenerator从source中进行加载。此时,对于一个网络图片资源来说,就是加载网络图片;对于本地资源来说,就是加载本地资源。
那么,resource资源和data资源都是磁盘缓存中的资源,其区别在开头的那段官方文档中有说到,在下面的分析中我们会看到的。
先看看ResourceCacheGenerator中查找缓存时key的组成部分:
ResourceCacheGenerator.java
currentKey =
    new ResourceCacheKey(
        helper.getArrayPool(),
        sourceId,
        helper.getSignature(),
        helper.getWidth(),
        helper.getHeight(),
        transformation,
        resourceClass,
        helper.getOptions());
| 组成 | 注释 |
|---|---|
| helper.getArrayPool() | GlideBuilder.build时初始化,默认为LruArrayPool;但不参与key的equals方法 |
| sourceId | 如果请求的是URL,那么此处会是一个GlideUrl |
| helper.getSignature() | BaseRequestOptions的成员变量,默认会是EmptySignature.obtain()在加载本地resource资源时会变成 ApplicationVersionSignature.obtain(context) |
| helper.getWidth() helper.getHeight() | 如果没有指定override(int size),那么将得到view的size |
| transformation | 默认会根据ImageView的scaleType设置对应的BitmapTransformation;如果指定了 transform,那么就会是指定的值 |
| resourceClass | 可以被编码成的资源类型,比如BitmapDrawable等 |
| helper.getOptions() | 如果没有设置过transform,此处会根据ImageView的scaleType默认指定一个KV,详见上一文2.2节 |
在ResourceCacheKey中,arrayPool并没有参与equals方法,所以判断两个ResourceCacheKey是否相等只需要其他7个参数。
然后看看DataCacheGenerator中Key的组成部分:
DataCacheGenerator.java
| 组成 | 注释 |
|---|---|
| sourceId | 如果请求的是URL,那么此处会是一个GlideUrl |
| helper.getSignature() | BaseRequestOptions的成员变量,默认会是EmptySignature.obtain()在加载本地resource资源时会变成 ApplicationVersionSignature.obtain(context) |
在DataCacheKey中,仅有的两个变量都参与了equals方法。这两个变量就是上面ResourceCacheKey中的两个变量。
显然,data cache就是比较原始的数据构成的缓存,而resource cache是被解码、转换后的data cache,这就印证了文章开头的那段文档。
此外,文档中缓存篇还有很多内容,下面在上一份关于缓存Key的描述,这对应我们在上面列过表格的EngineKey、ResourceCacheKey以及DataCacheKey。
In Glide 4, all cache keys contain at least two elements:
1. The model the load is requested for (File, Uri, Url). If you are using a custom model, it needs to correctly implements hashCode() and equals() 2. An optional SignatureIn fact, the cache keys for steps 1-3 (Active resources, memory cache, resource disk cache) also include a number of other pieces of data including: 1. The width and height 2. The optional Transformation 3. Any added Options 4. The requested data type (Bitmap, GIF, etc)
The keys used for active resources and the memory cache also differ slightly from those used from the resource disk cache to accomodate in memory Options like those that affect the configuration of the Bitmap or other decode time only parameters.
To generate the name of disk cache keys on disk, the individual elements of the keys are hashed to create a single String key, which is then used as the file name in the disk cache.
Cache Keys
看完了,回到ResourceCacheGenerator中,这里会用ResourceCacheKey在磁盘缓存中进行查找。难道我们用ResourceCacheKey的toString()方法作为key吗?肯定不是,因为这样不够Safe,所以我们看看源码中的SafeKey是如何生成的。代码在DiskLruCacheWrapper中,将原始的Key转换为SafeKey是这个wrapper类的重要作用之一。
DiskLruCacheWrapper.java
@Override
public File get(Key key) {
  String safeKey = safeKeyGenerator.getSafeKey(key);
  ...
  File result = null;
  try {
    // It is possible that the there will be a put in between these two gets. If so that shouldn't
    // be a problem because we will always put the same value at the same key so our input streams
    // will still represent the same data.
    final DiskLruCache.Value value = getDiskCache().get(safeKey);
    if (value != null) {
      result = value.getFile(0);
    }
  } catch (IOException e) {
    ...
  }
  return result;
}
这里调用SafeKeyGenerator生成了一个String类型的SafeKey,实际上就是对原始key中每个字段都使用SHA-256加密,然后将得到的字节数组转换为16进制的字符串。SafeKeyGenerator的代码很简单,为了效率还是使用了缓存以及对象池👍👍👍。
SafeKeyGenerator.java
public class SafeKeyGenerator {
  private final LruCache<Key, String> loadIdToSafeHash = new LruCache<>(1000);
  private final Pools.Pool<PoolableDigestContainer> digestPool = FactoryPools.threadSafe(10,
      new FactoryPools.Factory<PoolableDigestContainer>() {
        @Override
        public PoolableDigestContainer create() {
          try {
            return new PoolableDigestContainer(MessageDigest.getInstance("SHA-256"));
          } catch (NoSuchAlgorithmException e) {
            throw new RuntimeException(e);
          }
        }
      });

  public String getSafeKey(Key key) {
    String safeKey;
    synchronized (loadIdToSafeHash) {
      safeKey = loadIdToSafeHash.get(key);
    }
    if (safeKey == null) {
      safeKey = calculateHexStringDigest(key);
    }
    synchronized (loadIdToSafeHash) {
      loadIdToSafeHash.put(key, safeKey);
    }
    return safeKey;
  }

  private String calculateHexStringDigest(Key key) {
    PoolableDigestContainer container = Preconditions.checkNotNull(digestPool.acquire());
    try {
      key.updateDiskCacheKey(container.messageDigest);
      // calling digest() will automatically reset()
      return Util.sha256BytesToHex(container.messageDigest.digest());
    } finally {
      digestPool.release(container);
    }
  }

  private static final class PoolableDigestContainer implements FactoryPools.Poolable {

    @Synthetic final MessageDigest messageDigest;
    private final StateVerifier stateVerifier = StateVerifier.newInstance();

    PoolableDigestContainer(MessageDigest messageDigest) {
      this.messageDigest = messageDigest;
    }

    @NonNull
    @Override
    public StateVerifier getVerifier() {
      return stateVerifier;
    }
  }
}
可以看到,该类的主要功能落在了calculateHexStringDigest方法上,首先从对象池中获取一个消息摘要容器PoolableDigestContainer,然后调用Key.updateDiskCacheKey(MessageDigest)生成消息摘要,最后调用Util.sha256BytesToHex将将得到的字节数组转换为16进制的字符串。
这里我们看一下ResourceCacheKey的消息摘要生成过程,其中具体内容不展开了:
ResourceCacheKey.java
@Override
  public void updateDiskCacheKey(@NonNull MessageDigest messageDigest) {
    byte[] dimensions = arrayPool.getExact(8, byte[].class);
    ByteBuffer.wrap(dimensions).putInt(width).putInt(height).array();
    signature.updateDiskCacheKey(messageDigest);
    sourceKey.updateDiskCacheKey(messageDigest);
    messageDigest.update(dimensions);
    if (transformation != null) {
      transformation.updateDiskCacheKey(messageDigest);
    }
    options.updateDiskCacheKey(messageDigest);
    messageDigest.update(getResourceClassBytes());
    arrayPool.put(dimensions);
  }
回想一下表格------ResourceCacheGenerator中key的组成,表格中的参与equals运算的7个部分都参与了消息摘要的生成。
在进一步处理后,得到了以消息摘要的字符串作为key的SafeKey,并以此在Disk Cache中进行查询,并将查询结果以Value实体返回出来,最后从Value中获取对应文件,Disk Cache的get操作就是这么一个流程。
回到ResourceCacheGenerator中,如果确实有缓存,那么会加载该缓存文件。在前文的分析中,我们知道对于URL来说,调用了ByteBufferFetcher进行缓存文件的加载,加载成功了返回了一个ByteBuffer,并调用了callback也就是ResourceCacheGenerator的onDataReady方法。然后ResourceCacheGenerator又会回调DecodeJob的onDataFetcherReady方法进行后续的解码操作。
ResourceCacheGenerator.java
@Override
public void onDataReady(Object data) {
  cb.onDataFetcherReady(sourceKey, data, loadData.fetcher, DataSource.RESOURCE_DISK_CACHE,
      currentKey);
}
这里先按下不表,因为后面DataCacheGenerator和SourceGenerator的成功回调都会到这里来。我们暂时只需要看一下上面回调方法的一些参数即可。
如果ResourceCacheGenerator没有找到缓存,那么就会交给DataCacheGenerator了。该类大体流程和ResourceCacheGenerator一样,有点不同的是,DataCacheGenerator的构造器有两个构造器,其中的DataCacheGenerator(List<Key>, DecodeHelper<?>, FetcherReadyCallback)构造器是给SourceGenerator准备的。因为如果没有磁盘缓存,那么从源头加载后,肯定需要进行磁盘缓存操作的。所以,SourceGenerator会将加载后的资源保存到磁盘中,然后转交给DataCacheGenerator从磁盘中取出来。
DataCacheGenerator.java
如果DataCacheGenerator没有取到缓存,那么会交给SourceGenerator从源头加载。加载的过程在上一篇文章中也说到过,我们直接略过。现在来到了成功回调onDataReady()方法:
SourceGenerator.java
@Override
public void onDataReady(Object data) {
  DiskCacheStrategy diskCacheStrategy = helper.getDiskCacheStrategy();
  if (data != null && diskCacheStrategy.isDataCacheable(loadData.fetcher.getDataSource())) {
    dataToCache = data;
    // We might be being called back on someone else's thread. Before doing anything, we should
    // reschedule to get back onto Glide's thread.
    cb.reschedule();
  } else {
    cb.onDataFetcherReady(loadData.sourceKey, data, loadData.fetcher,
        loadData.fetcher.getDataSource(), originalKey);
  }
}
这里首先看会获取到的数据是否需要进行磁盘缓存:如果需要磁盘缓存,则经过DecodeJob、EngineJob的调度,重新调用SourceGenerator.startNext方法,进行磁盘缓存的写入,并转交给DataCacheGenerator完成后续的处理;否则就通知DecodeJob已经加载成功了。两个路径返回给DecodeJob的回调中,dataSource都是统一的,都是源头的dataSource。
两种不同路径的回调如下:
SourceGenerator.java
// 不需要磁盘缓存的路径
@Override
public void onDataReady(Object data) {
  ...
  if (...) {
    ...
  } else {
    cb.onDataFetcherReady(loadData.sourceKey, data, loadData.fetcher,
        loadData.fetcher.getDataSource(), originalKey);
  }
}

// 需要磁盘缓存的路径
@Override
public void onDataFetcherReady(Key sourceKey, Object data, DataFetcher<?> fetcher,
    DataSource dataSource, Key attemptedKey) {
  // This data fetcher will be loading from a File and provide the wrong data source, so override
  // with the data source of the original fetcher
  cb.onDataFetcherReady(sourceKey, data, fetcher, loadData.fetcher.getDataSource(), sourceKey);
}
磁盘缓存策略默认是DiskCacheStrategy.AUTOMATIC,其data资源缓存策略只缓存远程资源,也就是URL这种:
DiskCacheStrategy.AUTOMATIC
@Override
public boolean isDataCacheable(DataSource dataSource) {
  return dataSource == DataSource.REMOTE;
}
在加载的就是URL的情况下,我们看一下磁盘缓存写入过程的流程。
首先经过DecodeJob.reschedule()进行线程的调整后,又开始了startNext()方法。由于dataToCache保存了获取的原始数据,所以会调用cacheData方法进行缓存。cacheData方法先构建了一个DataCacheKey将data写入了磁盘,然后new了一个DataCacheGenerator。回到startNext()方法,此时sourceCacheGenerator不为空,就调用其startNext()方法从热乎的磁盘缓存中进行加载,并返回了true让DecodeJob停止尝试。
SourceGenerator.java
@Override
public void onDataReady(Object data) {
  DiskCacheStrategy diskCacheStrategy = helper.getDiskCacheStrategy();
  if (data != null && diskCacheStrategy.isDataCacheable(loadData.fetcher.getDataSource())) {
    dataToCache = data;
    // We might be being called back on someone else's thread. Before doing anything, we should
    // reschedule to get back onto Glide's thread.
    cb.reschedule();
  } else {
    ...
  }
}

@Override
public boolean startNext() {
  if (dataToCache != null) {
    Object data = dataToCache;
    dataToCache = null;
    cacheData(data);
  }

  if (sourceCacheGenerator != null && sourceCacheGenerator.startNext()) {
    return true;
  }
  ...
}

private void cacheData(Object dataToCache) {
  try {
    Encoder<Object> encoder = helper.getSourceEncoder(dataToCache);
    DataCacheWriter<Object> writer =
        new DataCacheWriter<>(encoder, dataToCache, helper.getOptions());
    originalKey = new DataCacheKey(loadData.sourceKey, helper.getSignature());
    helper.getDiskCache().put(originalKey, writer);
  } finally {
    loadData.fetcher.cleanup();
  }

  sourceCacheGenerator =
      new DataCacheGenerator(Collections.singletonList(loadData.sourceKey), helper, this);
}
无论上面三个DataFetcherGenerator之间怎么折腾,现在终于成功加载到了数据。所有缓存的读缓存操作也已经完成,剩下的都是写缓存了。
结下来表表上面按下不表的内容,即DecodeJob.onDataFetcherReady方法。该方法完成两个事情:
- 将比较原始的data数据转变为可以供ImageView显示的resource数据
- 将resource数据显示出来
这里面的每行代码的分析都在Glide2-3.9-DecodeJob.FetcherReadyCallback中,这里只说一下涉及到缓存的位置。
在过程1中,将原始data encode成resource数据后,会调用DecodeJob.onResourceDecoded对resource数据进行进一步的处理。DecodeJob.onResourceDecoded首先会对resource进行transform,然后可能会进行磁盘缓存。
DecodeJob.java
@Synthetic
@NonNull
<Z> Resource<Z> onResourceDecoded(DataSource dataSource,
    @NonNull Resource<Z> decoded) {
  @SuppressWarnings("unchecked")
  Class<Z> resourceSubClass = (Class<Z>) decoded.get().getClass();
  Transformation<Z> appliedTransformation = null;
  Resource<Z> transformed = decoded;
  if (dataSource != DataSource.RESOURCE_DISK_CACHE) {
    appliedTransformation = decodeHelper.getTransformation(resourceSubClass);
    transformed = appliedTransformation.transform(glideContext, decoded, width, height);
  }
  // TODO: Make this the responsibility of the Transformation.
  if (!decoded.equals(transformed)) {
    decoded.recycle();
  }

  final EncodeStrategy encodeStrategy;
  final ResourceEncoder<Z> encoder;
  if (decodeHelper.isResourceEncoderAvailable(transformed)) {
    encoder = decodeHelper.getResultEncoder(transformed);
    encodeStrategy = encoder.getEncodeStrategy(options);
  } else {
    encoder = null;
    encodeStrategy = EncodeStrategy.NONE;
  }

  Resource<Z> result = transformed;
  boolean isFromAlternateCacheKey = !decodeHelper.isSourceKey(currentSourceKey);
  if (diskCacheStrategy.isResourceCacheable(isFromAlternateCacheKey, dataSource,
      encodeStrategy)) {
    if (encoder == null) {
      throw new Registry.NoResultEncoderAvailableException(transformed.get().getClass());
    }
    final Key key;
    switch (encodeStrategy) {
      case SOURCE:
        key = new DataCacheKey(currentSourceKey, signature);
        break;
      case TRANSFORMED:
        key =
            new ResourceCacheKey(
                decodeHelper.getArrayPool(),
                currentSourceKey,
                signature,
                width,
                height,
                appliedTransformation,
                resourceSubClass,
                options);
        break;
      default:
        throw new IllegalArgumentException("Unknown strategy: " + encodeStrategy);
    }

    LockedResource<Z> lockedResult = LockedResource.obtain(transformed);
    deferredEncodeManager.init(key, encoder, lockedResult);
    result = lockedResult;
  }
  return result;
}
从上面的源码中可以看到,当dataSource != DataSource.RESOURCE_DISK_CACHE时会进行transform。哦~,这是因为resource cache肯定已经经历过transform了,所以就不用重新来一遍了。
然后是此过程中的磁盘缓存过程,影响的因素有encodeStrategy、DiskCacheStrategy.isResourceCacheable:
- encodeStrategy
根据resource数据的类型来判断,如果是Bitmap或BitmapDrawable,那么就是TRANSFORMED;
如果是GifDrawable,那么就是SOURCE。
详细请看BitmapEncoder、BitmapDrawableEncoder和GifDrawableEncoder类 - DiskCacheStrategy.isResourceCacheable
isFromAlternateCacheKey搜了一遍源码,只有一个没有使用过的类BaseGlideUrlLoader中发现了痕迹,还是一个空集合实现,没有其他任何位置在使用,所以此处可以简单理解的该参数一直为false。
也就是说,只有dataSource为DataSource.LOCAL且encodeStrategy为EncodeStrategy.TRANSFORMED时,才允许缓存。换句话说,只有本地的resource数据为Bitmap或BitmapDrawable的资源才可以缓存。
最后,如果可以缓存,会初始化一个deferredEncodeManager,在展示resource资源后会调用此对象进行磁盘缓存的写入。写入的代码如下:
// DecodeJob.java
//
// deferredEncodeManager.init(key, encoder, LockedResource.obtain(transformed));
private void notifyEncodeAndRelease(Resource<R> resource, DataSource dataSource) {
  if (resource instanceof Initializable) {
    ((Initializable) resource).initialize();
  }

  Resource<R> result = resource;
  LockedResource<R> lockedResource = null;
  if (deferredEncodeManager.hasResourceToEncode()) {
    lockedResource = LockedResource.obtain(resource);
    result = lockedResource;
  }

  notifyComplete(result, dataSource);

  stage = Stage.ENCODE;
  try {
    if (deferredEncodeManager.hasResourceToEncode()) {
      deferredEncodeManager.encode(diskCacheProvider, options);
    }
  } finally {
    if (lockedResource != null) {
      lockedResource.unlock();
    }
  }
  // Call onEncodeComplete outside the finally block so that it's not called if the encode process
  // throws.
  onEncodeComplete();
}

// DecodeJob#DeferredEncodeManager
private static class DeferredEncodeManager<Z> {
  private Key key;
  private ResourceEncoder<Z> encoder;
  private LockedResource<Z> toEncode;

  @Synthetic
  DeferredEncodeManager() { }

  // We just need the encoder and resource type to match, which this will enforce.
  @SuppressWarnings("unchecked")
  <X> void init(Key key, ResourceEncoder<X> encoder, LockedResource<X> toEncode) {
    this.key = key;
    this.encoder = (ResourceEncoder<Z>) encoder;
    this.toEncode = (LockedResource<Z>) toEncode;
  }

  void encode(DiskCacheProvider diskCacheProvider, Options options) {
    GlideTrace.beginSection("DecodeJob.encode");
    try {
      diskCacheProvider.getDiskCache().put(key,
          new DataCacheWriter<>(encoder, toEncode, options));
    } finally {
      toEncode.unlock();
      GlideTrace.endSection();
    }
  }

  boolean hasResourceToEncode() {
    return toEncode != null;
  }

  void clear() {
    key = null;
    encoder = null;
    toEncode = null;
  }
}
DiskLruCacheWrapper在写入的时候会使用到写锁DiskCacheWriteLocker,锁对象由对象池创建(Glide中对象池和缓存真的是无所不在👍👍👍),写锁WriteLock实现是一个重入锁ReentrantLock,该锁默认是一个不公平锁。
在缓存写入前,会判断key对应的value存不存在,若存在则放弃写入。缓存的真正写入会由DataCacheWriter交给ByteBufferEncoder和StreamEncoder两个具体类来写入,前者负责将ByteBuffer写入到文件,后者负责将InputStream写入到文件。
至此,磁盘缓存的读写都已经完毕,剩下的就是内存缓存的两个层次了。我们回到DecodeJob.notifyEncodeAndRelease方法中,经过notifyComplete、EngineJob.onResourceReady、notifyCallbacksOfResult方法中。
在该方法中一方面会将原始的resource包装成一个EngineResource,然后通过回调传给Engine.onEngineJobComplete,在这里会将资源保持在active resource中:
Engine.java
@Override
public synchronized void onEngineJobComplete(
    EngineJob<?> engineJob, Key key, EngineResource<?> resource) {
  // A null resource indicates that the load failed, usually due to an exception.
  if (resource != null) {
    resource.setResourceListener(key, this);

    if (resource.isCacheable()) {
      activeResources.activate(key, resource);
    }
  }

  jobs.removeIfCurrent(key, engineJob);
}
另一方面会使用Executors.mainThreadExecutor()调用SingleRequest.onResourceReady回调进行资源的显示。
在触发回调前后各有一个地方会对engineResource进行acquire()和release()操作。该过程发生在notifyCallbacksOfResult()方法的incrementPendingCallbacks、decrementPendingCallbacks()调用中。这一顿操作下来,engineResource的引用计数应该是1:
EngineJob.java
@Synthetic
void notifyCallbacksOfResult() {
  ResourceCallbacksAndExecutors copy;
  Key localKey;
  EngineResource<?> localResource;
  synchronized (this) {
    ...
    engineResource = engineResourceFactory.build(resource, isCacheable);
    // Hold on to resource for duration of our callbacks below so we don't recycle it in the
    // middle of notifying if it synchronously released by one of the callbacks. Acquire it under
    // a lock here so that any newly added callback that executes before the next locked section
    // below can't recycle the resource before we call the callbacks.
    hasResource = true;
    copy = cbs.copy();
    incrementPendingCallbacks(copy.size() + 1);

    localKey = key;
    localResource = engineResource;
  }

  listener.onEngineJobComplete(this, localKey, localResource);

  for (final ResourceCallbackAndExecutor entry : copy) {
    entry.executor.execute(new CallResourceReady(entry.cb));
  }
  decrementPendingCallbacks();
}

synchronized void incrementPendingCallbacks(int count) {
  ...
  if (pendingCallbacks.getAndAdd(count) == 0 && engineResource != null) {
    engineResource.acquire();
  }
}

synchronized void decrementPendingCallbacks() {
  ...
  int decremented = pendingCallbacks.decrementAndGet();
  if (decremented == 0) {
    if (engineResource != null) {
      engineResource.release();
    }

    release();
  }
}

private class CallResourceReady implements Runnable {

  private final ResourceCallback cb;

  CallResourceReady(ResourceCallback cb) {
    this.cb = cb;
  }

  @Override
  public void run() {
    synchronized (EngineJob.this) {
      if (cbs.contains(cb)) {
        // Acquire for this particular callback.
        engineResource.acquire();
        callCallbackOnResourceReady(cb);
        removeCallback(cb);
      }
      decrementPendingCallbacks();
    }
  }
}
engineResource的引用计数会在RequestManager.onDestory方法中经过clear、untrackOrDelegate、untrack、RequestTracker.clearRemoveAndRecycle、clearRemoveAndMaybeRecycle方法,调用SingleRequest.clear()方法经过releaseResource()、Engine.release,进行释放。这样引用计数就为0了。
Tip
Tips: 可以在打断点的时候在Evaluate Expression功能中调用Log.x(String, String, Throwable)方法打印出调用栈
前面在看EngineResource的代码时我们知道,一旦引用计数为0,就会通知Engine将此资源从active状态变成memory cache状态。如果我们再次加载资源时可以从memory cache中加载,那么资源又会从memory cache状态变成active状态。
也就是说,在资源第一次显示后,我们关闭页面,资源会由active变成memory cache;然后我们再次进入页面,加载时会命中memory cache,从而又变成active状态。
本章Glide缓存机制的源码内容到此为止了,现在看看文章最开始的流程图,是不是有一点点熟悉的味道。
最后,摘抄一下Glide官方文档对于缓存更新的说明:
Because disk cache are hashed keys, there is no good way to simply delete all of the cached files on disk that correspond to a particular url or file path. The problem would be simpler if you were only ever allowed to load or cache the original image, but since Glide also caches thumbnails and provides various transformations, each of which will result in a new File in the cache, tracking down and deleting every cached version of an image is difficult.
In practice, the best way to invalidate a cache file is to change your identifier when the content changes (url, uri, file path etc) when possible.
Since it’s often difficult or impossible to change identifiers, Glide also offers the
signature()API to mix in additional data that you control into your cache key. Signatures work well for media store content, as well as any content you can maintain some versioning metadata for.
- Media store content - For media store content, you can use Glide’sMediaStoreSignatureclass as your signature. MediaStoreSignature allows you to mix the date modified time, mime type, and orientation of a media store item into the cache key. These three attributes reliably catch edits and updates allowing you to cache media store thumbs. - Files - You can useObjectKeyto mix in the File’s date modified time. - Urls - Although the best way to invalidate urls is to make sure the server changes the url and updates the client when the content at the url changes, you can also useObjectKeyto mix in arbitrary metadata (such as a version number) instead.If all else fails and you can neither change your identifier nor keep track of any reasonable version metadata, you can also disable disk caching entirely using
diskCacheStrategy()andDiskCacheStrategy.NONE.
Cache Invalidation