@NonNullprivatestaticRequestManagerRetrievergetRetriever(@NullableContextcontext){// Context could be null for other reasons (ie the user passes in null), but in practice it will// only occur due to errors with the Fragment lifecycle.Preconditions.checkNotNull(context,"You cannot start a load on a not yet attached View or a Fragment where getActivity() "+"returns null (which usually occurs when getActivity() is called before the Fragment "+"is attached or after the Fragment is destroyed).");returnGlide.get(context).getRequestManagerRetriever();}
@NonNullpublicstaticGlideget(@NonNullContextcontext){if(glide==null){synchronized(Glide.class){if(glide==null){checkAndInitializeGlide(context);}}}returnglide;}privatestaticvoidcheckAndInitializeGlide(@NonNullContextcontext){// In the thread running initGlide(), one or more classes may call Glide.get(context).// Without this check, those calls could trigger infinite recursion.if(isInitializing){thrownewIllegalStateException("You cannot call Glide.get() in registerComponents(),"+" use the provided Glide instance instead");}isInitializing=true;initializeGlide(context);isInitializing=false;}privatestaticvoidinitializeGlide(@NonNullContextcontext){initializeGlide(context,newGlideBuilder());}
@NonNullprivateRequestManagergetApplicationManager(@NonNullContextcontext){// Either an application context or we're on a background thread.if(applicationManager==null){synchronized(this){if(applicationManager==null){// Normally pause/resume is taken care of by the fragment we add to the fragment or// activity. However, in this case since the manager attached to the application will not// receive lifecycle events, we must force the manager to start resumed using// ApplicationLifecycle.// TODO(b/27524013): Factor out this Glide.get() call.Glideglide=Glide.get(context.getApplicationContext());applicationManager=factory.build(glide,newApplicationLifecycle(),newEmptyRequestManagerTreeNode(),context.getApplicationContext());}}}returnapplicationManager;}@NonNullpublicRequestManagerget(@NonNullContextcontext){if(context==null){thrownewIllegalArgumentException("You cannot start a load on a null Context");}elseif(Util.isOnMainThread()&&!(contextinstanceofApplication)){if(contextinstanceofFragmentActivity){returnget((FragmentActivity)context);}elseif(contextinstanceofActivity){returnget((Activity)context);}elseif(contextinstanceofContextWrapper){returnget(((ContextWrapper)context).getBaseContext());}}returngetApplicationManager(context);}@NonNullpublicRequestManagerget(@NonNullFragmentActivityactivity){if(Util.isOnBackgroundThread()){returnget(activity.getApplicationContext());}else{assertNotDestroyed(activity);FragmentManagerfm=activity.getSupportFragmentManager();returnsupportFragmentGet(activity,fm,/*parentHint=*/null,isActivityVisible(activity));}}@NonNullpublicRequestManagerget(@NonNullFragmentfragment){Preconditions.checkNotNull(fragment.getActivity(),"You cannot start a load on a fragment before it is attached or after it is destroyed");if(Util.isOnBackgroundThread()){returnget(fragment.getActivity().getApplicationContext());}else{FragmentManagerfm=fragment.getChildFragmentManager();returnsupportFragmentGet(fragment.getActivity(),fm,fragment,fragment.isVisible());}}@SuppressWarnings("deprecation")@NonNullpublicRequestManagerget(@NonNullActivityactivity){if(Util.isOnBackgroundThread()){returnget(activity.getApplicationContext());}else{assertNotDestroyed(activity);android.app.FragmentManagerfm=activity.getFragmentManager();returnfragmentGet(activity,fm,/*parentHint=*/null,isActivityVisible(activity));}}@SuppressWarnings("deprecation")@NonNullpublicRequestManagerget(@NonNullViewview){if(Util.isOnBackgroundThread()){returnget(view.getContext().getApplicationContext());}Preconditions.checkNotNull(view);Preconditions.checkNotNull(view.getContext(),"Unable to obtain a request manager for a view without a Context");Activityactivity=findActivity(view.getContext());// The view might be somewhere else, like a service.if(activity==null){returnget(view.getContext().getApplicationContext());}// Support Fragments.// Although the user might have non-support Fragments attached to FragmentActivity, searching// for non-support Fragments is so expensive pre O and that should be rare enough that we// prefer to just fall back to the Activity directly.if(activityinstanceofFragmentActivity){Fragmentfragment=findSupportFragment(view,(FragmentActivity)activity);returnfragment!=null?get(fragment):get(activity);}// Standard Fragments.android.app.Fragmentfragment=findFragment(view,activity);if(fragment==null){returnget(activity);}returnget(fragment);}
// FragmentActivity activityFragmentManagerfm=activity.getSupportFragmentManager();supportFragmentGet(activity,fm,/*parentHint=*/null,isActivityVisible(activity));// Fragment fragmentFragmentManagerfm=fragment.getChildFragmentManager();supportFragmentGet(fragment.getActivity(),fm,fragment,fragment.isVisible());
@NonNullpublic<YextendsTarget<TranscodeType>>Yinto(@NonNullYtarget){returninto(target,/*targetListener=*/null,Executors.mainThreadExecutor());}@NonNull@Synthetic<YextendsTarget<TranscodeType>>Yinto(@NonNullYtarget,@NullableRequestListener<TranscodeType>targetListener,ExecutorcallbackExecutor){returninto(target,targetListener,/*options=*/this,callbackExecutor);}private<YextendsTarget<TranscodeType>>Yinto(@NonNullYtarget,@NullableRequestListener<TranscodeType>targetListener,BaseRequestOptions<?>options,ExecutorcallbackExecutor){...//见后文分解}// 🤚🤚🤚 这是我们最常用的一个重载@NonNullpublicViewTarget<ImageView,TranscodeType>into(@NonNullImageViewview){// sanity checkUtil.assertMainThread();Preconditions.checkNotNull(view);BaseRequestOptions<?>requestOptions=this;// 若没有指定transform,isTransformationSet()为false// isTransformationAllowed()一般为true,除非主动调用了dontTransform()方法if(!requestOptions.isTransformationSet()&&requestOptions.isTransformationAllowed()&&view.getScaleType()!=null){// Clone in this method so that if we use this RequestBuilder to load into a View and then// into a different target, we don't retain the transformation applied based on the previous// View's scale type.//// 根据ImageView的ScaleType设置不同的down sample和transform选项switch(view.getScaleType()){caseCENTER_CROP:requestOptions=requestOptions.clone().optionalCenterCrop();break;caseCENTER_INSIDE:requestOptions=requestOptions.clone().optionalCenterInside();break;caseFIT_CENTER:// 默认值caseFIT_START:caseFIT_END:requestOptions=requestOptions.clone().optionalFitCenter();break;caseFIT_XY:requestOptions=requestOptions.clone().optionalCenterInside();break;caseCENTER:caseMATRIX:default:// Do nothing.}}// 调用上面的重载方法returninto(glideContext.buildImageViewTarget(view,transcodeClass),/*targetListener=*/null,requestOptions,Executors.mainThreadExecutor());}
@NonNull@CheckResultpublicToptionalFitCenter(){returnoptionalScaleOnlyTransform(DownsampleStrategy.FIT_CENTER,newFitCenter());}@NonNullprivateToptionalScaleOnlyTransform(@NonNullDownsampleStrategystrategy,@NonNullTransformation<Bitmap>transformation){returnscaleOnlyTransform(strategy,transformation,false/*isTransformationRequired*/);}@SuppressWarnings("unchecked")@NonNullprivateTscaleOnlyTransform(@NonNullDownsampleStrategystrategy,@NonNullTransformation<Bitmap>transformation,booleanisTransformationRequired){BaseRequestOptions<T>result=isTransformationRequired?transform(strategy,transformation):optionalTransform(strategy,transformation);result.isScaleOnlyOrNoTransform=true;return(T)result;}@SuppressWarnings({"WeakerAccess","CheckResult"})@NonNullfinalToptionalTransform(@NonNullDownsampleStrategydownsampleStrategy,@NonNullTransformation<Bitmap>transformation){// isAutoCloneEnabled默认为false,只有在主动调用了autoClone()方法之后才会为trueif(isAutoCloneEnabled){returnclone().optionalTransform(downsampleStrategy,transformation);}downsample(downsampleStrategy);returntransform(transformation,/*isRequired=*/false);}@NonNull@CheckResultpublicTdownsample(@NonNullDownsampleStrategystrategy){returnset(DownsampleStrategy.OPTION,Preconditions.checkNotNull(strategy));}@NonNull@CheckResultpublic<Y>Tset(@NonNullOption<Y>option,@NonNullYvalue){if(isAutoCloneEnabled){returnclone().set(option,value);}Preconditions.checkNotNull(option);Preconditions.checkNotNull(value);options.set(option,value);returnselfOrThrowIfLocked();}@NonNullTtransform(@NonNullTransformation<Bitmap>transformation,booleanisRequired){if(isAutoCloneEnabled){returnclone().transform(transformation,isRequired);}DrawableTransformationdrawableTransformation=newDrawableTransformation(transformation,isRequired);transform(Bitmap.class,transformation,isRequired);transform(Drawable.class,drawableTransformation,isRequired);// TODO: remove BitmapDrawable decoder and this transformation.// Registering as BitmapDrawable is simply an optimization to avoid some iteration and// isAssignableFrom checks when obtaining the transformation later on. It can be removed without// affecting the functionality.transform(BitmapDrawable.class,drawableTransformation.asBitmapDrawable(),isRequired);transform(GifDrawable.class,newGifDrawableTransformation(transformation),isRequired);returnselfOrThrowIfLocked();}@NonNull<Y>Ttransform(@NonNullClass<Y>resourceClass,@NonNullTransformation<Y>transformation,booleanisRequired){if(isAutoCloneEnabled){returnclone().transform(resourceClass,transformation,isRequired);}Preconditions.checkNotNull(resourceClass);Preconditions.checkNotNull(transformation);transformations.put(resourceClass,transformation);fields|=TRANSFORMATION;isTransformationAllowed=true;fields|=TRANSFORMATION_ALLOWED;// Always set to false here. Known scale only transformations will call this method and then// set isScaleOnlyOrNoTransform to true immediately after.isScaleOnlyOrNoTransform=false;if(isRequired){fields|=TRANSFORMATION_REQUIRED;isTransformationRequired=true;}returnselfOrThrowIfLocked();}
/** Posts executions to the main thread. */publicstaticExecutormainThreadExecutor(){returnMAIN_THREAD_EXECUTOR;}privatestaticfinalExecutorMAIN_THREAD_EXECUTOR=newExecutor(){privatefinalHandlerhandler=newHandler(Looper.getMainLooper());@Overridepublicvoidexecute(@NonNullRunnablecommand){handler.post(command);}};
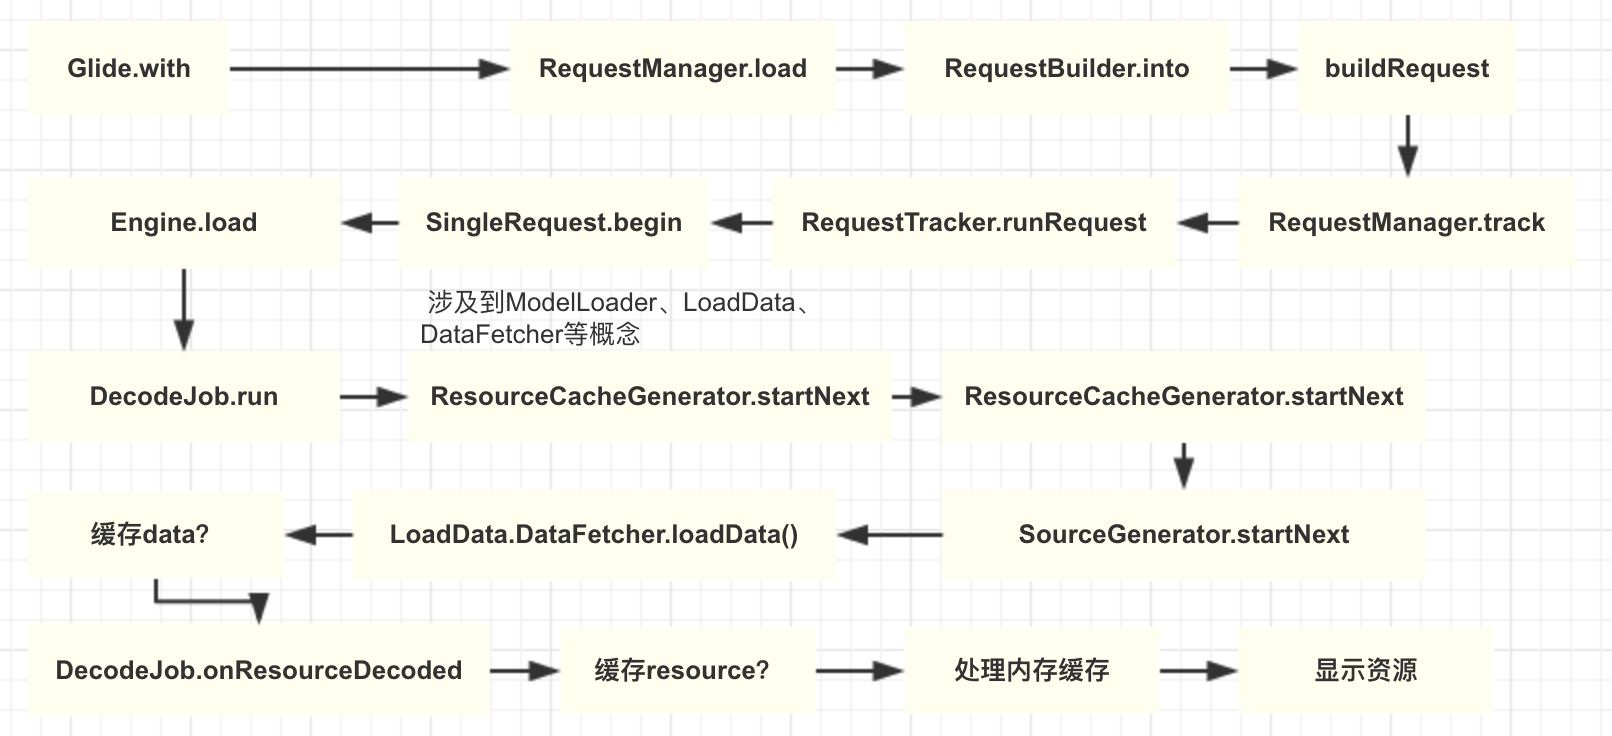
现在我们终于回到了最终的load重载方法:
private<YextendsTarget<TranscodeType>>Yinto(@NonNullYtarget,@NullableRequestListener<TranscodeType>targetListener,BaseRequestOptions<?>options,ExecutorcallbackExecutor){// sanity checkPreconditions.checkNotNull(target);if(!isModelSet){thrownewIllegalArgumentException("You must call #load() before calling #into()");}// 创建了一个SingleRequest,见后面️⛰️⛰️⛰️Requestrequest=buildRequest(target,targetListener,options,callbackExecutor);// 这里会判断需不需要重新开始任务// 如果当前request和target上之前的request previous相等// 且设置了忽略内存缓存或previous还没有完成// 那么会进入if分支,无需进行一些相关设置,这是一个很好的优化Requestprevious=target.getRequest();if(request.isEquivalentTo(previous)&&!isSkipMemoryCacheWithCompletePreviousRequest(options,previous)){request.recycle();// If the request is completed, beginning again will ensure the result is re-delivered,// triggering RequestListeners and Targets. If the request is failed, beginning again will// restart the request, giving it another chance to complete. If the request is already// running, we can let it continue running without interruption.// 如果正在运行,就不管它;如果已经失败了,就重新开始if(!Preconditions.checkNotNull(previous).isRunning()){// Use the previous request rather than the new one to allow for optimizations like skipping// setting placeholders, tracking and un-tracking Targets, and obtaining View dimensions// that are done in the individual Request.previous.begin();}returntarget;}// 如果不能复用previous// 先清除target上之前的RequestrequestManager.clear(target);// 将Request作为tag设置到view中target.setRequest(request);// 😷😷😷 真正开始网络图片的加载requestManager.track(target,request);returntarget;}
privateRequestbuildRequest(Target<TranscodeType>target,@NullableRequestListener<TranscodeType>targetListener,BaseRequestOptions<?>requestOptions,ExecutorcallbackExecutor){returnbuildRequestRecursive(target,targetListener,// null/*parentCoordinator=*/null,transitionOptions,requestOptions.getPriority(),// Priority.NORMALrequestOptions.getOverrideWidth(),// UNSETrequestOptions.getOverrideHeight(),// UNSETrequestOptions,callbackExecutor);// Executors.mainThreadExecutor()}privateRequestbuildRequestRecursive(Target<TranscodeType>target,@NullableRequestListener<TranscodeType>targetListener,@NullableRequestCoordinatorparentCoordinator,TransitionOptions<?,?superTranscodeType>transitionOptions,Prioritypriority,intoverrideWidth,intoverrideHeight,BaseRequestOptions<?>requestOptions,ExecutorcallbackExecutor){// Build the ErrorRequestCoordinator first if necessary so we can update parentCoordinator.ErrorRequestCoordinatorerrorRequestCoordinator=null;// errorBuilder为null, skip// 因此errorRequestCoordinator为nullif(errorBuilder!=null){errorRequestCoordinator=newErrorRequestCoordinator(parentCoordinator);parentCoordinator=errorRequestCoordinator;}// 如何获得SingleRequestRequestmainRequest=buildThumbnailRequestRecursive(target,targetListener,// nullparentCoordinator,// nulltransitionOptions,priority,overrideWidth,overrideHeight,requestOptions,callbackExecutor);// errorRequestCoordinator为nullif(errorRequestCoordinator==null){returnmainRequest;}...}privateRequestbuildThumbnailRequestRecursive(Target<TranscodeType>target,RequestListener<TranscodeType>targetListener,@NullableRequestCoordinatorparentCoordinator,TransitionOptions<?,?superTranscodeType>transitionOptions,Prioritypriority,intoverrideWidth,intoverrideHeight,BaseRequestOptions<?>requestOptions,ExecutorcallbackExecutor){// thumbnail重载方法没有调用过,所以会走最后的else caseif(thumbnailBuilder!=null){...}elseif(thumbSizeMultiplier!=null){...}else{// Base case: no thumbnail.returnobtainRequest(target,targetListener,requestOptions,parentCoordinator,transitionOptions,priority,overrideWidth,overrideHeight,callbackExecutor);}}privateRequestobtainRequest(Target<TranscodeType>target,RequestListener<TranscodeType>targetListener,BaseRequestOptions<?>requestOptions,RequestCoordinatorrequestCoordinator,TransitionOptions<?,?superTranscodeType>transitionOptions,Prioritypriority,intoverrideWidth,intoverrideHeight,ExecutorcallbackExecutor){returnSingleRequest.obtain(context,glideContext,model,transcodeClass,requestOptions,overrideWidth,overrideHeight,priority,target,targetListener,requestListeners,requestCoordinator,glideContext.getEngine(),transitionOptions.getTransitionFactory(),callbackExecutor);}
/** * Starts tracking the given request. */publicvoidrunRequest(@NonNullRequestrequest){requests.add(request);if(!isPaused){request.begin();}else{request.clear();if(Log.isLoggable(TAG,Log.VERBOSE)){Log.v(TAG,"Paused, delaying request");}pendingRequests.add(request);}}
@Overridepublicsynchronizedvoidbegin(){// sanity checkassertNotCallingCallbacks();stateVerifier.throwIfRecycled();startTime=LogTime.getLogTime();// 如果model为空,会调用监听器的onLoadFailed处理// 若无法处理,则展示失败时的占位图if(model==null){if(Util.isValidDimensions(overrideWidth,overrideHeight)){width=overrideWidth;height=overrideHeight;}// Only log at more verbose log levels if the user has set a fallback drawable, because// fallback Drawables indicate the user expects null models occasionally.intlogLevel=getFallbackDrawable()==null?Log.WARN:Log.DEBUG;onLoadFailed(newGlideException("Received null model"),logLevel);return;}if(status==Status.RUNNING){thrownewIllegalArgumentException("Cannot restart a running request");}// If we're restarted after we're complete (usually via something like a notifyDataSetChanged// that starts an identical request into the same Target or View), we can simply use the// resource and size we retrieved the last time around and skip obtaining a new size, starting a// new load etc. This does mean that users who want to restart a load because they expect that// the view size has changed will need to explicitly clear the View or Target before starting// the new load.//// 如果我们在请求完成后想重新开始加载,那么就会返回已经加载好的资源// 如果由于view尺寸的改变,我们的确需要重新来加载,此时我们需要明确地清除View或Targetif(status==Status.COMPLETE){onResourceReady(resource,DataSource.MEMORY_CACHE);return;}// Restarts for requests that are neither complete nor running can be treated as new requests// and can run again from the beginning.//// 请求岂没有完成也没有在运行,就当作新请求来对待。此时可以从beginning开始运行// 如果指定了overrideWidth和overrideHeight,那么直接调用onSizeReady方法// 否则会获取ImageView的宽、高,然后调用onSizeReady方法// 在该方法中会创建图片加载的Job并开始执行status=Status.WAITING_FOR_SIZE;if(Util.isValidDimensions(overrideWidth,overrideHeight)){onSizeReady(overrideWidth,overrideHeight);}else{target.getSize(this);}// 显示加载中的占位符if((status==Status.RUNNING||status==Status.WAITING_FOR_SIZE)&&canNotifyStatusChanged()){target.onLoadStarted(getPlaceholderDrawable());}if(IS_VERBOSE_LOGGABLE){logV("finished run method in "+LogTime.getElapsedMillis(startTime));}}
privatesynchronizedvoidonLoadFailed(GlideExceptione,intmaxLogLevel){stateVerifier.throwIfRecycled();e.setOrigin(requestOrigin);intlogLevel=glideContext.getLogLevel();if(logLevel<=maxLogLevel){Log.w(GLIDE_TAG,"Load failed for "+model+" with size ["+width+"x"+height+"]",e);if(logLevel<=Log.INFO){e.logRootCauses(GLIDE_TAG);}}// 设置状态为Status.FAILEDloadStatus=null;status=Status.FAILED;isCallingCallbacks=true;try{//TODO: what if this is a thumbnail request?// 尝试调用各个listener的onLoadFailed回调进行处理booleananyListenerHandledUpdatingTarget=false;if(requestListeners!=null){for(RequestListener<R>listener:requestListeners){anyListenerHandledUpdatingTarget|=listener.onLoadFailed(e,model,target,isFirstReadyResource());}}anyListenerHandledUpdatingTarget|=targetListener!=null&&targetListener.onLoadFailed(e,model,target,isFirstReadyResource());// 如果没有一个回调能够处理,那么显示失败占位符if(!anyListenerHandledUpdatingTarget){setErrorPlaceholder();}}finally{isCallingCallbacks=false;}// 通知requestCoordinator,此请求失败notifyLoadFailed();}privatevoidnotifyLoadFailed(){if(requestCoordinator!=null){requestCoordinator.onRequestFailed(this);}}
看一下setErrorPlaceholder中显示失败占位符的逻辑:
privatesynchronizedvoidsetErrorPlaceholder(){if(!canNotifyStatusChanged()){return;}Drawableerror=null;if(model==null){error=getFallbackDrawable();}// Either the model isn't null, or there was no fallback drawable set.if(error==null){error=getErrorDrawable();}// The model isn't null, no fallback drawable was set or no error drawable was set.if(error==null){error=getPlaceholderDrawable();}target.onLoadFailed(error);}
@OverridepublicsynchronizedvoidonSizeReady(intwidth,intheight){stateVerifier.throwIfRecycled();if(IS_VERBOSE_LOGGABLE){logV("Got onSizeReady in "+LogTime.getElapsedMillis(startTime));}// 在SingleRequest.begin方法中已经将status设置为WAITING_FOR_SIZE状态了if(status!=Status.WAITING_FOR_SIZE){return;}// 设置状态为RUNNINGstatus=Status.RUNNING;// 将原始尺寸与0~1之间的系数相乘,取最接近的整数值,得到新的尺寸floatsizeMultiplier=requestOptions.getSizeMultiplier();this.width=maybeApplySizeMultiplier(width,sizeMultiplier);this.height=maybeApplySizeMultiplier(height,sizeMultiplier);if(IS_VERBOSE_LOGGABLE){logV("finished setup for calling load in "+LogTime.getElapsedMillis(startTime));}// 🔥🔥🔥 根据load里面的这些参数开始加载loadStatus=engine.load(glideContext,model,requestOptions.getSignature(),this.width,this.height,requestOptions.getResourceClass(),transcodeClass,priority,requestOptions.getDiskCacheStrategy(),requestOptions.getTransformations(),requestOptions.isTransformationRequired(),requestOptions.isScaleOnlyOrNoTransform(),requestOptions.getOptions(),requestOptions.isMemoryCacheable(),requestOptions.getUseUnlimitedSourceGeneratorsPool(),requestOptions.getUseAnimationPool(),requestOptions.getOnlyRetrieveFromCache(),this,callbackExecutor);// This is a hack that's only useful for testing right now where loads complete synchronously// even though under any executor running on any thread but the main thread, the load would// have completed asynchronously.//// status目前显然是RUNNING状态,所以不会将loadStatus设置为nullif(status!=Status.RUNNING){loadStatus=null;}if(IS_VERBOSE_LOGGABLE){logV("finished onSizeReady in "+LogTime.getElapsedMillis(startTime));}}
/** * Starts a load for the given arguments. * * <p>Must be called on the main thread. * * <p>The flow for any request is as follows: * * <ul> * <li>Check the current set of actively used resources, return the active resource if present, * and move any newly inactive resources into the memory cache. * <li>Check the memory cache and provide the cached resource if present. * <li>Check the current set of in progress loads and add the cb to the in progress load if one * is present. * <li>Start a new load. * </ul> * * <p>Active resources are those that have been provided to at least one request and have not yet * been released. Once all consumers of a resource have released that resource, the resource then * goes to cache. If the resource is ever returned to a new consumer from cache, it is re-added to * the active resources. If the resource is evicted from the cache, its resources are recycled and * re-used if possible and the resource is discarded. There is no strict requirement that * consumers release their resources so active resources are held weakly. * * @param width The target width in pixels of the desired resource. * @param height The target height in pixels of the desired resource. * @param cb The callback that will be called when the load completes. */publicsynchronized<R>LoadStatusload(GlideContextglideContext,Objectmodel,Keysignature,intwidth,intheight,Class<?>resourceClass,Class<R>transcodeClass,Prioritypriority,DiskCacheStrategydiskCacheStrategy,Map<Class<?>,Transformation<?>>transformations,booleanisTransformationRequired,booleanisScaleOnlyOrNoTransform,Optionsoptions,booleanisMemoryCacheable,booleanuseUnlimitedSourceExecutorPool,booleanuseAnimationPool,booleanonlyRetrieveFromCache,ResourceCallbackcb,ExecutorcallbackExecutor){longstartTime=VERBOSE_IS_LOGGABLE?LogTime.getLogTime():0;// EngineKey以传入的8个参数作为keyEngineKeykey=keyFactory.buildKey(model,signature,width,height,transformations,resourceClass,transcodeClass,options);// 从active资源中进行加载,第一次显然取不到EngineResource<?>active=loadFromActiveResources(key,isMemoryCacheable);if(active!=null){cb.onResourceReady(active,DataSource.MEMORY_CACHE);if(VERBOSE_IS_LOGGABLE){logWithTimeAndKey("Loaded resource from active resources",startTime,key);}returnnull;}// 从内存cache资源中进行加载,第一次显然取不到EngineResource<?>cached=loadFromCache(key,isMemoryCacheable);if(cached!=null){cb.onResourceReady(cached,DataSource.MEMORY_CACHE);if(VERBOSE_IS_LOGGABLE){logWithTimeAndKey("Loaded resource from cache",startTime,key);}returnnull;}// 从正在进行的jobs中进行加载,第一次显然取不到EngineJob<?>current=jobs.get(key,onlyRetrieveFromCache);if(current!=null){current.addCallback(cb,callbackExecutor);if(VERBOSE_IS_LOGGABLE){logWithTimeAndKey("Added to existing load",startTime,key);}returnnewLoadStatus(cb,current);}// 构建出一个EngineJobEngineJob<R>engineJob=engineJobFactory.build(key,isMemoryCacheable,useUnlimitedSourceExecutorPool,useAnimationPool,onlyRetrieveFromCache);// 构建出一个DecodeJob,该类实现了Runnable接口DecodeJob<R>decodeJob=decodeJobFactory.build(glideContext,model,key,signature,width,height,resourceClass,transcodeClass,priority,diskCacheStrategy,transformations,isTransformationRequired,isScaleOnlyOrNoTransform,onlyRetrieveFromCache,options,engineJob);// 根据engineJob.onlyRetrieveFromCache的值是否为true// 将engineJob保存到onlyCacheJobs或者jobs HashMap中jobs.put(key,engineJob);// 添加资源加载状态回调,参数会包装成ResourceCallbackAndExecutor类型// 并保存到ResourceCallbacksAndExecutors.callbacksAndExecutors中engineJob.addCallback(cb,callbackExecutor);// 🔥🔥🔥开始执行decodeJob任务engineJob.start(decodeJob);if(VERBOSE_IS_LOGGABLE){logWithTimeAndKey("Started new load",startTime,key);}returnnewLoadStatus(cb,engineJob);}
@VisibleForTestingstaticclassDecodeJobFactory{...@SyntheticfinalPools.Pool<DecodeJob<?>>pool=FactoryPools.threadSafe(JOB_POOL_SIZE,newFactoryPools.Factory<DecodeJob<?>>(){@OverridepublicDecodeJob<?>create(){returnnewDecodeJob<>(diskCacheProvider,pool);}});...@SuppressWarnings("unchecked")<R>DecodeJob<R>build(...){DecodeJob<R>result=Preconditions.checkNotNull((DecodeJob<R>)pool.acquire());returnresult.init(...);}}// FactoryPools.javapublicfinalclassFactoryPools{@NonNullpublicstatic<TextendsPoolable>Pool<T>threadSafe(intsize,@NonNullFactory<T>factory){returnbuild(newSynchronizedPool<T>(size),factory);}@NonNullprivatestatic<TextendsPoolable>Pool<T>build(@NonNullPool<T>pool,@NonNullFactory<T>factory){returnbuild(pool,factory,FactoryPools.<T>emptyResetter());}@NonNullprivatestatic<T>Pool<T>build(@NonNullPool<T>pool,@NonNullFactory<T>factory,@NonNullResetter<T>resetter){returnnewFactoryPool<>(pool,factory,resetter);}privatestaticfinalclassFactoryPool<T>implementsPool<T>{privatefinalFactory<T>factory;privatefinalResetter<T>resetter;privatefinalPool<T>pool;FactoryPool(@NonNullPool<T>pool,@NonNullFactory<T>factory,@NonNullResetter<T>resetter){this.pool=pool;this.factory=factory;this.resetter=resetter;}@OverridepublicTacquire(){Tresult=pool.acquire();if(result==null){result=factory.create();if(Log.isLoggable(TAG,Log.VERBOSE)){Log.v(TAG,"Created new "+result.getClass());}}if(resultinstanceofPoolable){((Poolable)result).getVerifier().setRecycled(false/*isRecycled*/);}returnresult;}@Overridepublicbooleanrelease(@NonNullTinstance){if(instanceinstanceofPoolable){((Poolable)instance).getVerifier().setRecycled(true/*isRecycled*/);}resetter.reset(instance);returnpool.release(instance);}}}// PoolspublicfinalclassPools{/** * Interface for managing a pool of objects. * * @param <T> The pooled type. */publicinterfacePool<T>{/** * @return An instance from the pool if such, null otherwise. */@NullableTacquire();/** * Release an instance to the pool. * * @param instance The instance to release. * @return Whether the instance was put in the pool. * * @throws IllegalStateException If the instance is already in the pool. */booleanrelease(@NonNullTinstance);}privatePools(){/* do nothing - hiding constructor */}/** * Simple (non-synchronized) pool of objects. * * @param <T> The pooled type. */publicstaticclassSimplePool<T>implementsPool<T>{privatefinalObject[]mPool;privateintmPoolSize;/** * Creates a new instance. * * @param maxPoolSize The max pool size. * * @throws IllegalArgumentException If the max pool size is less than zero. */publicSimplePool(intmaxPoolSize){if(maxPoolSize<=0){thrownewIllegalArgumentException("The max pool size must be > 0");}mPool=newObject[maxPoolSize];}@Override@SuppressWarnings("unchecked")publicTacquire(){if(mPoolSize>0){finalintlastPooledIndex=mPoolSize-1;Tinstance=(T)mPool[lastPooledIndex];mPool[lastPooledIndex]=null;mPoolSize--;returninstance;}returnnull;}@Overridepublicbooleanrelease(@NonNullTinstance){if(isInPool(instance)){thrownewIllegalStateException("Already in the pool!");}if(mPoolSize<mPool.length){mPool[mPoolSize]=instance;mPoolSize++;returntrue;}returnfalse;}privatebooleanisInPool(@NonNullTinstance){for(inti=0;i<mPoolSize;i++){if(mPool[i]==instance){returntrue;}}returnfalse;}}/** * Synchronized) pool of objects. * * @param <T> The pooled type. */publicstaticclassSynchronizedPool<T>extendsSimplePool<T>{privatefinalObjectmLock=newObject();/** * Creates a new instance. * * @param maxPoolSize The max pool size. * * @throws IllegalArgumentException If the max pool size is less than zero. */publicSynchronizedPool(intmaxPoolSize){super(maxPoolSize);}@OverridepublicTacquire(){synchronized(mLock){returnsuper.acquire();}}@Overridepublicbooleanrelease(@NonNullTelement){synchronized(mLock){returnsuper.release(element);}}}}
接着看看engineJob.start(decodeJob)这句代码:
// EngineJobpublicsynchronizedvoidstart(DecodeJob<R>decodeJob){this.decodeJob=decodeJob;// decodeJob.willDecodeFromCache()返回trueGlideExecutorexecutor=decodeJob.willDecodeFromCache()?diskCacheExecutor:getActiveSourceExecutor();executor.execute(decodeJob);}// DecodeJob/** * Returns true if this job will attempt to decode a resource from the disk cache, and false if it * will always decode from source. */booleanwillDecodeFromCache(){// 返回值为Stage.RESOURCE_CACHEStagefirstStage=getNextStage(Stage.INITIALIZE);returnfirstStage==Stage.RESOURCE_CACHE||firstStage==Stage.DATA_CACHE;}privateStagegetNextStage(Stagecurrent){// diskCacheStrategy为DiskCacheStrategy.AUTOMATIC// decodeCachedResource()为trueswitch(current){caseINITIALIZE:returndiskCacheStrategy.decodeCachedResource()?Stage.RESOURCE_CACHE:getNextStage(Stage.RESOURCE_CACHE);caseRESOURCE_CACHE:returndiskCacheStrategy.decodeCachedData()?Stage.DATA_CACHE:getNextStage(Stage.DATA_CACHE);caseDATA_CACHE:// Skip loading from source if the user opted to only retrieve the resource from cache.returnonlyRetrieveFromCache?Stage.FINISHED:Stage.SOURCE;caseSOURCE:caseFINISHED:returnStage.FINISHED;default:thrownewIllegalArgumentException("Unrecognized stage: "+current);}}
此状态机的所有状态如下:
/** * Where we're trying to decode data from. */privateenumStage{/** The initial stage. */INITIALIZE,/** Decode from a cached resource. */RESOURCE_CACHE,/** Decode from cached source data. */DATA_CACHE,/** Decode from retrieved source. */SOURCE,/** Encoding transformed resources after a successful load. */ENCODE,/** No more viable stages. */FINISHED,}
/** * A prioritized {@link ThreadPoolExecutor} for running jobs in Glide. */publicfinalclassGlideExecutorimplementsExecutorService{privatestaticfinalStringDEFAULT_DISK_CACHE_EXECUTOR_NAME="disk-cache";privatestaticfinalintDEFAULT_DISK_CACHE_EXECUTOR_THREADS=1;privatefinalExecutorServicedelegate;publicstaticGlideExecutornewDiskCacheExecutor(){returnnewDiskCacheExecutor(DEFAULT_DISK_CACHE_EXECUTOR_THREADS,DEFAULT_DISK_CACHE_EXECUTOR_NAME,UncaughtThrowableStrategy.DEFAULT);}publicstaticGlideExecutornewDiskCacheExecutor(intthreadCount,Stringname,UncaughtThrowableStrategyuncaughtThrowableStrategy){returnnewGlideExecutor(newThreadPoolExecutor(threadCount/* corePoolSize */,threadCount/* maximumPoolSize */,0/* keepAliveTime */,TimeUnit.MILLISECONDS,newPriorityBlockingQueue<Runnable>(),newDefaultThreadFactory(name,uncaughtThrowableStrategy,true)));}@VisibleForTestingGlideExecutor(ExecutorServicedelegate){this.delegate=delegate;}@Overridepublicvoidexecute(@NonNullRunnablecommand){delegate.execute(command);}@NonNull@OverridepublicFuture<?>submit(@NonNullRunnabletask){returndelegate.submit(task);}...}
@Overridepublicvoidrun(){// This should be much more fine grained, but since Java's thread pool implementation silently// swallows all otherwise fatal exceptions, this will at least make it obvious to developers// that something is failing.GlideTrace.beginSectionFormat("DecodeJob#run(model=%s)",model);// Methods in the try statement can invalidate currentFetcher, so set a local variable here to// ensure that the fetcher is cleaned up either way.//// currentFetcher目前为nullDataFetcher<?>localFetcher=currentFetcher;try{if(isCancelled){notifyFailed();return;}runWrapped();}catch(CallbackExceptione){// If a callback not controlled by Glide throws an exception, we should avoid the Glide// specific debug logic below.throwe;}catch(Throwablet){// Catch Throwable and not Exception to handle OOMs. Throwables are swallowed by our// usage of .submit() in GlideExecutor so we're not silently hiding crashes by doing this. We// are however ensuring that our callbacks are always notified when a load fails. Without this// notification, uncaught throwables never notify the corresponding callbacks, which can cause// loads to silently hang forever, a case that's especially bad for users using Futures on// background threads.if(Log.isLoggable(TAG,Log.DEBUG)){Log.d(TAG,"DecodeJob threw unexpectedly"+", isCancelled: "+isCancelled+", stage: "+stage,t);}// When we're encoding we've already notified our callback and it isn't safe to do so again.if(stage!=Stage.ENCODE){throwables.add(t);notifyFailed();}if(!isCancelled){throwt;}throwt;}finally{// Keeping track of the fetcher here and calling cleanup is excessively paranoid, we call// close in all cases anyway.if(localFetcher!=null){localFetcher.cleanup();}GlideTrace.endSection();}}
privatevoidrunGenerators(){currentThread=Thread.currentThread();startFetchTime=LogTime.getLogTime();booleanisStarted=false;while(!isCancelled&¤tGenerator!=null&&!(isStarted=currentGenerator.startNext())){stage=getNextStage(stage);currentGenerator=getNextGenerator();if(stage==Stage.SOURCE){reschedule();return;}}// We've run out of stages and generators, give up.if((stage==Stage.FINISHED||isCancelled)&&!isStarted){notifyFailed();}// Otherwise a generator started a new load and we expect to be called back in// onDataFetcherReady.}
ModelLoaders to load custom Models (Urls, Uris, arbitrary POJOs) and Data (InputStreams, FileDescriptors).
ResourceDecoders to decode new Resources (Drawables, Bitmaps) or new types of Data (InputStreams, FileDescriptors).
Encoders to write Data (InputStreams, FileDescriptors) to Glide’s disk cache.
ResourceTranscoders to convert Resources (BitmapResource) into other types of Resources (DrawableResource).
ResourceEncoders to write Resources (BitmapResource, DrawableResource) to Glide’s disk cache.
Anatomy of a load The set of registered components, including both those registered by default in Glide and those registered in Modules are used to define a set of load paths. Each load path is a step by step progression from the the Model provided to load() to the Resource type specified by as(). A load path consists (roughly) of the following steps: 1. Model -> Data (handled by ModelLoaders) 2. Data -> Resource (handled by ResourceDecoders) 3. Resource -> Transcoded Resource (optional, handled by ResourceTranscoders).
Encoders can write Data to Glide’s disk cache cache before step 2. ResourceEncoders can write Resource’s to Glide’s disk cache before step 3. When a request is started, Glide will attempt all available paths from the Model to the requested Resource type. A request will succeed if any load path succeeds. A request will fail only if all available load paths fail.
@OverridepublicbooleanstartNext(){// list里面只有一个GlideUrl对象List<Key>sourceIds=helper.getCacheKeys();if(sourceIds.isEmpty()){returnfalse;}// 获得了三个可以到达的registeredResourceClasses// GifDrawable、Bitmap、BitmapDrawableList<Class<?>>resourceClasses=helper.getRegisteredResourceClasses();if(resourceClasses.isEmpty()){if(File.class.equals(helper.getTranscodeClass())){returnfalse;}thrownewIllegalStateException("Failed to find any load path from "+helper.getModelClass()+" to "+helper.getTranscodeClass());}// 遍历sourceIds中的每一个key、resourceClasses中每一个class,以及其他的一些值组成key// 尝试在磁盘缓存中以key找到缓存文件while(modelLoaders==null||!hasNextModelLoader()){resourceClassIndex++;if(resourceClassIndex>=resourceClasses.size()){sourceIdIndex++;if(sourceIdIndex>=sourceIds.size()){returnfalse;}resourceClassIndex=0;}KeysourceId=sourceIds.get(sourceIdIndex);Class<?>resourceClass=resourceClasses.get(resourceClassIndex);Transformation<?>transformation=helper.getTransformation(resourceClass);// PMD.AvoidInstantiatingObjectsInLoops Each iteration is comparatively expensive anyway,// we only run until the first one succeeds, the loop runs for only a limited// number of iterations on the order of 10-20 in the worst case.currentKey=newResourceCacheKey(// NOPMD AvoidInstantiatingObjectsInLoopshelper.getArrayPool(),sourceId,helper.getSignature(),helper.getWidth(),helper.getHeight(),transformation,resourceClass,helper.getOptions());cacheFile=helper.getDiskCache().get(currentKey);// 如果找到了缓存文件,那么循环条件则会为false,也就退出循环了if(cacheFile!=null){sourceKey=sourceId;modelLoaders=helper.getModelLoaders(cacheFile);modelLoaderIndex=0;}}// 找没找到缓存文件,都会执行这里的方法// 如果找到了,hasNextModelLoader()方法则会为true,可以执行循环// 没有找到缓存文件,则不会进入循环,会直接返回falseloadData=null;booleanstarted=false;while(!started&&hasNextModelLoader()){ModelLoader<File,?>modelLoader=modelLoaders.get(modelLoaderIndex++);// 在循环中会依次判断某个ModelLoader能不能加载此文件loadData=modelLoader.buildLoadData(cacheFile,helper.getWidth(),helper.getHeight(),helper.getOptions());if(loadData!=null&&helper.hasLoadPath(loadData.fetcher.getDataClass())){started=true;// 如果某个ModelLoader可以,那么就调用其fetcher进行加载数据// 加载成功或失败会通知自身loadData.fetcher.loadData(helper.getPriority(),this);}}returnstarted;}
@NonNullsynchronized<Model>List<ModelLoader<Model,?>>build(@NonNullClass<Model>modelClass){try{List<ModelLoader<Model,?>>loaders=newArrayList<>();// 遍历所有注册进来的entryfor(Entry<?,?>entry:entries){// Avoid stack overflow recursively creating model loaders by only creating loaders in// recursive requests if they haven't been created earlier in the chain. For example:// A Uri loader may translate to another model, which in turn may translate back to a Uri.// The original Uri loader won't be provided to the intermediate model loader, although// other Uri loaders will be.if(alreadyUsedEntries.contains(entry)){continue;}// 注册过的entry有很多,但是entry.modelClass是modelClass(即String.class)的同类或父类的却只有四个if(entry.handles(modelClass)){alreadyUsedEntries.add(entry);// 对每一个符合条件的entry调用build接口,获取对应的ModelLoaderloaders.add(this.<Model,Object>build(entry));alreadyUsedEntries.remove(entry);}}returnloaders;}catch(Throwablet){alreadyUsedEntries.clear();throwt;}}@NonNull@SuppressWarnings("unchecked")private<Model,Data>ModelLoader<Model,Data>build(@NonNullEntry<?,?>entry){return(ModelLoader<Model,Data>)Preconditions.checkNotNull(entry.factory.build(this));}
append(String.class, InputStream.class, new DataUrlLoader.StreamFactory<String>()) 该Factory会创建一个处理data scheme(data:[mediatype][;base64],encoded_data, e.g. data:image/gif;base64,R0lGO...lBCBMQiB0UjIQA7)类型数据的DataUrlLoader 声明可能处理以data:image开头的model
append(String.class, InputStream.class, new StringLoader.StreamFactory()) 该Factory能够从String中加载InputStream 声明可能处理所有类型的model
.append(String.class, ParcelFileDescriptor.class, new StringLoader.FileDescriptorFactory()) 该Factory能够从String中加载ParcelFileDescriptor 声明可能处理所有类型的model
.append(String.class, AssetFileDescriptor.class, new StringLoader.AssetFileDescriptorFactory()) 该Factory能够从String中加载AssetFileDescriptor 声明可能处理所有类型的model
/** * Factory for loading {@link InputStream}s from Strings. */publicstaticclassStreamFactoryimplementsModelLoaderFactory<String,InputStream>{@NonNull@OverridepublicModelLoader<String,InputStream>build(@NonNullMultiModelLoaderFactorymultiFactory){returnnewStringLoader<>(multiFactory.build(Uri.class,InputStream.class));}@Overridepublicvoidteardown(){// Do nothing.}}
@NonNullpublicsynchronized<Model,Data>ModelLoader<Model,Data>build(@NonNullClass<Model>modelClass/* Uri.class */,@NonNullClass<Data>dataClass/* InputStream.class */){try{List<ModelLoader<Model,Data>>loaders=newArrayList<>();booleanignoredAnyEntries=false;for(Entry<?,?>entry:entries){// Avoid stack overflow recursively creating model loaders by only creating loaders in// recursive requests if they haven't been created earlier in the chain. For example:// A Uri loader may translate to another model, which in turn may translate back to a Uri.// The original Uri loader won't be provided to the intermediate model loader, although// other Uri loaders will be.//// 防止递归时重复加载到,造成StackOverflowif(alreadyUsedEntries.contains(entry)){ignoredAnyEntries=true;continue;}// ⚡⚡️⚡️ 差别1,这里会检查两个classif(entry.handles(modelClass,dataClass)){alreadyUsedEntries.add(entry);loaders.add(this.<Model,Data>build(entry));alreadyUsedEntries.remove(entry);}}// ⚡⚡️⚡️ 差别2,这里会检查loaders的数量,并做相应的处理if(loaders.size()>1){returnfactory.build(loaders,throwableListPool);}elseif(loaders.size()==1){returnloaders.get(0);}else{// Avoid crashing if recursion results in no loaders available. The assertion is supposed to// catch completely unhandled types, recursion may mean a subtype isn't handled somewhere// down the stack, which is often ok.if(ignoredAnyEntries){returnemptyModelLoader();}else{thrownewNoModelLoaderAvailableException(modelClass,dataClass);}}}catch(Throwablet){alreadyUsedEntries.clear();throwt;}}
我们看一下四个注册项调用this.<Model, Data>build(entry)后返回的值:
append(String.class, InputStream.class, new DataUrlLoader.StreamFactory<String>())
build → DataUrlLoader
append(String.class, InputStream.class, new StringLoader.StreamFactory())
classMultiModelLoader<Model,Data>implementsModelLoader<Model,Data>{privatefinalList<ModelLoader<Model,Data>>modelLoaders;privatefinalPool<List<Throwable>>exceptionListPool;MultiModelLoader(@NonNullList<ModelLoader<Model,Data>>modelLoaders,@NonNullPool<List<Throwable>>exceptionListPool){this.modelLoaders=modelLoaders;this.exceptionListPool=exceptionListPool;}@OverridepublicLoadData<Data>buildLoadData(@NonNullModelmodel,intwidth,intheight,@NonNullOptionsoptions){KeysourceKey=null;intsize=modelLoaders.size();List<DataFetcher<Data>>fetchers=newArrayList<>(size);//noinspection ForLoopReplaceableByForEach to improve perffor(inti=0;i<size;i++){ModelLoader<Model,Data>modelLoader=modelLoaders.get(i);if(modelLoader.handles(model)){LoadData<Data>loadData=modelLoader.buildLoadData(model,width,height,options);if(loadData!=null){sourceKey=loadData.sourceKey;fetchers.add(loadData.fetcher);}}}return!fetchers.isEmpty()&&sourceKey!=null?newLoadData<>(sourceKey,newMultiFetcher<>(fetchers,exceptionListPool)):null;}@Overridepublicbooleanhandles(@NonNullModelmodel){for(ModelLoader<Model,Data>modelLoader:modelLoaders){if(modelLoader.handles(model)){returntrue;}}returnfalse;}}
buildLoadData方法会先调用hanldes进行第一次筛选,然后在调用ModelLoader的buildLoadData方法,如果不为空则保存起来,最后返回LoadData<>(sourceKey, new MultiFetcher<>(fetchers, exceptionListPool))对象。
List<Key>getCacheKeys(){if(!isCacheKeysSet){isCacheKeysSet=true;cacheKeys.clear();List<LoadData<?>>loadData=getLoadData();//noinspection ForLoopReplaceableByForEach to improve perffor(inti=0,size=loadData.size();i<size;i++){LoadData<?>data=loadData.get(i);if(!cacheKeys.contains(data.sourceKey)){cacheKeys.add(data.sourceKey);}for(intj=0;j<data.alternateKeys.size();j++){if(!cacheKeys.contains(data.alternateKeys.get(j))){cacheKeys.add(data.alternateKeys.get(j));}}}}returncacheKeys;}
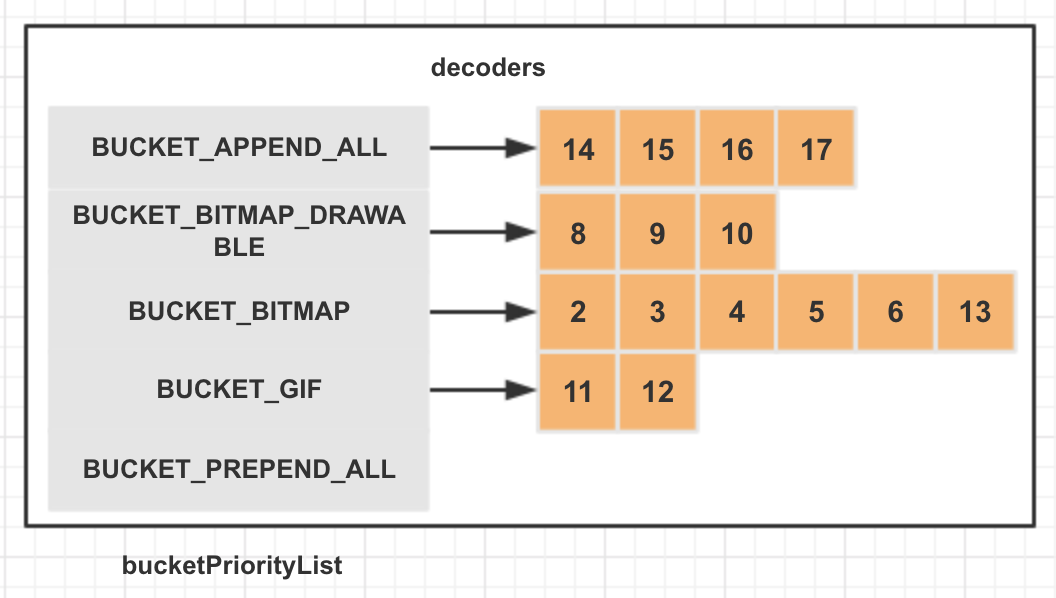
// Glide.append(Registry.BUCKET_BITMAP,ByteBuffer.class,Bitmap.class,byteBufferBitmapDecoder).append(Registry.BUCKET_BITMAP,InputStream.class,Bitmap.class,streamBitmapDecoder).append(Registry.BUCKET_BITMAP,ParcelFileDescriptor.class,Bitmap.class,parcelFileDescriptorVideoDecoder).append(Registry.BUCKET_BITMAP,AssetFileDescriptor.class,Bitmap.class,VideoDecoder.asset(bitmapPool)).append(Registry.BUCKET_BITMAP,Bitmap.class,Bitmap.class,newUnitBitmapDecoder()).append(Registry.BUCKET_BITMAP_DRAWABLE,ByteBuffer.class,BitmapDrawable.class,newBitmapDrawableDecoder<>(resources,byteBufferBitmapDecoder)).append(Registry.BUCKET_BITMAP_DRAWABLE,InputStream.class,BitmapDrawable.class,newBitmapDrawableDecoder<>(resources,streamBitmapDecoder)).append(Registry.BUCKET_BITMAP_DRAWABLE,ParcelFileDescriptor.class,BitmapDrawable.class,newBitmapDrawableDecoder<>(resources,parcelFileDescriptorVideoDecoder)).append(Registry.BUCKET_GIF,InputStream.class,GifDrawable.class,newStreamGifDecoder(imageHeaderParsers,byteBufferGifDecoder,arrayPool)).append(Registry.BUCKET_GIF,ByteBuffer.class,GifDrawable.class,byteBufferGifDecoder).append(Registry.BUCKET_BITMAP,GifDecoder.class,Bitmap.class,newGifFrameResourceDecoder(bitmapPool)).append(Uri.class,Drawable.class,resourceDrawableDecoder).append(Uri.class,Bitmap.class,newResourceBitmapDecoder(resourceDrawableDecoder,bitmapPool)).append(File.class,File.class,newFileDecoder()).append(Drawable.class,Drawable.class,newUnitDrawableDecoder())// RegistrypublicclassRegistry{publicstaticfinalStringBUCKET_GIF="Gif";publicstaticfinalStringBUCKET_BITMAP="Bitmap";publicstaticfinalStringBUCKET_BITMAP_DRAWABLE="BitmapDrawable";privatestaticfinalStringBUCKET_PREPEND_ALL="legacy_prepend_all";privatestaticfinalStringBUCKET_APPEND_ALL="legacy_append";privatefinalResourceDecoderRegistrydecoderRegistry;publicRegistry(){this.decoderRegistry=newResourceDecoderRegistry();setResourceDecoderBucketPriorityList(Arrays.asList(BUCKET_GIF,BUCKET_BITMAP,BUCKET_BITMAP_DRAWABLE));}@NonNullpublicfinalRegistrysetResourceDecoderBucketPriorityList(@NonNullList<String>buckets){// See #3296 and https://bugs.openjdk.java.net/browse/JDK-6260652.List<String>modifiedBuckets=newArrayList<>(buckets.size());modifiedBuckets.addAll(buckets);modifiedBuckets.add(0,BUCKET_PREPEND_ALL);modifiedBuckets.add(BUCKET_APPEND_ALL);decoderRegistry.setBucketPriorityList(modifiedBuckets);returnthis;}@NonNullpublic<Data,TResource>Registryappend(@NonNullClass<Data>dataClass,@NonNullClass<TResource>resourceClass,@NonNullResourceDecoder<Data,TResource>decoder){append(BUCKET_APPEND_ALL,dataClass,resourceClass,decoder);returnthis;}@NonNullpublic<Data,TResource>Registryappend(@NonNullStringbucket,@NonNullClass<Data>dataClass,@NonNullClass<TResource>resourceClass,@NonNullResourceDecoder<Data,TResource>decoder){decoderRegistry.append(bucket,decoder,dataClass,resourceClass);returnthis;}@NonNullpublic<Data,TResource>Registryprepend(@NonNullStringbucket,@NonNullClass<Data>dataClass,@NonNullClass<TResource>resourceClass,@NonNullResourceDecoder<Data,TResource>decoder){decoderRegistry.prepend(bucket,decoder,dataClass,resourceClass);returnthis;}}// ResourceDecoderRegistrypublicclassResourceDecoderRegistry{privatefinalList<String>bucketPriorityList=newArrayList<>();privatefinalMap<String,List<Entry<?,?>>>decoders=newHashMap<>();publicsynchronizedvoidsetBucketPriorityList(@NonNullList<String>buckets){List<String>previousBuckets=newArrayList<>(bucketPriorityList);bucketPriorityList.clear();bucketPriorityList.addAll(buckets);for(StringpreviousBucket:previousBuckets){if(!buckets.contains(previousBucket)){// Keep any buckets from the previous list that aren't included here, but but them at the// end.bucketPriorityList.add(previousBucket);}}}publicsynchronized<T,R>voidappend(@NonNullStringbucket,@NonNullResourceDecoder<T,R>decoder,@NonNullClass<T>dataClass,@NonNullClass<R>resourceClass){getOrAddEntryList(bucket).add(newEntry<>(dataClass,resourceClass,decoder));}publicsynchronized<T,R>voidprepend(@NonNullStringbucket,@NonNullResourceDecoder<T,R>decoder,@NonNullClass<T>dataClass,@NonNullClass<R>resourceClass){getOrAddEntryList(bucket).add(0,newEntry<>(dataClass,resourceClass,decoder));}@NonNullprivatesynchronizedList<Entry<?,?>>getOrAddEntryList(@NonNullStringbucket){if(!bucketPriorityList.contains(bucket)){// Add this unspecified bucket as a low priority bucket.bucketPriorityList.add(bucket);}List<Entry<?,?>>entries=decoders.get(bucket);if(entries==null){entries=newArrayList<>();decoders.put(bucket,entries);}returnentries;}}
@NonNullpublicsynchronized<Z,R>List<Class<R>>getTranscodeClasses(@NonNullClass<Z>resourceClass,@NonNullClass<R>transcodeClass){List<Class<R>>transcodeClasses=newArrayList<>();// GifDrawable -> Drawable is just the UnitTranscoder, as is GifDrawable -> GifDrawable.// 🔥路径1if(transcodeClass.isAssignableFrom(resourceClass)){transcodeClasses.add(transcodeClass);returntranscodeClasses;}// 🔥路径2for(Entry<?,?>entry:transcoders){if(entry.handles(resourceClass,transcodeClass)){transcodeClasses.add(transcodeClass);}}// list添加的都是入参transcodeClassreturntranscodeClasses;}
// 遍历sourceIds中的每一个key、resourceClasses中每一个class,以及其他的一些值组成key// 尝试在磁盘缓存中以key找到缓存文件while(modelLoaders==null||!hasNextModelLoader()){resourceClassIndex++;if(resourceClassIndex>=resourceClasses.size()){sourceIdIndex++;if(sourceIdIndex>=sourceIds.size()){returnfalse;}resourceClassIndex=0;}KeysourceId=sourceIds.get(sourceIdIndex);Class<?>resourceClass=resourceClasses.get(resourceClassIndex);Transformation<?>transformation=helper.getTransformation(resourceClass);// PMD.AvoidInstantiatingObjectsInLoops Each iteration is comparatively expensive anyway,// we only run until the first one succeeds, the loop runs for only a limited// number of iterations on the order of 10-20 in the worst case.currentKey=newResourceCacheKey(// NOPMD AvoidInstantiatingObjectsInLoopshelper.getArrayPool(),sourceId,helper.getSignature(),helper.getWidth(),helper.getHeight(),transformation,resourceClass,helper.getOptions());cacheFile=helper.getDiskCache().get(currentKey);// 如果找到了缓存文件,那么循环条件则会为false,也就退出循环了if(cacheFile!=null){sourceKey=sourceId;modelLoaders=helper.getModelLoaders(cacheFile);modelLoaderIndex=0;}}
// DecodeHelper<Data>LoadPath<Data,?,Transcode>getLoadPath(Class<Data>dataClass){returnglideContext.getRegistry().getLoadPath(dataClass,resourceClass,transcodeClass);}// Registry@Nullablepublic<Data,TResource,Transcode>LoadPath<Data,TResource,Transcode>getLoadPath(@NonNullClass<Data>dataClass,@NonNullClass<TResource>resourceClass,@NonNullClass<Transcode>transcodeClass){// 先取缓存LoadPath<Data,TResource,Transcode>result=loadPathCache.get(dataClass,resourceClass,transcodeClass);// 如果取到NO_PATHS_SIGNAL这条LoadPath,那么返回nullif(loadPathCache.isEmptyLoadPath(result)){returnnull;}elseif(result==null){// 取到null,说明还没有获取过// 那么先获取decodePaths,在创建LoadPath对象并存入缓存中List<DecodePath<Data,TResource,Transcode>>decodePaths=getDecodePaths(dataClass,resourceClass,transcodeClass);// It's possible there is no way to decode or transcode to the desired types from a given// data class.if(decodePaths.isEmpty()){result=null;}else{result=newLoadPath<>(dataClass,resourceClass,transcodeClass,decodePaths,throwableListPool);}// 存入缓存loadPathCache.put(dataClass,resourceClass,transcodeClass,result);}returnresult;}
@NonNull@SuppressWarnings("unchecked")publicsynchronized<T,R>List<ResourceDecoder<T,R>>getDecoders(@NonNullClass<T>dataClass,@NonNullClass<R>resourceClass){List<ResourceDecoder<T,R>>result=newArrayList<>();for(Stringbucket:bucketPriorityList){List<Entry<?,?>>entries=decoders.get(bucket);if(entries==null){continue;}for(Entry<?,?>entry:entries){if(entry.handles(dataClass,resourceClass)){result.add((ResourceDecoder<T,R>)entry.decoder);}}}// TODO: cache result list.returnresult;}
@NonNull@SuppressWarnings("unchecked")publicsynchronized<Z,R>ResourceTranscoder<Z,R>get(@NonNullClass<Z>resourceClass,@NonNullClass<R>transcodedClass){// For example, there may be a transcoder that can convert a GifDrawable to a Drawable, which// will be caught above. However, if there is no registered transcoder, we can still just use// the UnitTranscoder to return the Drawable because the transcode class (Drawable) is// assignable from the resource class (GifDrawable).if(transcodedClass.isAssignableFrom(resourceClass)){return(ResourceTranscoder<Z,R>)UnitTranscoder.get();}for(Entry<?,?>entry:transcoders){if(entry.handles(resourceClass,transcodedClass)){return(ResourceTranscoder<Z,R>)entry.transcoder;}}thrownewIllegalArgumentException("No transcoder registered to transcode from "+resourceClass+" to "+transcodedClass);}
@OverridepublicvoidloadData(@NonNullPrioritypriority,@NonNullDataCallback<?superByteBuffer>callback){ByteBufferresult;try{// 这里的file就是缓存下来的source file// 路径在demo中为 /data/data/yorek.demoandtest/cache/image_manager_disk_cache/65a6e0855da59221f073aba07dc6c69206834ef83f60c58062bee458fcac7dde.0result=ByteBufferUtil.fromFile(file);}catch(IOExceptione){if(Log.isLoggable(TAG,Log.DEBUG)){Log.d(TAG,"Failed to obtain ByteBuffer for file",e);}callback.onLoadFailed(e);return;}callback.onDataReady(result);}
privatevoidrunGenerators(){currentThread=Thread.currentThread();startFetchTime=LogTime.getLogTime();booleanisStarted=false;while(!isCancelled&¤tGenerator!=null&&!(isStarted=currentGenerator.startNext())){stage=getNextStage(stage);currentGenerator=getNextGenerator();if(stage==Stage.SOURCE){reschedule();return;}}// We've run out of stages and generators, give up.if((stage==Stage.FINISHED||isCancelled)&&!isStarted){notifyFailed();}// Otherwise a generator started a new load and we expect to be called back in// onDataFetcherReady.}
@OverridepublicbooleanstartNext(){while(modelLoaders==null||!hasNextModelLoader()){sourceIdIndex++;if(sourceIdIndex>=cacheKeys.size()){returnfalse;}KeysourceId=cacheKeys.get(sourceIdIndex);// PMD.AvoidInstantiatingObjectsInLoops The loop iterates a limited number of times// and the actions it performs are much more expensive than a single allocation.@SuppressWarnings("PMD.AvoidInstantiatingObjectsInLoops")KeyoriginalKey=newDataCacheKey(sourceId,helper.getSignature());cacheFile=helper.getDiskCache().get(originalKey);if(cacheFile!=null){this.sourceKey=sourceId;modelLoaders=helper.getModelLoaders(cacheFile);modelLoaderIndex=0;}}loadData=null;booleanstarted=false;while(!started&&hasNextModelLoader()){ModelLoader<File,?>modelLoader=modelLoaders.get(modelLoaderIndex++);loadData=modelLoader.buildLoadData(cacheFile,helper.getWidth(),helper.getHeight(),helper.getOptions());if(loadData!=null&&helper.hasLoadPath(loadData.fetcher.getDataClass())){started=true;loadData.fetcher.loadData(helper.getPriority(),this);}}returnstarted;}privatebooleanhasNextModelLoader(){returnmodelLoaderIndex<modelLoaders.size();}
staticclassMultiFetcher<Data>implementsDataFetcher<Data>,DataCallback<Data>{privatefinalList<DataFetcher<Data>>fetchers;privateintcurrentIndex;privatePrioritypriority;privateDataCallback<?superData>callback;@OverridepublicvoidloadData(@NonNullPrioritypriority,@NonNullDataCallback<?superData>callback){this.priority=priority;this.callback=callback;exceptions=throwableListPool.acquire();fetchers.get(currentIndex).loadData(priority,this);// If a race occurred where we cancelled the fetcher in cancel() and then called loadData here// immediately after, make sure that we cancel the newly started fetcher. We don't bother// checking cancelled before loadData because it's not required for correctness and would// require an unlikely race to be useful.if(isCancelled){cancel();}}@OverridepublicvoidonDataReady(@NullableDatadata){if(data!=null){callback.onDataReady(data);}else{startNextOrFail();}}@OverridepublicvoidonLoadFailed(@NonNullExceptione){Preconditions.checkNotNull(exceptions).add(e);startNextOrFail();}privatevoidstartNextOrFail(){if(isCancelled){return;}if(currentIndex<fetchers.size()-1){currentIndex++;loadData(priority,callback);}else{Preconditions.checkNotNull(exceptions);callback.onLoadFailed(newGlideException("Fetch failed",newArrayList<>(exceptions)));}}}
@OverridepublicvoidloadData(@NonNullPrioritypriority,@NonNullDataCallback<?superInputStream>callback){longstartTime=LogTime.getLogTime();try{InputStreamresult=loadDataWithRedirects(glideUrl.toURL(),0,null,glideUrl.getHeaders());callback.onDataReady(result);}catch(IOExceptione){if(Log.isLoggable(TAG,Log.DEBUG)){Log.d(TAG,"Failed to load data for url",e);}callback.onLoadFailed(e);}finally{if(Log.isLoggable(TAG,Log.VERBOSE)){Log.v(TAG,"Finished http url fetcher fetch in "+LogTime.getElapsedMillis(startTime));}}}
privateInputStreamloadDataWithRedirects(URLurl,intredirects,URLlastUrl,Map<String,String>headers)throwsIOException{// 检查重定向次数if(redirects>=MAXIMUM_REDIRECTS){thrownewHttpException("Too many (> "+MAXIMUM_REDIRECTS+") redirects!");}else{// Comparing the URLs using .equals performs additional network I/O and is generally broken.// See http://michaelscharf.blogspot.com/2006/11/javaneturlequals-and-hashcode-make.html.try{// 检查是不是重定向到自身了if(lastUrl!=null&&url.toURI().equals(lastUrl.toURI())){thrownewHttpException("In re-direct loop");}}catch(URISyntaxExceptione){// Do nothing, this is best effort.}}// connectionFactory默认是DefaultHttpUrlConnectionFactory// 其build方法就是调用了url.openConnection()urlConnection=connectionFactory.build(url);for(Map.Entry<String,String>headerEntry:headers.entrySet()){urlConnection.addRequestProperty(headerEntry.getKey(),headerEntry.getValue());}urlConnection.setConnectTimeout(timeout);urlConnection.setReadTimeout(timeout);urlConnection.setUseCaches(false);urlConnection.setDoInput(true);// Stop the urlConnection instance of HttpUrlConnection from following redirects so that// redirects will be handled by recursive calls to this method, loadDataWithRedirects.// 禁止HttpUrlConnection自动重定向,重定向功能由本方法自己实现urlConnection.setInstanceFollowRedirects(false);// Connect explicitly to avoid errors in decoders if connection fails.urlConnection.connect();// Set the stream so that it's closed in cleanup to avoid resource leaks. See #2352.stream=urlConnection.getInputStream();if(isCancelled){returnnull;}finalintstatusCode=urlConnection.getResponseCode();if(isHttpOk(statusCode)){// statusCode=2xx,请求成功returngetStreamForSuccessfulRequest(urlConnection);}elseif(isHttpRedirect(statusCode)){// statusCode=3xx,需要重定向StringredirectUrlString=urlConnection.getHeaderField("Location");if(TextUtils.isEmpty(redirectUrlString)){thrownewHttpException("Received empty or null redirect url");}URLredirectUrl=newURL(url,redirectUrlString);// Closing the stream specifically is required to avoid leaking ResponseBodys in addition// to disconnecting the url connection below. See #2352.cleanup();returnloadDataWithRedirects(redirectUrl,redirects+1,url,headers);}elseif(statusCode==INVALID_STATUS_CODE){// -1 表示不是HTTP响应thrownewHttpException(statusCode);}else{// 其他HTTP错误thrownewHttpException(urlConnection.getResponseMessage(),statusCode);}}// Referencing constants is less clear than a simple static method.privatestaticbooleanisHttpOk(intstatusCode){returnstatusCode/100==2;}// Referencing constants is less clear than a simple static method.privatestaticbooleanisHttpRedirect(intstatusCode){returnstatusCode/100==3;}
@OverridepublicvoidonDataReady(Objectdata){DiskCacheStrategydiskCacheStrategy=helper.getDiskCacheStrategy();if(data!=null&&diskCacheStrategy.isDataCacheable(loadData.fetcher.getDataSource())){dataToCache=data;// We might be being called back on someone else's thread. Before doing anything, we should// reschedule to get back onto Glide's thread.cb.reschedule();}else{cb.onDataFetcherReady(loadData.sourceKey,data,loadData.fetcher,loadData.fetcher.getDataSource(),originalKey);}}@OverridepublicvoidonLoadFailed(@NonNullExceptione){cb.onDataFetcherFailed(originalKey,e,loadData.fetcher,loadData.fetcher.getDataSource());}
@OverridepublicvoidonDataFetcherFailed(KeyattemptedKey,Exceptione,DataFetcher<?>fetcher,DataSourcedataSource){fetcher.cleanup();GlideExceptionexception=newGlideException("Fetching data failed",e);exception.setLoggingDetails(attemptedKey,dataSource,fetcher.getDataClass());throwables.add(exception);if(Thread.currentThread()!=currentThread){runReason=RunReason.SWITCH_TO_SOURCE_SERVICE;callback.reschedule(this);}else{runGenerators();}}
private<Data>Resource<R>decodeFromData(DataFetcher<?>fetcher,Datadata,DataSourcedataSource)throwsGlideException{try{if(data==null){returnnull;}longstartTime=LogTime.getLogTime();Resource<R>result=decodeFromFetcher(data,dataSource);if(Log.isLoggable(TAG,Log.VERBOSE)){logWithTimeAndKey("Decoded result "+result,startTime);}returnresult;}finally{fetcher.cleanup();}}@SuppressWarnings("unchecked")private<Data>Resource<R>decodeFromFetcher(Datadata,DataSourcedataSource)throwsGlideException{LoadPath<Data,?,R>path=decodeHelper.getLoadPath((Class<Data>)data.getClass());returnrunLoadPath(data,dataSource,path);}private<Data,ResourceType>Resource<R>runLoadPath(Datadata,DataSourcedataSource,LoadPath<Data,ResourceType,R>path)throwsGlideException{Optionsoptions=getOptionsWithHardwareConfig(dataSource);DataRewinder<Data>rewinder=glideContext.getRegistry().getRewinder(data);try{// ResourceType in DecodeCallback below is required for compilation to work with gradle.returnpath.load(rewinder,options,width,height,newDecodeCallback<ResourceType>(dataSource));}finally{rewinder.cleanup();}}
privateResource<Transcode>loadWithExceptionList(DataRewinder<Data>rewinder,@NonNullOptionsoptions,intwidth,intheight,DecodePath.DecodeCallback<ResourceType>decodeCallback,List<Throwable>exceptions)throwsGlideException{Resource<Transcode>result=null;//noinspection ForLoopReplaceableByForEach to improve perffor(inti=0,size=decodePaths.size();i<size;i++){DecodePath<Data,ResourceType,Transcode>path=decodePaths.get(i);try{result=path.decode(rewinder,width,height,options,decodeCallback);}catch(GlideExceptione){exceptions.add(e);}if(result!=null){break;}}if(result==null){thrownewGlideException(failureMessage,newArrayList<>(exceptions));}returnresult;}
@NonNullprivateResource<ResourceType>decodeResource(DataRewinder<DataType>rewinder,intwidth,intheight,@NonNullOptionsoptions)throwsGlideException{List<Throwable>exceptions=Preconditions.checkNotNull(listPool.acquire());try{returndecodeResourceWithList(rewinder,width,height,options,exceptions);}finally{listPool.release(exceptions);}}@NonNullprivateResource<ResourceType>decodeResourceWithList(DataRewinder<DataType>rewinder,intwidth,intheight,@NonNullOptionsoptions,List<Throwable>exceptions)throwsGlideException{Resource<ResourceType>result=null;//noinspection ForLoopReplaceableByForEach to improve perffor(inti=0,size=decoders.size();i<size;i++){// decoders只有一条,就是ByteBufferBitmapDecoderResourceDecoder<DataType,ResourceType>decoder=decoders.get(i);try{// rewinder自然是ByteBufferRewind// data为ByteBufferDataTypedata=rewinder.rewindAndGet();// ByteBufferBitmapDecoder内部会调用Downsampler的hanldes方法// 它对任意的InputStream和ByteBuffer都返回trueif(decoder.handles(data,options)){// 调用ByteBuffer.position(0)复位data=rewinder.rewindAndGet();// 开始解码result=decoder.decode(data,width,height,options);}// Some decoders throw unexpectedly. If they do, we shouldn't fail the entire load path, but// instead log and continue. See #2406 for an example.}catch(IOException|RuntimeException|OutOfMemoryErrore){if(Log.isLoggable(TAG,Log.VERBOSE)){Log.v(TAG,"Failed to decode data for "+decoder,e);}exceptions.add(e);}if(result!=null){break;}}if(result==null){thrownewGlideException(failureMessage,newArrayList<>(exceptions));}returnresult;}
@Synthetic@NonNull<Z>Resource<Z>onResourceDecoded(DataSourcedataSource,@NonNullResource<Z>decoded){@SuppressWarnings("unchecked")Class<Z>resourceSubClass=(Class<Z>)decoded.get().getClass();// Bitmap.classTransformation<Z>appliedTransformation=null;Resource<Z>transformed=decoded;// dataSource为DATA_DISK_CACHE,所以满足条件if(dataSource!=DataSource.RESOURCE_DISK_CACHE){// 在2.2节中给出了一个「optionalFitCenter()过程保存的KV表」,查阅得知Bitmap.class对应的正是FitCenter()appliedTransformation=decodeHelper.getTransformation(resourceSubClass);// 对decoded资源进行transformtransformed=appliedTransformation.transform(glideContext,decoded,width,height);}// TODO: Make this the responsibility of the Transformation.if(!decoded.equals(transformed)){decoded.recycle();}finalEncodeStrategyencodeStrategy;finalResourceEncoder<Z>encoder;// Bitmap有注册对应的BitmapEncoder,所以是available的if(decodeHelper.isResourceEncoderAvailable(transformed)){// encoder就是BitmapEncoderencoder=decodeHelper.getResultEncoder(transformed);// encodeStrategy为EncodeStrategy.TRANSFORMEDencodeStrategy=encoder.getEncodeStrategy(options);}else{encoder=null;encodeStrategy=EncodeStrategy.NONE;}Resource<Z>result=transformed;// isSourceKey显然为true,所以isFromAlternateCacheKey为false,所以就返回了booleanisFromAlternateCacheKey=!decodeHelper.isSourceKey(currentSourceKey);// diskCacheStrategy为AUTOMATIC,该方法返回falseif(diskCacheStrategy.isResourceCacheable(isFromAlternateCacheKey,dataSource,encodeStrategy)){if(encoder==null){thrownewRegistry.NoResultEncoderAvailableException(transformed.get().getClass());}finalKeykey;switch(encodeStrategy){caseSOURCE:key=newDataCacheKey(currentSourceKey,signature);break;caseTRANSFORMED:key=newResourceCacheKey(decodeHelper.getArrayPool(),currentSourceKey,signature,width,height,appliedTransformation,resourceSubClass,options);break;default:thrownewIllegalArgumentException("Unknown strategy: "+encodeStrategy);}LockedResource<Z>lockedResult=LockedResource.obtain(transformed);deferredEncodeManager.init(key,encoder,lockedResult);result=lockedResult;}returnresult;}
privatevoidnotifyEncodeAndRelease(Resource<R>resource,DataSourcedataSource){// resource是BitmapResource类型,实现了Initializable接口if(resourceinstanceofInitializable){// initialize方法调用了bitmap.prepareToDraw()((Initializable)resource).initialize();}Resource<R>result=resource;LockedResource<R>lockedResource=null;// 由于在DecodeJob.onResourceDecoded方法中diskCacheStrategy.isResourceCacheable返回false// 所以没有调用deferredEncodeManager.init方法,因此此处为falseif(deferredEncodeManager.hasResourceToEncode()){lockedResource=LockedResource.obtain(resource);result=lockedResource;}// 通知回调,资源已经就绪notifyComplete(result,dataSource);stage=Stage.ENCODE;try{// 此处为false, skipif(deferredEncodeManager.hasResourceToEncode()){deferredEncodeManager.encode(diskCacheProvider,options);}}finally{// lockedResource为null, skipif(lockedResource!=null){lockedResource.unlock();}}// Call onEncodeComplete outside the finally block so that it's not called if the encode process// throws.// 进行清理工作onEncodeComplete();}
// EngineJob.java@OverridepublicvoidonResourceReady(Resource<R>resource,DataSourcedataSource){synchronized(this){this.resource=resource;this.dataSource=dataSource;}notifyCallbacksOfResult();}voidnotifyCallbacksOfResult(){ResourceCallbacksAndExecutorscopy;KeylocalKey;EngineResource<?>localResource;synchronized(this){stateVerifier.throwIfRecycled();if(isCancelled){// TODO: Seems like we might as well put this in the memory cache instead of just recycling// it since we've gotten this far...resource.recycle();release();return;}elseif(cbs.isEmpty()){thrownewIllegalStateException("Received a resource without any callbacks to notify");}elseif(hasResource){thrownewIllegalStateException("Already have resource");}// engineResourceFactory默认为EngineResourceFactory// 其build方法就是new一个对应的资源// new EngineResource<>(resource, isMemoryCacheable, /*isRecyclable=*/ true)engineResource=engineResourceFactory.build(resource,isCacheable);// Hold on to resource for duration of our callbacks below so we don't recycle it in the// middle of notifying if it synchronously released by one of the callbacks. Acquire it under// a lock here so that any newly added callback that executes before the next locked section// below can't recycle the resource before we call the callbacks.hasResource=true;copy=cbs.copy();incrementPendingCallbacks(copy.size()+1);localKey=key;localResource=engineResource;}// listener就是Engine,该方法会讲资源保存到activeResources中listener.onEngineJobComplete(this,localKey,localResource);// 这里的ResourceCallbackAndExecutor就是我们在3.3节中创建EngineJob和DecodeJob// 并在执行DecodeJob之前添加的回调// entry.executor就是Glide.with.load.into中出现的Executors.mainThreadExecutor()// entry.cb就是SingleRequestfor(finalResourceCallbackAndExecutorentry:copy){entry.executor.execute(newCallResourceReady(entry.cb));}decrementPendingCallbacks();}
@OverridepublicsynchronizedvoidonEngineJobComplete(EngineJob<?>engineJob,Keykey,EngineResource<?>resource){// A null resource indicates that the load failed, usually due to an exception.if(resource!=null){resource.setResourceListener(key,this);if(resource.isCacheable()){activeResources.activate(key,resource);}}jobs.removeIfCurrent(key,engineJob);}@OverridepublicsynchronizedvoidonResourceReleased(KeycacheKey,EngineResource<?>resource){activeResources.deactivate(cacheKey);if(resource.isCacheable()){cache.put(cacheKey,resource);}else{resourceRecycler.recycle(resource);}}
privateclassCallResourceReadyimplementsRunnable{privatefinalResourceCallbackcb;CallResourceReady(ResourceCallbackcb){this.cb=cb;}@Overridepublicvoidrun(){synchronized(EngineJob.this){if(cbs.contains(cb)){// Acquire for this particular callback.engineResource.acquire();callCallbackOnResourceReady(cb);removeCallback(cb);}decrementPendingCallbacks();}}}
@SyntheticsynchronizedvoidcallCallbackOnResourceReady(ResourceCallbackcb){try{// This is overly broad, some Glide code is actually called here, but it's much// simpler to encapsulate here than to do so at the actual call point in the// Request implementation.cb.onResourceReady(engineResource,dataSource);}catch(Throwablet){thrownewCallbackException(t);}}
@OverridepublicsynchronizedvoidonResourceReady(Resource<?>resource,DataSourcedataSource){stateVerifier.throwIfRecycled();loadStatus=null;if(resource==null){GlideExceptionexception=newGlideException("Expected to receive a Resource<R> with an "+"object of "+transcodeClass+" inside, but instead got null.");onLoadFailed(exception);return;}Objectreceived=resource.get();if(received==null||!transcodeClass.isAssignableFrom(received.getClass())){releaseResource(resource);GlideExceptionexception=newGlideException("Expected to receive an object of "+transcodeClass+" but instead"+" got "+(received!=null?received.getClass():"")+"{"+received+"} inside"+" "+"Resource{"+resource+"}."+(received!=null?"":" "+"To indicate failure return a null Resource "+"object, rather than a Resource object containing null data."));onLoadFailed(exception);return;}if(!canSetResource()){releaseResource(resource);// We can't put the status to complete before asking canSetResource().status=Status.COMPLETE;return;}onResourceReady((Resource<R>)resource,(R)received,dataSource);}
privatesynchronizedvoidonResourceReady(Resource<R>resource,Rresult,DataSourcedataSource){// We must call isFirstReadyResource before setting status.// 由于requestCoordinator为null,所以返回truebooleanisFirstResource=isFirstReadyResource();// 将status状态设置为COMPLETEstatus=Status.COMPLETE;this.resource=resource;if(glideContext.getLogLevel()<=Log.DEBUG){Log.d(GLIDE_TAG,"Finished loading "+result.getClass().getSimpleName()+" from "+dataSource+" for "+model+" with size ["+width+"x"+height+"] in "+LogTime.getElapsedMillis(startTime)+" ms");}isCallingCallbacks=true;try{// 尝试调用各个listener的onResourceReady回调进行处理booleananyListenerHandledUpdatingTarget=false;if(requestListeners!=null){for(RequestListener<R>listener:requestListeners){anyListenerHandledUpdatingTarget|=listener.onResourceReady(result,model,target,dataSource,isFirstResource);}}anyListenerHandledUpdatingTarget|=targetListener!=null&&targetListener.onResourceReady(result,model,target,dataSource,isFirstResource);// 如果没有一个回调能够处理,那么自己处理if(!anyListenerHandledUpdatingTarget){// animationFactory默认为NoTransition.getFactory(),生成的animation为NO_ANIMATIONTransition<?superR>animation=animationFactory.build(dataSource,isFirstResource);// target为DrawableImageViewTargettarget.onResourceReady(result,animation);}}finally{isCallingCallbacks=false;}// 通知requestCoordinatornotifyLoadSuccess();}
DrawableImageViewTarget的基类ImageViewTarget实现了此方法:
// ImageViewTarget.java@OverridepublicvoidonResourceReady(@NonNullZresource,@NullableTransition<?superZ>transition){// NO_ANIMATION.transition返回false,所以直接调用setResourceInternal方法if(transition==null||!transition.transition(resource,this)){setResourceInternal(resource);}else{maybeUpdateAnimatable(resource);}}privatevoidsetResourceInternal(@NullableZresource){// Order matters here. Set the resource first to make sure that the Drawable has a valid and// non-null Callback before starting it.// 先设置图片setResource(resource);// 然后如果是动画,会执行动画maybeUpdateAnimatable(resource);}privatevoidmaybeUpdateAnimatable(@NullableZresource){// BitmapDrawable显然不是一个Animatable对象,所以走else分支if(resourceinstanceofAnimatable){animatable=(Animatable)resource;animatable.start();}else{animatable=null;}}// DrawableImageViewTarget@OverrideprotectedvoidsetResource(@NullableDrawableresource){view.setImageDrawable(resource);}