EventBus源码解析
Info
本文基于EventBus最新v3.1.1版本进行分析。
1. 简单使用
EventBus有两种使用方式: - 可以配置注解处理器预先提取回调方法到辅助文件中,这样在运行时就不需要通过反射获取回调方法了 - 也可以不配置注解处理器,让EventBus在运行时通过反射获取
EventBus如何使用注解处理器可以参考官网文档Subscriber Index。在kotlin环境下步骤如下:
-
添加依赖项以及注解处理器,编译之后会将回调方法编译进
com.example.myapp.MyEventBusIndex文件中 -
使用
或者,如果我们想要继续使用EventBus的默认实例:com.example.myapp.MyEventBusIndex文件
我们可以这样设置EventBus:
-
使用Library的索引
如果我们既有Library的索引,也有App的索引,我们可以在EventBus设置过程中全部添加它们,例如:
在上面的配置完成之后,下面给出简单的示例,以及所生成的辅助文件。
class EventBusActivity : BaseActivity() {

    init {
        // 初始化带Index文件的EventBus
        EventBus.builder().addIndex(MyEventBusIndex()).installDefaultEventBus()
    }

    override fun onCreate(savedInstanceState: Bundle?) {
        super.onCreate(savedInstanceState)
        // EventBus的注册
        EventBus.getDefault().register(this)

        // 通过EventBus发送消息
        EventBus.getDefault().post(Any())
    }

    @Subscribe(threadMode = ThreadMode.BACKGROUND, priority = 1)
    fun onTest(obj : Any) {
        Log.e("Yorek", ">>>>>> trigger ${Thread.currentThread().name}")
    }

    @Subscribe(threadMode = ThreadMode.MAIN, priority = 2)
    fun onTestMain(obj : Any) {
        Log.e("Yorek", ">>>>>> trigger ${Thread.currentThread().name}")
    }

    override fun onDestroy() {
        // EventBus的注销
        EventBus.getDefault().unregister(this)
        super.onDestroy()
    }
}
/** This class is generated by EventBus, do not edit. */
public class MyEventBusIndex implements SubscriberInfoIndex {
    private static final Map<Class<?>, SubscriberInfo> SUBSCRIBER_INDEX;

    static {
        SUBSCRIBER_INDEX = new HashMap<Class<?>, SubscriberInfo>();

        putIndex(new SimpleSubscriberInfo(yorek.demoandtest.eventbus.EventBusActivity.class, true,
                new SubscriberMethodInfo[] {
            new SubscriberMethodInfo("onTest", Object.class, ThreadMode.BACKGROUND),
            new SubscriberMethodInfo("onTestMain", Object.class, ThreadMode.MAIN),
        }));

    }

    private static void putIndex(SubscriberInfo info) {
        SUBSCRIBER_INDEX.put(info.getSubscriberClass(), info);
    }

    @Override
    public SubscriberInfo getSubscriberInfo(Class<?> subscriberClass) {
        SubscriberInfo info = SUBSCRIBER_INDEX.get(subscriberClass);
        if (info != null) {
            return info;
        } else {
            return null;
        }
    }
}
通过生成的辅助文件,我们可以看到示例代码中两个回调方法都添加到了SUBSCRIBER_INDEX这个map中,这样后面在注册时,就可以直接获取方法了,不需要反射获取,为广大客户节约了一点点时间。
2. EventBus源码解析
2.1 注册过程
我们先看EventBus.register方法,在分析过程中遇到的字段再回过头来分析。
EventBus.java
public void register(Object subscriber) {
    Class<?> subscriberClass = subscriber.getClass();
    List<SubscriberMethod> subscriberMethods = subscriberMethodFinder.findSubscriberMethods(subscriberClass);
    synchronized (this) {
        for (SubscriberMethod subscriberMethod : subscriberMethods) {
            subscribe(subscriber, subscriberMethod);
        }
    }
}
上面的代码可以分为两个部分,2~3行完成了注册对象中@Subscribe方法的解析,后面的代码真正完成了注册。
我们先看看第3行subscriberMethodFinder.findSubscriberMethods(subscriberClass)是如何完成@Subscribe方法的解析的。subscriberMethodFinder在EventBus创建的时候就已经确定了,其构造方法如下:
SubscriberMethodFinder.java
SubscriberMethodFinder(List<SubscriberInfoIndex> subscriberInfoIndexes, boolean strictMethodVerification,
                        boolean ignoreGeneratedIndex) {
    this.subscriberInfoIndexes = subscriberInfoIndexes;
    this.strictMethodVerification = strictMethodVerification;
    this.ignoreGeneratedIndex = ignoreGeneratedIndex;
}
subscriberInfoIndexes里面只有注解解释器生成的MyEventBusIndex对象,其他两个参数都是默认值false。下面我们深入findSubscriberMethods方法:
List<SubscriberMethod> findSubscriberMethods(Class<?> subscriberClass) {
    List<SubscriberMethod> subscriberMethods = METHOD_CACHE.get(subscriberClass);
    if (subscriberMethods != null) {
        return subscriberMethods;
    }

    if (ignoreGeneratedIndex) {
        subscriberMethods = findUsingReflection(subscriberClass);
    } else {
        subscriberMethods = findUsingInfo(subscriberClass);
    }
    if (subscriberMethods.isEmpty()) {
        throw new EventBusException("Subscriber " + subscriberClass
                + " and its super classes have no public methods with the @Subscribe annotation");
    } else {
        METHOD_CACHE.put(subscriberClass, subscriberMethods);
        return subscriberMethods;
    }
}
在findSubscriberMethods方法的2~5行,是取缓存的操作。假设一下,由于一个页面的生命周期频繁的发生变化,导致频繁的注册、注销,这时候缓存就非常有用了。方法最后返回返回值前,会进行缓存的更新。这就是一个完成的缓存流程了。
第7行中,由于ignoreGeneratedIndex默认为false,所以执行第10行的findUsingInfo方法来获取订阅类的回调方法。顺便提一下,第8行的findUsingReflection方法顾名思义是使用反射来获取回调方法的,第10行的findUsingInfo方法在没有从注解处理器生成的Index文件中找到回调方法时,也会使用反射来获取回调方法。因此,findUsingInfo等于是findUsingReflection方法的加强版本。两个方法如下:
private List<SubscriberMethod> findUsingReflection(Class<?> subscriberClass) {
    FindState findState = prepareFindState();
    findState.initForSubscriber(subscriberClass);
    while (findState.clazz != null) {
        findUsingReflectionInSingleClass(findState);
        findState.moveToSuperclass();
    }
    return getMethodsAndRelease(findState);
}

private List<SubscriberMethod> findUsingInfo(Class<?> subscriberClass) {
    FindState findState = prepareFindState();
    findState.initForSubscriber(subscriberClass);
    while (findState.clazz != null) {
        findState.subscriberInfo = getSubscriberInfo(findState);
        if (findState.subscriberInfo != null) {
            SubscriberMethod[] array = findState.subscriberInfo.getSubscriberMethods();
            for (SubscriberMethod subscriberMethod : array) {
                if (findState.checkAdd(subscriberMethod.method, subscriberMethod.eventType)) {
                    findState.subscriberMethods.add(subscriberMethod);
                }
            }
        } else {
            findUsingReflectionInSingleClass(findState);
        }
        findState.moveToSuperclass();
    }
    return getMethodsAndRelease(findState);
}
我们顺着分析一下findUsingInfo方法。在第12行中,会通过prepareFindState()方法尝试从对象池中获取一个FindState对象,若对象池中没有可用的对象,则新建一个。第13行初始化FindState对象,使其内部的subscriberClass、clazz都是订阅类。后面的while循环就是从当前的订阅类开始,一直向父类进行循环操作,也就是说,这里**会解析当前订阅类的父类里面的方法**。
接着,看第15行的getSubscriberInfo方法,在该方法中会将注解处理器生成的Index里面的回调方法返回:
private SubscriberInfo getSubscriberInfo(FindState findState) {
    if (findState.subscriberInfo != null && findState.subscriberInfo.getSuperSubscriberInfo() != null) {
        SubscriberInfo superclassInfo = findState.subscriberInfo.getSuperSubscriberInfo();
        if (findState.clazz == superclassInfo.getSubscriberClass()) {
            return superclassInfo;
        }
    }
    if (subscriberInfoIndexes != null) {
        for (SubscriberInfoIndex index : subscriberInfoIndexes) {
            SubscriberInfo info = index.getSubscriberInfo(findState.clazz);
            if (info != null) {
                return info;
            }
        }
    }
    return null;
}
在通过findState.checkAdd校验之后,两个示例方法都加入了findState.subscriberMethods中,然后由getMethodsAndRelease(findState)方法返回。getMethodsAndRelease方法就是将findState.subscriberMethods复制了出来,然后回收了FindState对象。
上面就是注解处理器生成的Index参与的时候的流程。在这里还是有必要说一下没有Index参与时的流程,也就是findUsingReflectionInSingleClass方法是如何获取订阅类的回调方法的。
其实不用说我们也知道,肯定是反射,且从方法名上也可以看出来。该方法的源码以及解释如下:
private void findUsingReflectionInSingleClass(FindState findState) {
    Method[] methods;
    try {
        // This is faster than getMethods, especially when subscribers are fat classes like Activities
        // 获取该类的所有方法,不包括父类
        methods = findState.clazz.getDeclaredMethods();
    } catch (Throwable th) {
        // Workaround for java.lang.NoClassDefFoundError, see https://github.com/greenrobot/EventBus/issues/149
        // 获取该类以及父类的所有public方法,同时指定忽略父类
        methods = findState.clazz.getMethods();
        findState.skipSuperClasses = true;
    }
    for (Method method : methods) {
        int modifiers = method.getModifiers();
        // 判断方法是否是PUBLIC且不是ABSTRACT、STATIC、SYNTHETIC
        if ((modifiers & Modifier.PUBLIC) != 0 && (modifiers & MODIFIERS_IGNORE) == 0) {
            Class<?>[] parameterTypes = method.getParameterTypes();
            // 判断该方法的参数是不是只有一个
            if (parameterTypes.length == 1) {
                // 判断方法是否有Subscribe注解
                Subscribe subscribeAnnotation = method.getAnnotation(Subscribe.class);
                if (subscribeAnnotation != null) {
                    // 方法是PUBLIC且不是ABSTRACT、STATIC、SYNTHETIC
                    // 同时方法参数只有一个,且带有Subscribe注解
                    // 以上条件都满足后,就进行最后的校验,然后添加到findState.subscriberMethods中
                    Class<?> eventType = parameterTypes[0];
                    if (findState.checkAdd(method, eventType)) {
                        ThreadMode threadMode = subscribeAnnotation.threadMode();
                        findState.subscriberMethods.add(new SubscriberMethod(method, eventType, threadMode,
                                subscribeAnnotation.priority(), subscribeAnnotation.sticky()));
                    }
                }
            } else if (strictMethodVerification && method.isAnnotationPresent(Subscribe.class)) {
                // 如果开启了严格验证(默认不开启),且方法有Subscribe注解,则抛出异常
                String methodName = method.getDeclaringClass().getName() + "." + method.getName();
                throw new EventBusException("@Subscribe method " + methodName +
                        "must have exactly 1 parameter but has " + parameterTypes.length);
            }
        } else if (strictMethodVerification && method.isAnnotationPresent(Subscribe.class)) {
            // 如果开启了严格验证(默认不开启),且方法有Subscribe注解,则抛出异常
            String methodName = method.getDeclaringClass().getName() + "." + method.getName();
            throw new EventBusException(methodName +
                    " is a illegal @Subscribe method: must be public, non-static, and non-abstract");
        }
    }
}
从上面方法的分析我们可以看出,订阅类的方法要满足以下条件,才能够顺利的进行注册:
- 方法必须是
public的,且不能是abstract、static、synthetic的 - 方法参数必须只有一个
- 方法必须带有
@Subscribe注解
上面这些内容就是订阅类回调方法的获取过程了,下面说说回调方法是如何进行注册的。方法为EventBus.subscribe:
EventBus.java
// Must be called in synchronized block
private void subscribe(Object subscriber, SubscriberMethod subscriberMethod) {
    // eventType为回调方法的入参类型,Object类型
    Class<?> eventType = subscriberMethod.eventType;
    // 将订阅者以及订阅方法封装为一个Subscription类
    Subscription newSubscription = new Subscription(subscriber, subscriberMethod);
    // subscriptionsByEventType:以订阅方法的参数为key,Subscription为value进行保存
    CopyOnWriteArrayList<Subscription> subscriptions = subscriptionsByEventType.get(eventType);
    if (subscriptions == null) {
        subscriptions = new CopyOnWriteArrayList<>();
        subscriptionsByEventType.put(eventType, subscriptions);
    } else {
        if (subscriptions.contains(newSubscription)) {
            throw new EventBusException("Subscriber " + subscriber.getClass() + " already registered to event "
                    + eventType);
        }
    }

    // 在订阅参数对应的Subscription列表中按照订阅方法的优先级进行排序
    // priority的数值越高,越在列表的前面;相同priority的方法,后来的方法会在后面
    int size = subscriptions.size();
    for (int i = 0; i <= size; i++) {
        if (i == size || subscriberMethod.priority > subscriptions.get(i).subscriberMethod.priority) {
            subscriptions.add(i, newSubscription);
            break;
        }
    }

    // typesBySubscriber:以订阅者为key,订阅方法参数为value进行保存
    List<Class<?>> subscribedEvents = typesBySubscriber.get(subscriber);
    if (subscribedEvents == null) {
        subscribedEvents = new ArrayList<>();
        typesBySubscriber.put(subscriber, subscribedEvents);
    }
    subscribedEvents.add(eventType);

    // 最后,如果订阅方法为粘性的,则会在注册时接受到粘性事件
    if (subscriberMethod.sticky) {
        if (eventInheritance) {
            // Existing sticky events of all subclasses of eventType have to be considered.
            // Note: Iterating over all events may be inefficient with lots of sticky events,
            // thus data structure should be changed to allow a more efficient lookup
            // (e.g. an additional map storing sub classes of super classes: Class -> List<Class>).
            Set<Map.Entry<Class<?>, Object>> entries = stickyEvents.entrySet();
            for (Map.Entry<Class<?>, Object> entry : entries) {
                Class<?> candidateEventType = entry.getKey();
                if (eventType.isAssignableFrom(candidateEventType)) {
                    Object stickyEvent = entry.getValue();
                    checkPostStickyEventToSubscription(newSubscription, stickyEvent);
                }
            }
        } else {
            Object stickyEvent = stickyEvents.get(eventType);
            checkPostStickyEventToSubscription(newSubscription, stickyEvent);
        }
    }
}
在上面的方法中,会先将订阅者以及订阅事件包装成为一个Subscription对象,然后与其他参数一起保存起来,具体为下面两个保存的地方:
subscriptionsByEventType以订阅事件参数为key,对应Subscription对象数组typesBySubscriber以订阅者对象为key,对应订阅事件参数数组
另外,Subscription对象还会根据priority进行排序,具体来说:priority的数值越高,越在列表的前面;相同priority的方法,后来的方法会在后面。
同时我们还可以看出粘性事件的触发机制:
- 粘性事件发出时,会主动通知所有可以处理的方法,不管方法是否是粘性的
- 在订阅者进行注册时,如果有可以响应的粘性事件,粘性方法会被触发
if (subscriberMethod.sticky) { if (eventInheritance) { ... for (...) { ... if (...) { Object stickyEvent = entry.getValue(); checkPostStickyEventToSubscription(newSubscription, stickyEvent); } } } else { Object stickyEvent = stickyEvents.get(eventType); checkPostStickyEventToSubscription(newSubscription, stickyEvent); } }
2.2 发送事件
我们可以调用EventBus.post以及EventBus.postSticky这两个方法来发送事件,前者是普通事件,后者是粘性事件。
粘性事件的发送比较简单,该方法除了保存了事件之外,还调用了post方法当做非粘性事件进行了分发。此时,会主动通知所有可以处理的方法,不管方法是否是粘性的:
EventBus.java
public void postSticky(Object event) {
    synchronized (stickyEvents) {
        stickyEvents.put(event.getClass(), event);
    }
    // Should be posted after it is putted, in case the subscriber wants to remove immediately
    post(event);
}
另外,在订阅者进行注册时,如果有可以响应的粘性事件,粘性方法会被触发,代码在2.1节——注册过程的末尾有讲解。
粘性事件不会被消耗掉,除非手动remove掉
removeStickyEvent(Class<T>)removeStickyEvent(Object)removeAllStickyEvents()
更多可以参考Sticky Events
接下来,我们看看EventBus.post是如何触发订阅者的回调事件的。
EventBus.java
/** For ThreadLocal, much faster to set (and get multiple values). */
final static class PostingThreadState {
    final List<Object> eventQueue = new ArrayList<>();
    boolean isPosting;
    boolean isMainThread;
    Subscription subscription;
    Object event;
    boolean canceled;
}

private final ThreadLocal<PostingThreadState> currentPostingThreadState = new ThreadLocal<PostingThreadState>() {
    @Override
    protected PostingThreadState initialValue() {
        return new PostingThreadState();
    }
};

/** Posts the given event to the event bus. */
public void post(Object event) {
    PostingThreadState postingState = currentPostingThreadState.get();
    List<Object> eventQueue = postingState.eventQueue;
    eventQueue.add(event);

    if (!postingState.isPosting) {
        postingState.isMainThread = isMainThread();
        postingState.isPosting = true;
        if (postingState.canceled) {
            throw new EventBusException("Internal error. Abort state was not reset");
        }
        try {
            while (!eventQueue.isEmpty()) {
                postSingleEvent(eventQueue.remove(0), postingState);
            }
        } finally {
            postingState.isPosting = false;
            postingState.isMainThread = false;
        }
    }
}
EventBus.post的相关代码如上所示,post的事件会加入到一个事件队列里面,然后开始执行。当在极短时间内多次调用post方法时,只会将事件添加到队列里面,第24行的代码走不进去。而在31-33行代码里面,会取时间队列的头进行事件分发。最后所有事件处理完成后,标志位复位。
下面我们看看postSingleEvent的方法,注释都在里面:
private void postSingleEvent(Object event, PostingThreadState postingState) throws Error {
    Class<?> eventClass = event.getClass();
    boolean subscriptionFound = false;
    if (eventInheritance) {
        // lookupAllEventTypes方法的作用是查询class的父类以及接口,显然示例中就是一个Object
        List<Class<?>> eventTypes = lookupAllEventTypes(eventClass);
        int countTypes = eventTypes.size();
        for (int h = 0; h < countTypes; h++) {
            Class<?> clazz = eventTypes.get(h);
            // 调用postSingleEventForEventType方法
            subscriptionFound |= postSingleEventForEventType(event, postingState, clazz);
        }
    } else {
        // 直接以当前的eventClass调用postSingleEventForEventType方法
        subscriptionFound = postSingleEventForEventType(event, postingState, eventClass);
    }
    // 最后,当没有订阅者可以处理该事件时,EventBus会抛出一个NoSubscriberEvent事件
    if (!subscriptionFound) {
        if (logNoSubscriberMessages) {
            logger.log(Level.FINE, "No subscribers registered for event " + eventClass);
        }
        if (sendNoSubscriberEvent && eventClass != NoSubscriberEvent.class &&
                eventClass != SubscriberExceptionEvent.class) {
            post(new NoSubscriberEvent(this, event));
        }
    }
}
接着看看postSingleEventForEventType方法
private boolean postSingleEventForEventType(Object event, PostingThreadState postingState, Class<?> eventClass) {
    // subscriptions就是示例中对应的两个方法
    CopyOnWriteArrayList<Subscription> subscriptions;
    synchronized (this) {
        subscriptions = subscriptionsByEventType.get(eventClass);
    }
    if (subscriptions != null && !subscriptions.isEmpty()) {
        for (Subscription subscription : subscriptions) {
            postingState.event = event;
            postingState.subscription = subscription;
            boolean aborted = false;
            try {
                // 调用postToSubscription进行真正的分发
                postToSubscription(subscription, event, postingState.isMainThread);
                aborted = postingState.canceled;
            } finally {
                postingState.event = null;
                postingState.subscription = null;
                postingState.canceled = false;
            }
            if (aborted) {
                break;
            }
        }
        return true;
    }
    return false;
}
在上面的方法中,最终调用了postToSubscription方法完成了最终的事件分发。且这里需要注意一个系列,只要eventClass可以找到对应的Subscription,那么该方法就会返回true,也就是说已经发送给订阅者了。
最后看看postToSubscription方法,该方法会根据方法的threaMode值,决定在哪如何触发回调方法:
private void postToSubscription(Subscription subscription, Object event, boolean isMainThread) {
    switch (subscription.subscriberMethod.threadMode) {
        case POSTING:
            invokeSubscriber(subscription, event);
            break;
        case MAIN:
            if (isMainThread) {
                invokeSubscriber(subscription, event);
            } else {
                mainThreadPoster.enqueue(subscription, event);
            }
            break;
        case MAIN_ORDERED:
            if (mainThreadPoster != null) {
                mainThreadPoster.enqueue(subscription, event);
            } else {
                // temporary: technically not correct as poster not decoupled from subscriber
                invokeSubscriber(subscription, event);
            }
            break;
        case BACKGROUND:
            if (isMainThread) {
                backgroundPoster.enqueue(subscription, event);
            } else {
                invokeSubscriber(subscription, event);
            }
            break;
        case ASYNC:
            asyncPoster.enqueue(subscription, event);
            break;
        default:
            throw new IllegalStateException("Unknown thread mode: " + subscription.subscriberMethod.threadMode);
    }
}
这里面5种ThreadMode,采取的手段也不一样。从该枚举值的定义可以看出,分为5种情况,下表就是每种情况的含义:
| 含义 | 解决方式 | |
|---|---|---|
| POSTING | 在发送事件的线程中执行 | 回调方法会立刻触发 |
| MAIN | 在主线程中执行 | 如果事件的发送发生在主线程,则立刻执行;否则让mainThreadPoster将回调提交到主线程的队列中 |
| MAIN_ORDERED | 在主线程中按顺序执行 | 让mainThreadPoster将回调提交到主线程的队列中 |
| BACKGROUND | 在后台线程中执行 | 如果当前线程是UI线程,则让backgroundPoster提交回调到队列中;否则直接触发方法 |
| ASYNC | 在单独的线程中执行 | 将任务提交到asyncPoster中 |
无论在哪个线程中执行,最后都会调用invokeSubscriber方法来触发回调任务:
void invokeSubscriber(Subscription subscription, Object event) {
    try {
        subscription.subscriberMethod.method.invoke(subscription.subscriber, event);
    } catch (InvocationTargetException e) {
        handleSubscriberException(subscription, event, e.getCause());
    } catch (IllegalAccessException e) {
        throw new IllegalStateException("Unexpected exception", e);
    }
}
这里通过反射调用了订阅者的回调方法。至此,事件的发送已经分析完毕。
2.3 注销过程
注销过程原理比较简单,就是将注册时保存到subscriptionsByEventType、typesBySubscriber两个集合中的元素删除。
这两个集合在注册过程中分析过: - subscriptionsByEventType 以订阅事件参数为key,对应Subscription对象数组 - typesBySubscriber 以订阅者对象为key,对应订阅事件参数数组
EventBus.unregister代码如下:
/** Unregisters the given subscriber from all event classes. */
public synchronized void unregister(Object subscriber) {
    // 先通过subscriber订阅者对象从`typesBySubscriber`中获取订阅事件参数数组
    List<Class<?>> subscribedTypes = typesBySubscriber.get(subscriber);
    if (subscribedTypes != null) {
        // 以订阅事件参数为key,从`subscriptionsByEventType`中获取到对应的`Subscrition`对象
        for (Class<?> eventType : subscribedTypes) {
            unsubscribeByEventType(subscriber, eventType);
        }
        typesBySubscriber.remove(subscriber);
    } else {
        logger.log(Level.WARNING, "Subscriber to unregister was not registered before: " + subscriber.getClass());
    }
}

/** Only updates subscriptionsByEventType, not typesBySubscriber! Caller must update typesBySubscriber. */
private void unsubscribeByEventType(Object subscriber, Class<?> eventType) {
    List<Subscription> subscriptions = subscriptionsByEventType.get(eventType);
    if (subscriptions != null) {
        int size = subscriptions.size();
        for (int i = 0; i < size; i++) {
            Subscription subscription = subscriptions.get(i);
            if (subscription.subscriber == subscriber) {
                subscription.active = false;
                subscriptions.remove(i);
                i--;
                size--;
            }
        }
    }
}
显然,先通过subscriber订阅者对象从typesBySubscriber中获取订阅事件参数数组;然后以订阅事件参数为key,从subscriptionsByEventType中获取到对应的Subscrition对象。
以上就是EventBus的注销过程了。
3. 跨进程EventBus
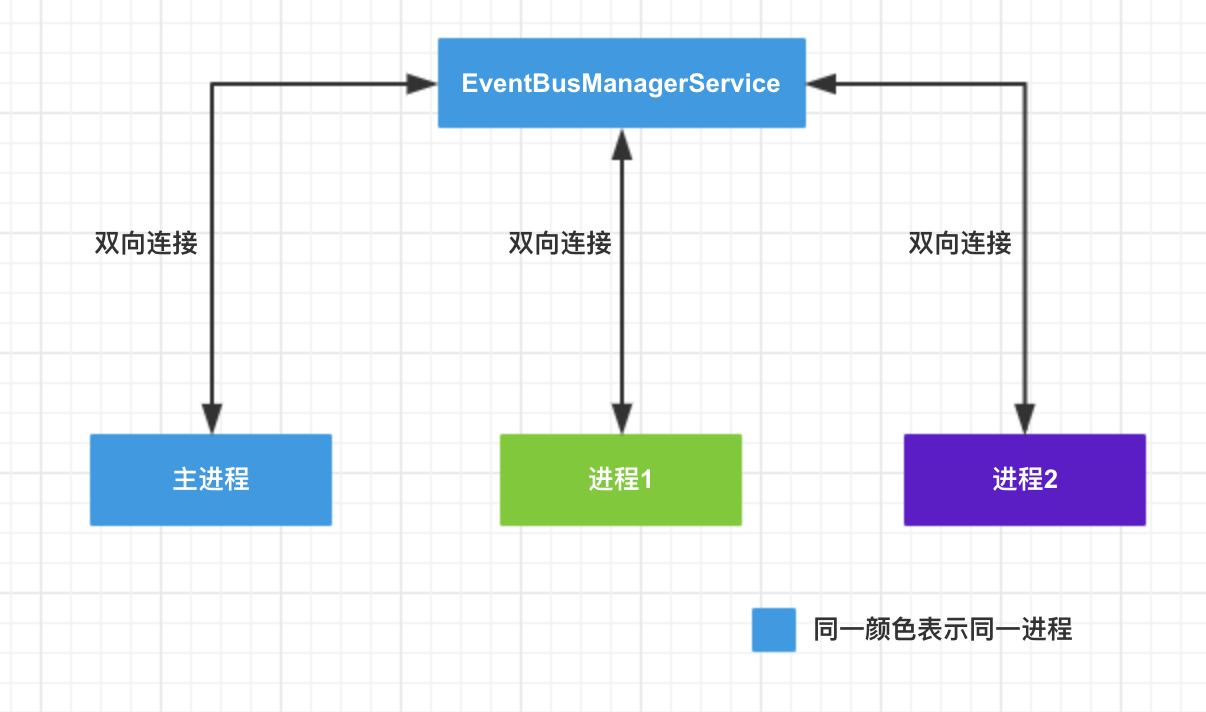
跨进程EventBus的难点在于如何将一个进程中的事件传递到另一个进程中,技术点还是离不来IPC的几种常用方式,这里比较实用的是AIDL方式。
下面先简单的说一下原理: 1. 弄一个主进程的Service作为消息中心,用来向各个进程转发事件 2. 主进程和子进程在初始化的时候都绑定到该Service上面,这样就得到了各进程向消息中心Service发送消息的通道 3. 在绑定到Service后,各个进程向Service注册本进程的消息转发器,这样消息中心Service就可以对各进程发送消息了,至此C/S之间双向的联系通道已经打通
下面分别考虑一下消息的传递,可以分为三种情况讨论。 1. 主进程向子进程的通信:获取主进程Service中各个进程(包括主进程自己)的消息转发器,依次转发消息 2. 子进程和主进程的通信:通过初始化绑定到Service时获取到的Service代理对象,向Service发送消息。Service收到消息后,会向各个进程的消息转发器依次转发消息,这样主进程以及所有子进程都会收到消息 3. 子进程和子进程的通信:先发送到主进程,主进程会进行转发。
注意这里,主进程Service持有主进程以及所有子进程的消息转发器,这里不对主进程进行特别处理。此外,所有的事件都会由Service进行分发,Service分发时会对主进程和所有子进程进行分发。
也就是说,如果子进程内部调用了跨进程EventBus进行事件分发的话,会在两次IPC之后再由改子进程内部的EventBus进行触发。这两次IPC是:子进程向主进程Service发出消息,主进程Service接收到消息后向所有进程进行分发。
3.1 简单实现
文件清单如下:
- 服务端:IEventBusManager.aidl
- 客户端:IEventDispatcher.aidl
- 传输的事件:IPCEvent.java、IPCEvent.aidl
- 核心类:IPCEventBus.kt
src/main/aidl/xyz/yorek/eventbus/IEventBusManager.aidl
// IEventBusManager.aidl
package xyz.yorek.eventbus;

import xyz.yorek.eventbus.IEventDispatcher;
import xyz.yorek.eventbus.IPCEvent;

interface IEventBusManager {
    void register(IEventDispatcher dispatcher);

    void unregister(IEventDispatcher dispatcher);

    /** 向主进程发送Event */
    void postToService(in IPCEvent event);
}
src/main/aidl/xyz/yorek/eventbus/IEventDispatcher.aidl
// IEventDispatcher.aidl
package xyz.yorek.eventbus;

import xyz.yorek.eventbus.IPCEvent;

interface IEventDispatcher {
    /** 接收其他进程发送过来的Event */
    void dispatch(in IPCEvent event);
}
src/main/aidl/xyz/yorek/eventbus/IPCEvent.aidl
src/main/java/xyz/yorek/eventbus/IPCEvent.java
public class IPCEvent implements Parcelable {
    public int code;
    public String msg;

    public IPCEvent() {}

    public IPCEvent(int code, String msg) {
        this.code = code;
        this.msg = msg;
    }

    protected IPCEvent(Parcel in) {
        this.code = in.readInt();
        this.msg = in.readString();
    }

    @Override
    public String toString() {
        return "IPCEvent{" +
                "code=" + code +
                ", msg='" + msg + '\'' +
                '}';
    }

    @Override
    public int describeContents() {
        return 0;
    }

    @Override
    public void writeToParcel(Parcel dest, int flags) {
        dest.writeInt(this.code);
        dest.writeString(this.msg);
    }

    public static final Creator<IPCEvent> CREATOR = new Creator<IPCEvent>() {
        @Override
        public IPCEvent createFromParcel(Parcel source) {
            return new IPCEvent(source);
        }

        @Override
        public IPCEvent[] newArray(int size) {
            return new IPCEvent[size];
        }
    };
}
src/main/java/xyz/yorek/eventbus/IPCEventBus.kt
内含一个内部类EventBusManagerService,管理所有进程的事件转发器。
需要注意一下这里面的RemoteCallbackList的独特用法
object IPCEventBus {
    // 本进程的事件分发器,服务端向本进程客户端发送数据
    private val mEventDispatcher = object : IEventDispatcher.Stub() {
        override fun dispatch(event: IPCEvent?) {
            EventBus.getDefault().post(event)
        }
    }

    // 本进程获取的服务端代理,可以向服务端注册事件分发器,还可以发送数据
    private var mEventBusManagerService: IEventBusManager? = null
    private val mServiceConnection = object : ServiceConnection {
        override fun onServiceDisconnected(name: ComponentName?) {
            mEventBusManagerService = null
        }

        override fun onServiceConnected(name: ComponentName?, service: IBinder?) {
            service ?: return
            mEventBusManagerService = IEventBusManager.Stub.asInterface(service)

            mEventBusManagerService?.register(mEventDispatcher)
        }
    }

    /**
     * 初始化方法
     */
    fun init(context: Application) {
        this.app = context

        val intent = Intent(app, EventBusManagerService::class.java)
        app.bindService(intent, mServiceConnection, Context.BIND_AUTO_CREATE)
    }

    /**
     * 销毁方法,进程不需要时调用
     */
    fun destory() {
        if (mEventBusManagerService?.asBinder()?.isBinderAlive == true) {
            mEventBusManagerService?.unregister(mEventDispatcher)
            app.unbindService(mServiceConnection)
        }
    }

    fun register(any: Any) {
        EventBus.getDefault().register(any)
    }

    fun unregister(any: Any) {
        EventBus.getDefault().unregister(any)
    }

    /**
     * 向服务端发送数据,经过服务端转发到各个进程(包括主进程)
     */
    fun post(event: IPCEvent?) {
        mEventBusManagerService?.postToService(event)
    }

    private lateinit var app: Application

    /**
     * 服务端
     */
    class EventBusManagerService : Service() {
        // 各个进程的事件分发器
        private val mDispatchers = RemoteCallbackList<IEventDispatcher>()
        // 服务端实现
        private val mEventBusManagerService = object : IEventBusManager.Stub() {
            override fun register(dispatcher: IEventDispatcher?) {
                dispatcher ?: return
                mDispatchers.register(dispatcher)
            }

            override fun unregister(dispatcher: IEventDispatcher?) {
                dispatcher ?: return
                mDispatchers.unregister(dispatcher)
            }

            override fun postToService(event: IPCEvent?) {
                dispatchEvent(event)
            }
        }

        override fun onBind(intent: Intent?) = mEventBusManagerService

        /**
         * 分发事件到各个进程
         */
        private fun dispatchEvent(event: IPCEvent?) {
            val n = mDispatchers.beginBroadcast()

            for (i in 0 until n) {
                val dispatcher = mDispatchers.getBroadcastItem(i)
                dispatcher.dispatch(event)
            }

            mDispatchers.finishBroadcast()
        }
    }
}
3.2 使用示例
我们首先在AndroidMenifest中注册一下IPCEventBus$EventBusManagerService;顺便注册一下三个在不同进程的Activity,方便我们测试:
<!-- 主进程的Activity -->
<activity android:name=".MainActivity">
    <intent-filter>
        <action android:name="android.intent.action.VIEW" />
        <action android:name="android.intent.action.MAIN" />

        <category android:name="android.intent.category.LAUNCHER" />
    </intent-filter>
</activity>
<!-- 子进程1的Activity -->
<activity android:name=".SecondActivity" android:process=":second" />
<!-- 子进程2的Activity -->
<activity android:name=".ThirdActivity" android:process=":third" />

<service android:name="xyz.yorek.eventbus.IPCEventBus$EventBusManagerService" />
上面三个Activity引用了同样的布局文件,拥有同样的代码。唯一的区别就是三者的TAG不一样,用来区分发出的消息。
下面是MainActivity的布局以及代码:
src/main/res/layout/activity_main.xml
<?xml version="1.0" encoding="utf-8"?>
<androidx.constraintlayout.widget.ConstraintLayout
    xmlns:android="http://schemas.android.com/apk/res/android"
    xmlns:app="http://schemas.android.com/apk/res-auto"
    xmlns:tools="http://schemas.android.com/tools"
    android:layout_width="match_parent"
    android:layout_height="match_parent"
    tools:context=".MainActivity">

    <Button
        android:id="@+id/btnPost"
        android:layout_width="wrap_content"
        android:layout_height="wrap_content"
        android:text="post"
        android:onClick="post"
        app:layout_constraintBottom_toBottomOf="parent"
        app:layout_constraintLeft_toLeftOf="parent"
        app:layout_constraintRight_toRightOf="parent"
        app:layout_constraintTop_toTopOf="parent" />

    <Button
        android:id="@+id/btnFirst"
        android:layout_width="wrap_content"
        android:layout_height="wrap_content"
        android:text="first"
        android:onClick="first"
        app:layout_constraintTop_toBottomOf="@id/btnPost"
        app:layout_constraintStart_toStartOf="parent"
        app:layout_constraintEnd_toStartOf="@+id/btnSecond"/>

    <Button
        android:id="@+id/btnSecond"
        android:layout_width="wrap_content"
        android:layout_height="wrap_content"
        android:text="second"
        android:onClick="second"
        app:layout_constraintTop_toBottomOf="@id/btnPost"
        app:layout_constraintStart_toEndOf="@id/btnFirst"
        app:layout_constraintEnd_toStartOf="@+id/btnThird"/>

    <Button
        android:id="@+id/btnThird"
        android:layout_width="wrap_content"
        android:layout_height="wrap_content"
        android:text="third"
        android:onClick="third"
        app:layout_constraintTop_toBottomOf="@id/btnPost"
        app:layout_constraintStart_toEndOf="@id/btnSecond"
        app:layout_constraintEnd_toEndOf="parent"/>

</androidx.constraintlayout.widget.ConstraintLayout>
app/src/main/java/xyz/yorek/eventbus/MainActivity.kt
private const val TAG = "MainActivity"

class MainActivity : AppCompatActivity() {

    override fun onCreate(savedInstanceState: Bundle?) {
        super.onCreate(savedInstanceState)

        IPCEventBus.init(application)
        IPCEventBus.register(this)

        setContentView(R.layout.activity_main)
    }

    override fun onDestroy() {
        IPCEventBus.unregister(this)
        super.onDestroy()
    }

    @Subscribe
    fun onEventReceived(any: Any?) {
        Log.e(TAG, "receive message : $any")
    }

    fun post(view: View) {
        val msg = "Hello World, from $TAG"
        IPCEventBus.post(IPCEvent(1, msg))
    }

    fun first(view: View) {
        startActivity(Intent(this, MainActivity::class.java))
    }

    fun second(view: View) {
        startActivity(Intent(this, SecondActivity::class.java))
    }

    fun third(view: View) {
        startActivity(Intent(this, ThirdActivity::class.java))
    }
}
在MainActivity中我们post一下消息,然后进入SecondActivity再次post,进入ThirdActivity后最后一次post。
各个进程日志如下(按照日志时间顺序):
1569683305.912 31157-31157/xyz.yorek.eventbus E/MainActivity: receive message : IPCEvent{code=1, msg='Hello World, from MainActivity'}

1569683307.622 31157-31169/xyz.yorek.eventbus E/MainActivity: receive message : IPCEvent{code=2, msg='Hello World, from SecondActivity'}
1569683307.625 31093-31093/xyz.yorek.eventbus:second E/SecondActivity: receive message : IPCEvent{code=2, msg='Hello World, from SecondActivity'}

1569683309.245 31157-31169/xyz.yorek.eventbus E/MainActivity: receive message : IPCEvent{code=3, msg='Hello World, from ThirdActivity'}
1569683309.245 31210-31210/xyz.yorek.eventbus:third E/ThirdActivity: receive message : IPCEvent{code=3, msg='Hello World, from ThirdActivity'}
1569683309.246 31093-31246/xyz.yorek.eventbus:second E/SecondActivity: receive message : IPCEvent{code=3, msg='Hello World, from ThirdActivity'}
从上面的日志来看,我们已经完成了跨进程EventBus的功能。
下面的日志是一份详细记载了各个事件的日志。从日志的中可以看出:本进程的某线程发出的事件会由同一个线程来触发;其他进程发出的事件,会由本进程Binder线程池里面的线程触发。
1569683981.405 31484-31484/xyz.yorek.eventbus E/EventBusManagerService: dispatch begin : main
1569683981.405 31484-31484/xyz.yorek.eventbus E/MainActivity: receive message : main IPCEvent{code=1, msg='Hello World, from MainActivity'}
1569683981.406 31484-31484/xyz.yorek.eventbus E/EventBusManagerService: dispatch end : main
1569683981.406 31484-31484/xyz.yorek.eventbus E/MainActivity: post message done : main

1569684013.794 31484-31526/xyz.yorek.eventbus E/EventBusManagerService: dispatch begin : Binder:31484_1
1569684013.794 31484-31526/xyz.yorek.eventbus E/MainActivity: receive message : Binder:31484_1 IPCEvent{code=2, msg='Hello World, from SecondActivity'}
1569684013.799 32016-32016/xyz.yorek.eventbus:second E/SecondActivity: receive message : main IPCEvent{code=2, msg='Hello World, from SecondActivity'}
1569684013.803 31484-31526/xyz.yorek.eventbus E/EventBusManagerService: dispatch end : Binder:31484_1
1569684013.804 32016-32016/xyz.yorek.eventbus:second E/SecondActivity: post message done : main

1569684035.762 31484-31526/xyz.yorek.eventbus E/EventBusManagerService: dispatch begin : Binder:31484_1
1569684035.762 31484-31526/xyz.yorek.eventbus E/MainActivity: receive message : Binder:31484_1 IPCEvent{code=3, msg='Hello World, from ThirdActivity'}
1569684035.764 32063-32063/xyz.yorek.eventbus:third E/ThirdActivity: receive message : main IPCEvent{code=3, msg='Hello World, from ThirdActivity'}
1569684035.765 31484-31526/xyz.yorek.eventbus E/EventBusManagerService: dispatch end : Binder:31484_1
1569684035.765 32016-32089/xyz.yorek.eventbus:second E/SecondActivity: receive message : Binder:32016_4 IPCEvent{code=3, msg='Hello World, from ThirdActivity'}
1569684035.766 32063-32063/xyz.yorek.eventbus:third E/ThirdActivity: post message done : main