AndResGuard资源混淆原理浅析
1. 前言
AndResGuard
AndResGuard是一款可以实现资源混淆的插件,可以达到立减1M的效果1。实际上对于比较大型的工程来说,达到的效果不止1M。
这是因为其实现了以下功能:
- 最主要的资源混淆功能(资源路径短链化:res/drawable/udgasudg.xml -> 成r/a/a.xml)
- 重复资源合并(修改资源表中的路径值即可,冗余的文件不打进新的zip中)
- 统一资源项的EntryName(将资源项的名称统一为固定字符串,可以减少全剧字符串池的大小)
- 指定文件在zip包中采取DEFLATED压缩方式,而不是STORED压缩方式
- 最后对zip进行了整包7z压缩
本篇文章主要讲述的是AndResGuard是如何实现资源混淆的,这个功能的实现离不开解析、修改以及回写resources.arsc文件。
为了能够理清这里面的实现,我们得先介绍一下resources.arsc这个二进制文件的具体格式。
AGP new features
AGP 4.2 支持了资源混淆的功能:https://jakewharton.com/smaller-apks-with-resource-optimization/
可以使用android.enableResourceOptimizations=false关闭
AGP 7.1 支持了无用资源的完全删除:https://developer.android.com/studio/releases/gradle-plugin#improved-resource-shrinker
以往无用资源都是替换为非常小的占位图,现在可以使用android.experimental.enableNewResourceShrinker.preciseShrinking=true彻底删除了
AGP的逐渐迭代会使该库持续失去价值,但是对于大的项目工程来说,由于依赖了许许多多的插件,AGP版本的升级会导致许多插件需要适配,这是很庞大的工作量。而且一些小的优化点,AGP也没有支持到,所以AndResGuard仍然有它的使用价值。
2. resources.arsc格式
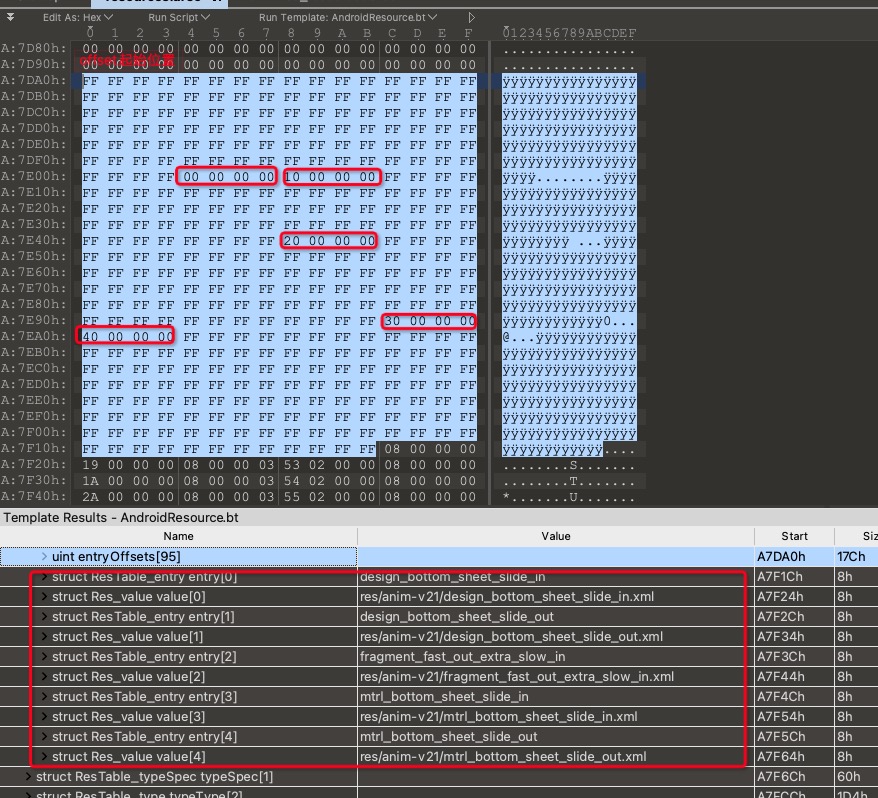
下面这张图是一张典型的格式图。这里简单叙述一下,具体的例子可以对照andresguard的实现来看。点击跳转

010 Editor
这里推荐使用010 Editor工具来可视化查看resrouces.arsc二进制文件的结构,可以下载AndroidResource.bt这个模板解析文件,验证起来更方便。
当然,1.1版本里面有些bug,在解析Res_value时应该读取全局字符串池,而不是ResTable_package里面的资源项名称字符串池。
修正方法如下:
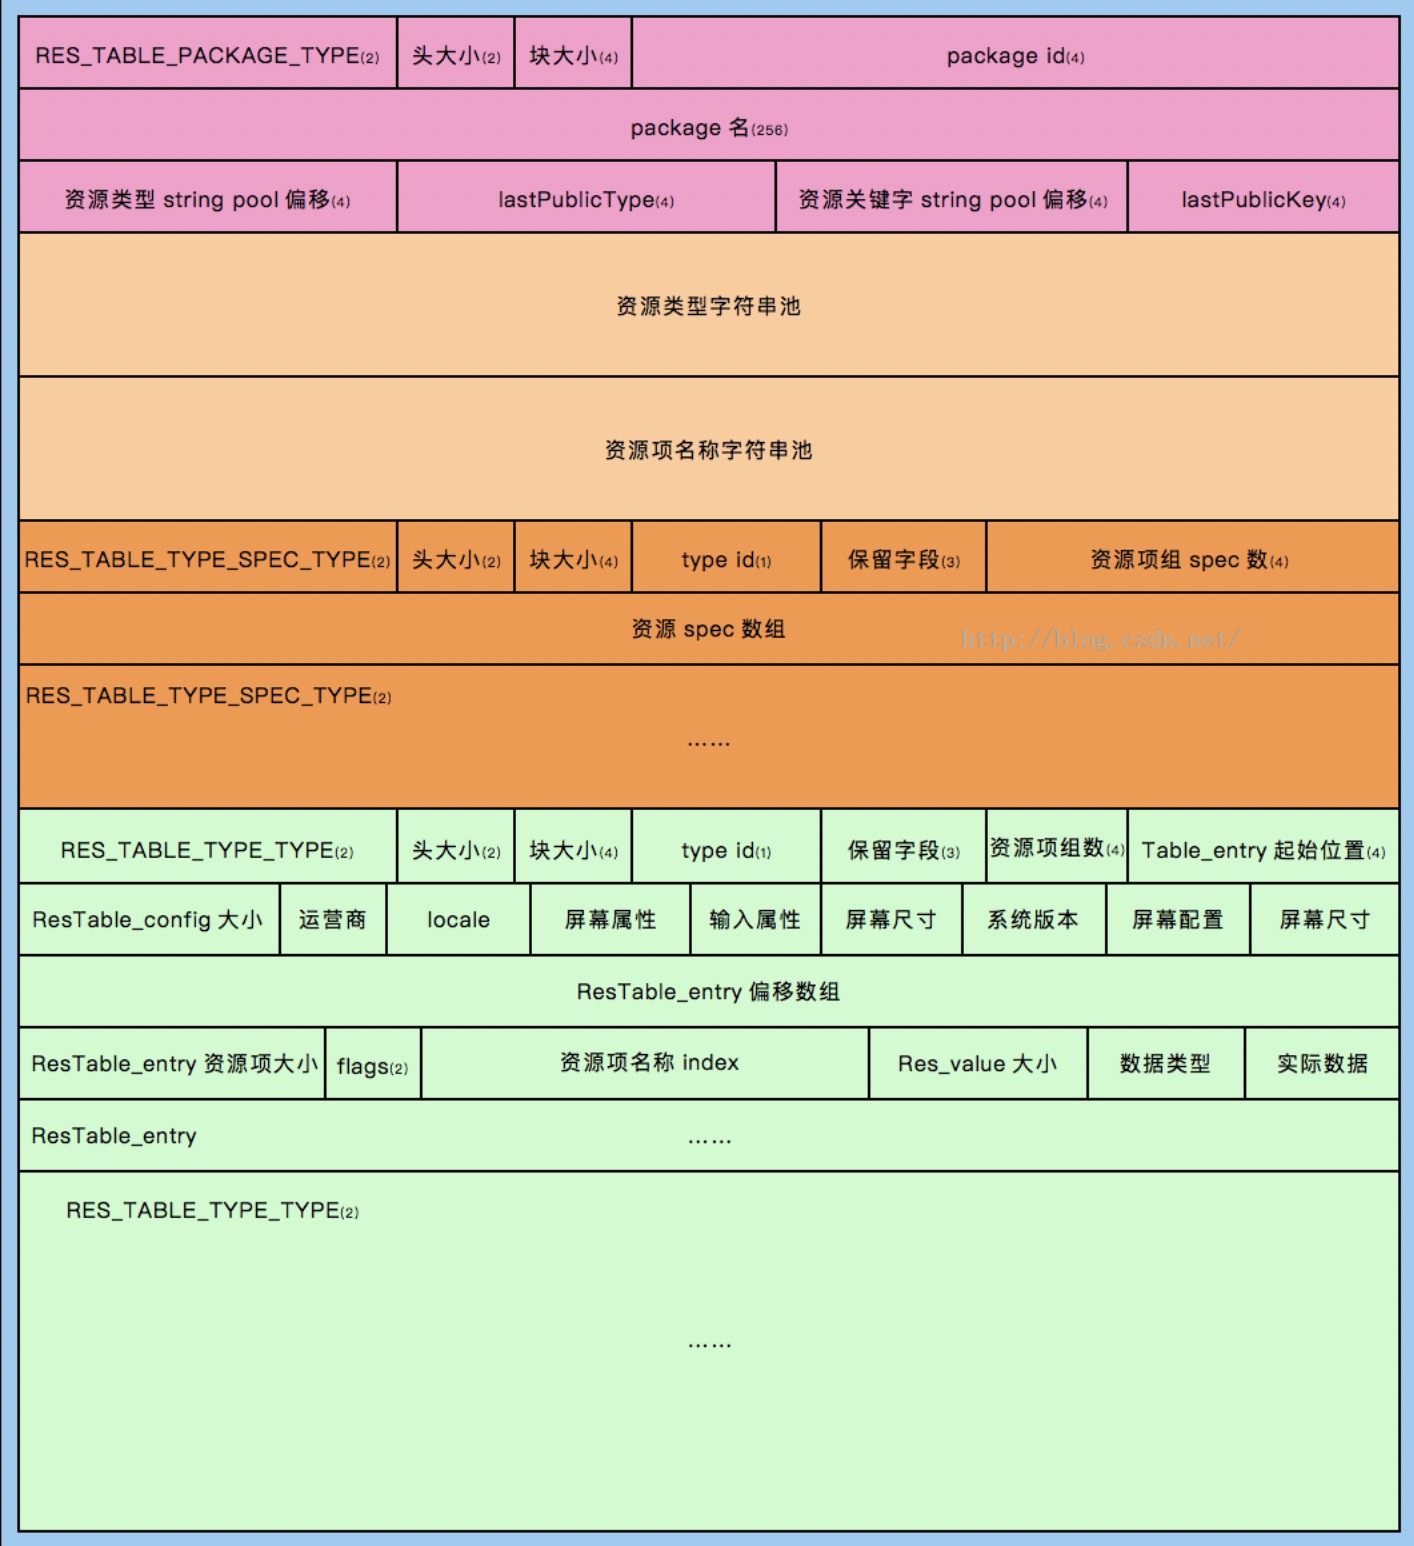
首先,resources.arsc在文件中的分布采用的是小端存储的分布方式。文件的每一个部分都由一个chunk结构打头,通过chunk中的type可以知道这一个chunk是什么类型,从而进行不同的解析。这些定义位于源码ResourceTypes.h中,可以对照来看。
首先是资源表头部分ResTable_header,该部分对应着图中的第一行。由一个ResChunk_header和一个uint32_t构成:
struct ResTable_header
{
    struct ResChunk_header header;
    // The number of ResTable_package structures.
    uint32_t packageCount;
};

struct ResChunk_header
{
    // Type identifier for this chunk.  The meaning of this value depends
    // on the containing chunk.
    uint16_t type;
    // Size of the chunk header (in bytes).  Adding this value to
    // the address of the chunk allows you to find its associated data
    // (if any).
    uint16_t headerSize;
    // Total size of this chunk (in bytes).  This is the chunkSize plus
    // the size of any data associated with the chunk.  Adding this value
    // to the chunk allows you to completely skip its contents (including
    // any child chunks).  If this value is the same as chunkSize, there is
    // no data associated with the chunk.
    uint32_t size;
};
ResTable_header.packageCount代表的是这个文件中有多少个ResTable_package数,大部分情况都只有自己这一个包的资源。
ResChunk_header.type表示的是chunk的类型,取值如下枚举:
enum {
    RES_NULL_TYPE                     = 0x0000,
    RES_STRING_POOL_TYPE              = 0x0001,
    RES_TABLE_TYPE                    = 0x0002,
    RES_XML_TYPE                      = 0x0003,

    // Chunk types in RES_XML_TYPE
    RES_XML_FIRST_CHUNK_TYPE          = 0x0100,
    RES_XML_START_NAMESPACE_TYPE      = 0x0100,
    RES_XML_END_NAMESPACE_TYPE        = 0x0101,
    RES_XML_START_ELEMENT_TYPE        = 0x0102,
    RES_XML_END_ELEMENT_TYPE          = 0x0103,
    RES_XML_CDATA_TYPE                = 0x0104,
    RES_XML_LAST_CHUNK_TYPE           = 0x017f,
    // This contains a uint32_t array mapping strings in the string
    // pool back to resource identifiers.  It is optional.
    RES_XML_RESOURCE_MAP_TYPE         = 0x0180,

    // Chunk types in RES_TABLE_TYPE
    RES_TABLE_PACKAGE_TYPE            = 0x0200,
    RES_TABLE_TYPE_TYPE               = 0x0201,
    RES_TABLE_TYPE_SPEC_TYPE          = 0x0202,
    RES_TABLE_LIBRARY_TYPE            = 0x0203,
    RES_TABLE_OVERLAYABLE_TYPE        = 0x0204,
    RES_TABLE_OVERLAYABLE_POLICY_TYPE = 0x0205,
    RES_TABLE_STAGED_ALIAS_TYPE       = 0x0206,
};
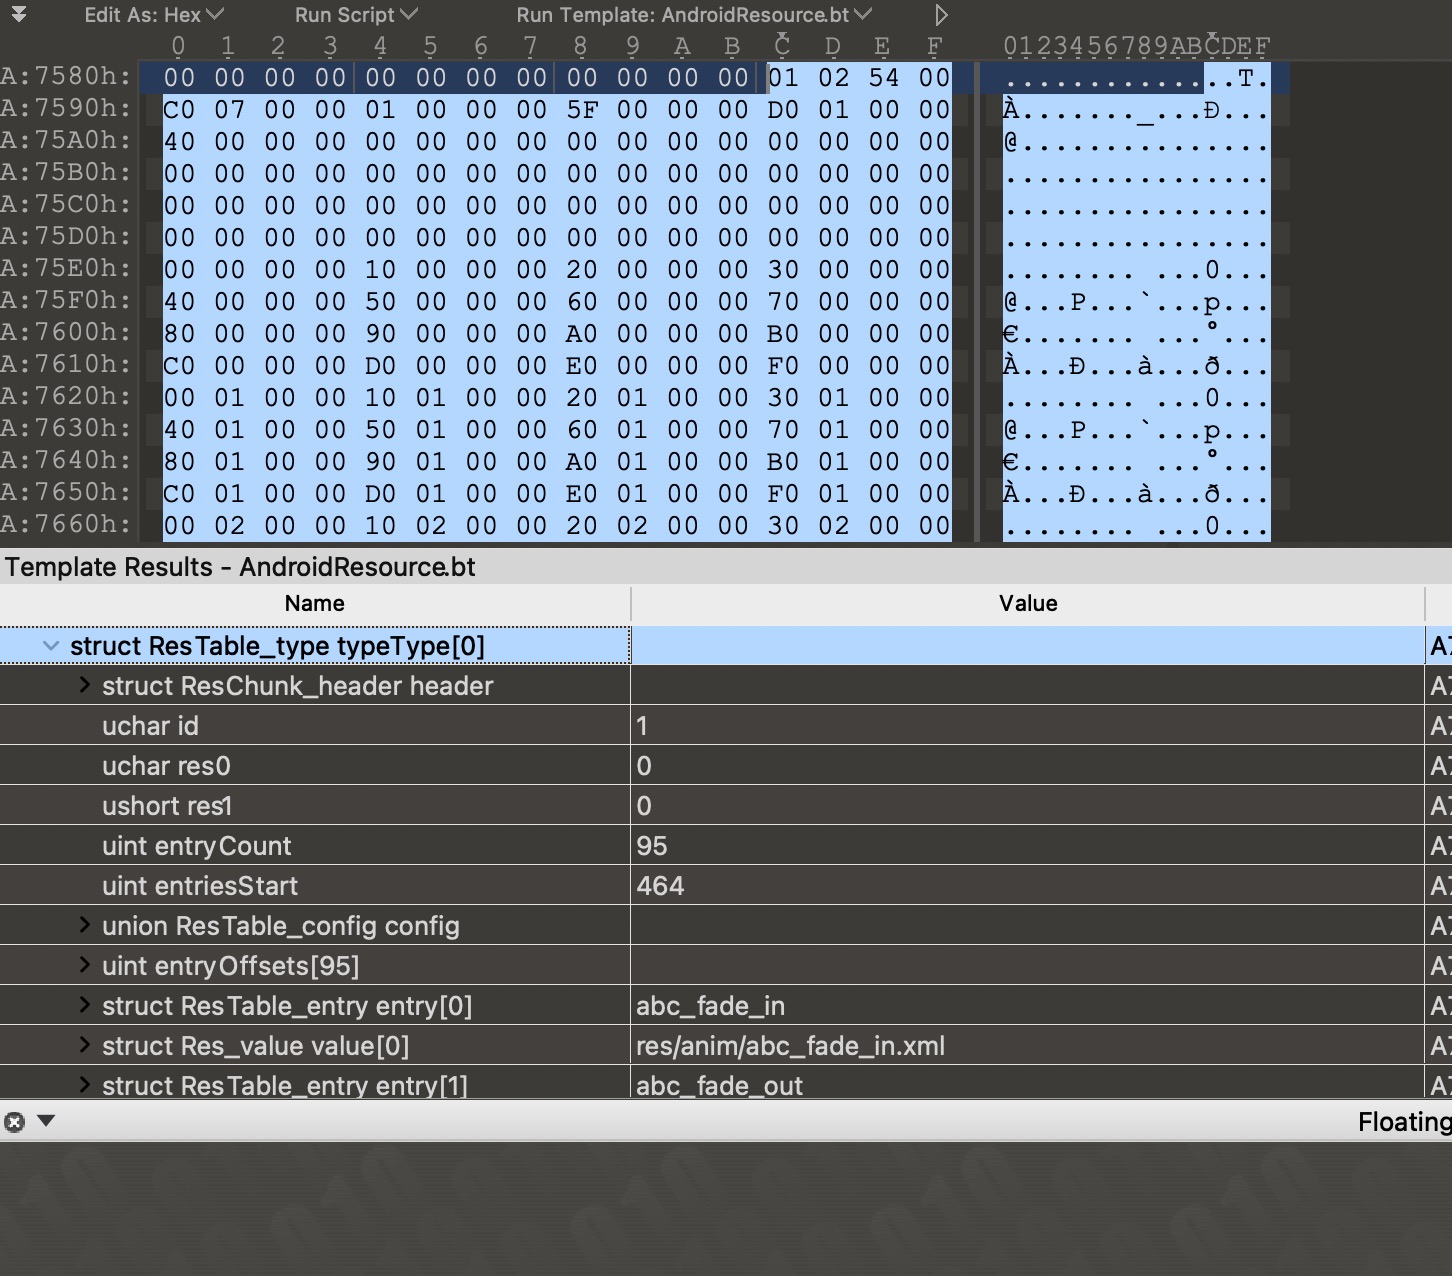
由于小端存储的特点0x0002在内存中的分布是0x02 0x00。显然,下图中资源表表头里面的chunk的取值类型就是RES_TABLE_TYPE了。此外,我们还知道资源表表头的大小是0x0c也就是12;整个chunk的大小(也就是整个resources.arsc文件的大小)是0x00176d1c也就是1535260个字节;resources.arsc文件的package数是1。

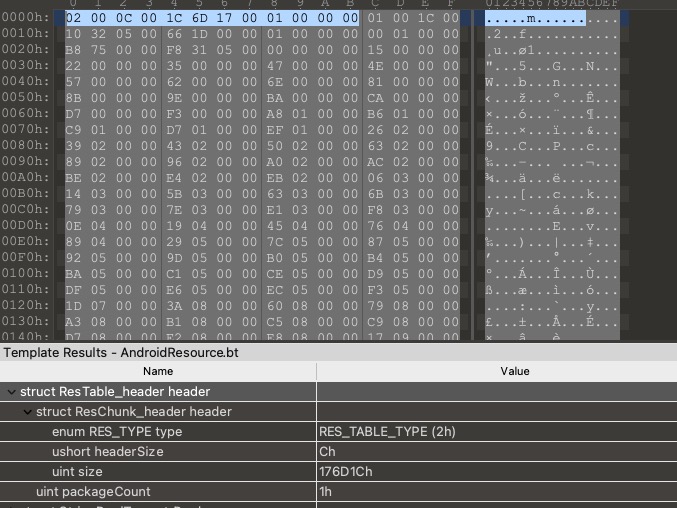
在ResTable_header之后,是全局字符串池ResStringPool了。其header是一个ResStringPool_header:
/**
 * Convenience class for accessing data in a ResStringPool resource.
 */
class ResStringPool
{
public:
    ResStringPool();
    ResStringPool(const void* data, size_t size, bool copyData=false);
    ~ResStringPool();
    status_t setTo(const void* data, size_t size, bool copyData=false);
    status_t getError() const;
    void uninit();
    // Return string entry as UTF16; if the pool is UTF8, the string will
    // be converted before returning.
    inline const char16_t* stringAt(const ResStringPool_ref& ref, size_t* outLen) const {
        return stringAt(ref.index, outLen);
    }
    const char16_t* stringAt(size_t idx, size_t* outLen) const;
    // Note: returns null if the string pool is not UTF8.
    const char* string8At(size_t idx, size_t* outLen) const;
    // Return string whether the pool is UTF8 or UTF16.  Does not allow you
    // to distinguish null.
    const String8 string8ObjectAt(size_t idx) const;
    const ResStringPool_span* styleAt(const ResStringPool_ref& ref) const;
    const ResStringPool_span* styleAt(size_t idx) const;
    ssize_t indexOfString(const char16_t* str, size_t strLen) const;
    size_t size() const;
    size_t styleCount() const;
    size_t bytes() const;
    bool isSorted() const;
    bool isUTF8() const;
private:
    status_t                    mError;
    void*                       mOwnedData;
    const ResStringPool_header* mHeader;
    size_t                      mSize;
    mutable Mutex               mDecodeLock;
    const uint32_t*             mEntries;
    const uint32_t*             mEntryStyles;
    const void*                 mStrings;
    char16_t**                  mCache;
    uint32_t                    mStringPoolSize;    // number of uint16_t
    const uint32_t*             mStyles;
    uint32_t                    mStylePoolSize;    // number of uint32_t
};

/**
 * Definition for a pool of strings.  The data of this chunk is an
 * array of uint32_t providing indices into the pool, relative to
 * stringsStart.  At stringsStart are all of the UTF-16 strings
 * concatenated together; each starts with a uint16_t of the string's
 * length and each ends with a 0x0000 terminator.  If a string is >
 * 32767 characters, the high bit of the length is set meaning to take
 * those 15 bits as a high word and it will be followed by another
 * uint16_t containing the low word.
 *
 * If styleCount is not zero, then immediately following the array of
 * uint32_t indices into the string table is another array of indices
 * into a style table starting at stylesStart.  Each entry in the
 * style table is an array of ResStringPool_span structures.
 */
struct ResStringPool_header
{
    struct ResChunk_header header;
    // Number of strings in this pool (number of uint32_t indices that follow
    // in the data).
    uint32_t stringCount;
    // Number of style span arrays in the pool (number of uint32_t indices
    // follow the string indices).
    uint32_t styleCount;
    // Flags.
    enum {
        // If set, the string index is sorted by the string values (based
        // on strcmp16()).
        SORTED_FLAG = 1<<0,
        // String pool is encoded in UTF-8
        UTF8_FLAG = 1<<8
    };
    uint32_t flags;
    // Index from header of the string data.
    uint32_t stringsStart;
    // Index from header of the style data.
    uint32_t stylesStart;
};
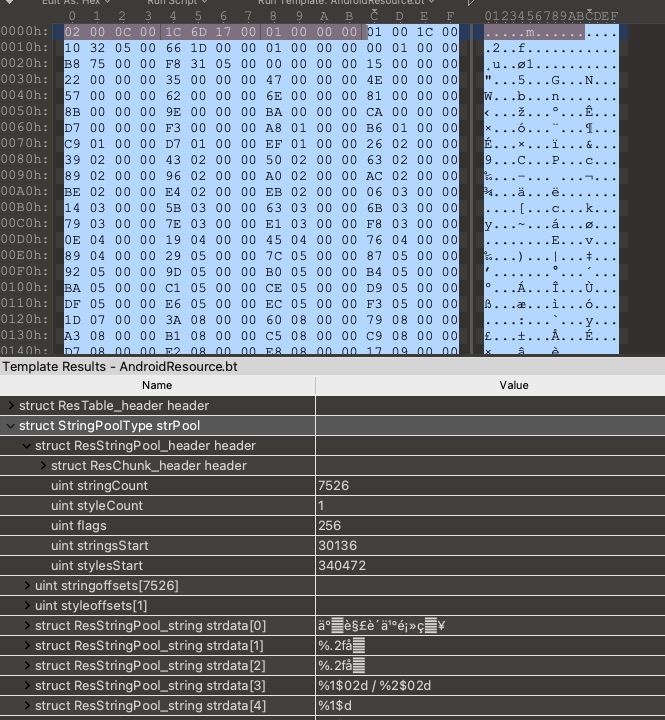
ResStringPool_header后面紧接着就是stringCount个uint32_t类型的偏移数组,styleCount个uint32_t类型的偏移数组,所有的字符串,所有的style。

全局字符串池之后,就是ResTable_header.packageCount个ResTable_package结构了,里面存储的是一个包下的所有资源。首先是其header的结构:
/**
 * A collection of resource data types within a package.  Followed by
 * one or more ResTable_type and ResTable_typeSpec structures containing the
 * entry values for each resource type.
 */
struct ResTable_package
{
    struct ResChunk_header header;
    // If this is a base package, its ID.  Package IDs start
    // at 1 (corresponding to the value of the package bits in a
    // resource identifier).  0 means this is not a base package.
    uint32_t id;
    // Actual name of this package, \0-terminated.
    char16_t name[128];
    // Offset to a ResStringPool_header defining the resource
    // type symbol table.  If zero, this package is inheriting from
    // another base package (overriding specific values in it).
    uint32_t typeStrings;
    // Last index into typeStrings that is for public use by others.
    uint32_t lastPublicType;
    // Offset to a ResStringPool_header defining the resource
    // key symbol table.  If zero, this package is inheriting from
    // another base package (overriding specific values in it).
    uint32_t keyStrings;
    // Last index into keyStrings that is for public use by others.
    uint32_t lastPublicKey;
};
ResTable_package里面有该包的包名、资源id的16进制的高两位(0x7f010000的0x7f)等信息。
ResTable_package之后紧跟着的是包里面的字符串池:资源类型字符串池、资源项名称字符串池。这两个字符串池的格式与之前提到的全局字符串池一样。
在这两个字符串池之后,紧跟着的是若干个ResTable_typeSpec结构,而每一个ResTable_typeSepc内部又会紧跟着ResTable_type类型。
ResTable_typeSpec描述的某个类型的资源,比如anim、animator、dimen、color等。里面有资源id的16进制表示的中间两位(0x7f010000的0x01)。
ResTable_type描述的是某种类型资源的具体配置下的所有资源,比如都是anim、anim-v19、anim-v21这种。
举个例子,有三种不同限定符的anim资源,这种情况下ResTable_typeSepc就表示的是anim这一类资源,不论有没有什么限定符。紧跟着就有三个ResTable_type组成的数组,分别表示anim、anim-v19、anim-v21这三个。
/**
 * A specification of the resources defined by a particular type.
 *
 * There should be one of these chunks for each resource type.
 *
 * This structure is followed by an array of integers providing the set of
 * configuration change flags (ResTable_config::CONFIG_*) that have multiple
 * resources for that configuration.  In addition, the high bit is set if that
 * resource has been made public.
 */
struct ResTable_typeSpec
{
    struct ResChunk_header header;
    // The type identifier this chunk is holding.  Type IDs start
    // at 1 (corresponding to the value of the type bits in a
    // resource identifier).  0 is invalid.
    uint8_t id;

    // Must be 0.
    uint8_t res0;
    // Must be 0.
    uint16_t res1;

    // Number of uint32_t entry configuration masks that follow.
    uint32_t entryCount;
    enum {
        // Additional flag indicating an entry is public.
        SPEC_PUBLIC = 0x40000000
    };
};

/**
 * A collection of resource entries for a particular resource data
 * type. Followed by an array of uint32_t defining the resource
 * values, corresponding to the array of type strings in the
 * ResTable_package::typeStrings string block. Each of these hold an
 * index from entriesStart; a value of NO_ENTRY means that entry is
 * not defined.
 *
 * There may be multiple of these chunks for a particular resource type,
 * supply different configuration variations for the resource values of
 * that type.
 *
 * It would be nice to have an additional ordered index of entries, so
 * we can do a binary search if trying to find a resource by string name.
 */
struct ResTable_type
{
    struct ResChunk_header header;
    enum {
        NO_ENTRY = 0xFFFFFFFF
    };

    // The type identifier this chunk is holding.  Type IDs start
    // at 1 (corresponding to the value of the type bits in a
    // resource identifier).  0 is invalid.
    uint8_t id;

    // Must be 0.
    uint8_t res0;
    // Must be 0.
    uint16_t res1;

    // Number of uint32_t entry indices that follow.
    uint32_t entryCount;
    // Offset from header where ResTable_entry data starts.
    uint32_t entriesStart;

    // Configuration this collection of entries is designed for.
    ResTable_config config;
};
在ResTable_type中,最后一项ResTable_config之后有entryCount个offset的数组。在之后总体就是ResTable_entry的数组。
entryCount个offset的数组表示的是具体资源id在ResTable_entry的数组中的偏移量。
还是拿anim、anim-v21这种来说。其中有些资源可能有anim与anim-v21这两个版本,大多数资源都只有anim版本。如果当前ResTable_type表示的是anim-v21,entryCount有95个。说明R.anim.xxx有95个。但实际上anim-v21下只有5个资源,所以95个offset数组中只有5个是有意义的值,其他90个都是0xFFFFFFFF,也就是无意义的。后面跟着的ResTable_entry数组也只有5个。例子见下图。
ResTable_entry表示的是resources中的每一项资源的entry name,它有一种复杂(complex)结构:ResTable_map_entry。这个结构会包含多个Res_value结构,而普通的ResTable_entry只会紧跟着一个Res_value结构。
ResTable_map_entry表示的是下面的这种资源。
<style name="AlbumTabTextStyle">
    <item name="android:textStyle">bold</item>
    <item name="android:textColor">@color/album_tab_color</item>
    <item name="android:textSize">@dimen/text_size_large</item>
</style>
Res_value表示的资源的值。一般情况下我们检索资源都是通过id来找到对应的值,用不到entry name,所以ResTable_entry里面的值是可以被固定成一个特定值的,以此来减少字符串池的大小。AndResGuard混淆资源的重点就是处理的这两个类型。
3. AndResGuard原理解析
AndResGuard实现资源混淆的主要原理就是将资源目录将res/drawable/udgasudg.xml这种目录 混淆 成r/a/a.xml这种。此外,对于包中相同的 冗余资源,也会采用修改Res_value中的值来重定向到同一份文件的方式来优化包体积。最后,也会对整包进行压缩率更大的 7z 来重新压缩安装包。
AndResGuard的源码位于https://github.com/shwenzhang/AndResGuard中。
3.1 AndResGuardPlugin
下面我们正式来看看神奇的AndResGuard插件到底干了些什么。
首先还是先找到plugin的入口:
AndResGuard-gradle-plugin/src/main/resources/META-INF/gradle-plugins/AndResGuard.properties
这表明了这个插件的实现类是com.tencent.gradle.AndResGuardPlugin。在AndResGuardPlugin中会创建一些AndResGuardTask,并将Task设置依赖为依赖于assemble${variantName}。但是assembleUseApk除外,这个task需要用户手动触发,并配置一些额外的参数。
AndResGuard-gradle-plugin/src/main/groovy/com/tencent/gradle/AndResGuardPlugin.groovy
class AndResGuardPlugin implements Plugin<Project> {

  public static final String USE_APK_TASK_NAME = "UseApk"

  @Override
  void apply(Project project) {
    project.apply plugin: 'com.google.osdetector'
    project.extensions.create('andResGuard', AndResGuardExtension)
    project.extensions.add("sevenzip", new ExecutorExtension("sevenzip"))

    project.afterEvaluate {
      def android = project.extensions.android
      createTask(project, USE_APK_TASK_NAME)

      android.applicationVariants.all { variant ->
        def variantName = variant.name.capitalize()
        createTask(project, variantName)
      }

      android.buildTypes.all { buildType ->
        def buildTypeName = buildType.name.capitalize()
        createTask(project, buildTypeName)
      }

      android.productFlavors.all { flavor ->
        def flavorName = flavor.name.capitalize()
        createTask(project, flavorName)
      }

      project.extensions.findByName("sevenzip").loadArtifact(project)
    }
  }

  private static void createTask(Project project, variantName) {
    def taskName = "resguard${variantName}"
    if (project.tasks.findByPath(taskName) == null) {
      def task = project.task(taskName, type: AndResGuardTask)
      if (variantName != USE_APK_TASK_NAME) {
        task.dependsOn "assemble${variantName}"
      }
    }
  }
}
上面这些task的创建以及设置依赖就不多说了。在一般的,没有配置flavor的项目中,会创建三个task:
- resguardUseApk
- resguardDebug
- resguardRelease
我们注意一下这里配置7zip的代码:
project.extensions.findByName("sevenzip").loadArtifact(project)。
AndResGuard-gradle-plugin/src/main/groovy/com/tencent/gradle/ExecutorExtension.groovy
void loadArtifact(Project project) {
    if (path == null && artifact != null) {
        Configuration config = project.configurations.create("AndResGuardLocatorSevenZip") {
        visible = false
        transitive = false
        extendsFrom = []
        }
        def groupId, artifactId, version

        // artifact = 'com.tencent.mm:SevenZip:1.2.20'
        // groupId: com.tencent.mm
        // artifactId: SevenZip
        // version: 1.2.20
        (groupId, artifactId, version) = this.artifact.split(":")
        def notation = [group     : groupId,
                        name      : artifactId,
                        version   : version,
                        classifier: project.osdetector.classifier,
                        ext       : 'exe']

        project.logger.info("[AndResGuard]Resolving artifact: ${notation}")
        // 添加依赖项并解析出对应的文件
        Dependency dep = project.dependencies.add(config.name, notation)
        File file = config.fileCollection(dep).singleFile
        if (!file.canExecute() && !file.setExecutable(true)) {
        throw new GradleException("Cannot set ${file} as executable")
        }
        project.logger.info("[AndResGuard]Resolved artifact: ${file}")
        // 保存7zip工具文件的目录
        this.path = file.path
    }
}
上面的project.osdetector.classifier依赖于com.google.osdetector插件来检测当前编译机器的平台,从而下载对应平台的7zip工具。这个插件在AndResGuardPlugin#apply方法的第一行就引入了。
然后我们回到主干,在注册完AndResGuardTask并设置依赖的Task后,等待assemble${variantName}执行完毕之后,我们的这个Task就可以接手,开始解压包、处理然后重新压缩包的过程了。
AndResGuardTask在构造函数中完成了一些初始化的操作,收集了一些变量信息,并在@TaskAction修饰的run方法中调用了RunGradleTask方法进行变量的转换,最后调用了Main.gradleRun方法。这后面就进入了另外一个module中了。
这个过程中我们注意一下对于白名单的预处理就可以了。对于每个R打头的白名单项,都会在前面拼接本应用的包名。比如填写的是R.id.a,那么处理之后就变成了com.exmaple.example.R.id.a。
AndResGuard-gradle-plugin/src/main/groovy/com/tencent/gradle/AndResGuardTask.groovy
def RunGradleTask(config, String absPath, int minSDKVersion, int targetSDKVersion) {
    ...
    String packageName = config.packageName
    ArrayList<String> whiteListFullName = new ArrayList<>()
    ExecutorExtension sevenzip = project.extensions.findByName("sevenzip") as ExecutorExtension
    configuration.whiteList.each { res ->
      if (res.startsWith("R")) {
        whiteListFullName.add(packageName + "." + res)
      } else {
        whiteListFullName.add(res)
      }
    }
    ...
}
到达Main类之后,会将gradle传过来的配置项转换成自己模块的配置项。一些要点如下。
  /**
   * use by gradle
   *
   * @param param {@link InputParam} parameter
   * @throws IOException io exception
   */
  public Configuration(InputParam param) throws IOException {
    mWhiteList = new HashMap<>();
    ...
    // 进行白名单的转换
    for (String item : param.whiteList) {
      mUseWhiteList = true;
      addWhiteList(item);
    }
    ...
    // 固定ResTable_entry的名称,有助于减少全局字符串池的大小,此处的值一般配置为arg
    mFixedResName = param.fixedResName;
    // 需要将存储类型设置为deflated类型的名单
    for (String item : param.compressFilePattern) {
      mUseCompress = true;
      addToCompressPatterns(item);
    }
    ...
  }
addWhiteList里面会将白名单按照包、类型、资源名进行分类。
  public final HashMap<String, HashMap<String, HashSet<Pattern>>> mWhiteList;

  private void addWhiteList(String item) throws IOException {
    if (item.length() == 0) {
      throw new IOException("Invalid config file: Missing required attribute " + ATTR_VALUE);
    }

    int packagePos = item.indexOf(".R.");
    if (packagePos == -1) {

      throw new IOException(String.format("please write the full package name,eg com.tencent.mm.R.drawable.dfdf, but yours %s\n",
          item
      ));
    }
    //先去掉空格
    item = item.trim();
    // 解析出包名
    String packageName = item.substring(0, packagePos);
    //不能通过lastDot
    int nextDot = item.indexOf(".", packagePos + 3);
    // 解析出类型名
    String typeName = item.substring(packagePos + 3, nextDot);
    // 资源名
    String name = item.substring(nextDot + 1);
    HashMap<String, HashSet<Pattern>> typeMap;

    if (mWhiteList.containsKey(packageName)) {
      typeMap = mWhiteList.get(packageName);
    } else {
      typeMap = new HashMap<>();
    }

    HashSet<Pattern> patterns;
    if (typeMap.containsKey(typeName)) {
      patterns = typeMap.get(typeName);
    } else {
      patterns = new HashSet<>();
    }

    // 资源名需要转换成Pattern,方便进行字符串匹配
    name = Utils.convertToPatternString(name);
    Pattern pattern = Pattern.compile(name);
    patterns.add(pattern);
    typeMap.put(typeName, patterns);
    System.out.println(String.format("convertToPatternString typeName %s format %s", typeName, name));
    mWhiteList.put(packageName, typeMap);
  }
了解完白名单之后,我们可以回到Main.run方法了。接下来的方法就是这个插件中最重要的大方法了,我们且看resourceProguard将会完成资源混淆操作。
AndResGuard-core/src/main/java/com/tencent/mm/resourceproguard/Main.java
  protected void resourceProguard(
      File outputDir, File outputFile, String apkFilePath, InputParam.SignatureType signatureType, int minSDKVersoin) {
    File apkFile = new File(apkFilePath);
    if (!apkFile.exists()) {
      System.err.printf("The input apk %s does not exist", apkFile.getAbsolutePath());
      goToError();
    }
    mRawApkSize = FileOperation.getFileSizes(apkFile);
    try {
      ApkDecoder decoder = new ApkDecoder(config, apkFile);
      /* 默认使用V1签名 */
      decodeResource(outputDir, decoder, apkFile);
      buildApk(decoder, apkFile, outputFile, signatureType, minSDKVersoin);
    } catch (Exception e) {
      e.printStackTrace();
      goToError();
    }
  }
混淆过程先经过ApkDecoder进行解码,然后调用buildApk构建APK并签名。所以下面的内容就分这两步来进行。
3.2 ApkDecoder
  protected void resourceProguard(
      File outputDir, File outputFile, String apkFilePath, InputParam.SignatureType signatureType, int minSDKVersoin) {
      ...
      ApkDecoder decoder = new ApkDecoder(config, apkFile);
      /* 默认使用V1签名 */
      decodeResource(outputDir, decoder, apkFile);
      ...
  }

  private void decodeResource(File outputFile, ApkDecoder decoder, File apkFile)
      throws AndrolibException, IOException, DirectoryException {
    if (outputFile == null) {
      mOutDir = new File(mRunningLocation, apkFile.getName().substring(0, apkFile.getName().indexOf(".apk")));
    } else {
      mOutDir = outputFile;
    }
    decoder.setOutDir(mOutDir.getAbsoluteFile());
    decoder.decode();
  }
整个APK的解码过程由ApkDecoder来进行,在decodeResource方法中为解码器设置了输出目录之后,就开始了decode解码工作。
在正式开始decode前,需要做一些前置的工作:保证apk文件中有resources.arsc文件;进行一些初始化的设置。
AndResGuard-core/src/main/java/com/tencent/mm/androlib/ApkDecoder.java
  public boolean hasResources() throws AndrolibException {
    try {
      return apkFile.getDirectory().containsFile("resources.arsc");
    } catch (DirectoryException ex) {
      throw new AndrolibException(ex);
    }
  }

  private void ensureFilePath() throws IOException {
    Utils.cleanDir(mOutDir);

    // TypedValue.UNZIP_FILE_PATH = temp
    String unZipDest = new File(mOutDir, TypedValue.UNZIP_FILE_PATH).getAbsolutePath();
    System.out.printf("unziping apk to %s\n", unZipDest);
    // 解压apk里面的所有文件到unZipDest,并记录每一项的压缩方式
    mCompressData = FileOperation.unZipAPk(apkFile.getAbsoluteFile().getAbsolutePath(), unZipDest);
    // 遍历apk里面每一项的名称,若匹配上了compressFilePattern配置的值,则将其压缩方式变为deflated
    dealWithCompressConfig();
    // 确定资源输出目录是res目录还是r目录,也就是说是否将res目录混淆成r目录
    if (!config.mKeepRoot) {
      mOutResFile = new File(mOutDir.getAbsolutePath() + File.separator + TypedValue.RES_FILE_PATH);
    } else {
      mOutResFile = new File(mOutDir.getAbsolutePath() + File.separator + "res");
    }

    //这个需要混淆各个文件夹
    mRawResFile = new File(mOutDir.getAbsoluteFile().getAbsolutePath()
                           + File.separator
                           + TypedValue.UNZIP_FILE_PATH
                           + File.separator
                           + "res");
    mOutTempDir = new File(mOutDir.getAbsoluteFile().getAbsolutePath() + File.separator + TypedValue.UNZIP_FILE_PATH);

    //这里纪录原始res目录的文件
    // 将原始res目录里面的文件记录到mRawResourceFiles中
    Files.walkFileTree(mRawResFile.toPath(), new ResourceFilesVisitor());

    if (!mRawResFile.exists() || !mRawResFile.isDirectory()) {
      throw new IOException("can not found res dir in the apk or it is not a dir");
    }

    mOutTempARSCFile = new File(mOutDir.getAbsoluteFile().getAbsolutePath() + File.separator + "resources_temp.arsc");
    mOutARSCFile = new File(mOutDir.getAbsoluteFile().getAbsolutePath() + File.separator + "resources.arsc");

    String basename = apkFile.getName().substring(0, apkFile.getName().indexOf(".apk"));
    // resources_mapping日志文件的地址
    mResMappingFile = new File(mOutDir.getAbsoluteFile().getAbsolutePath()
                               + File.separator
                               + TypedValue.RES_MAPPING_FILE
                               + basename
                               + TypedValue.TXT_FILE);
    // 被合并的冗余项的日志文件的地址
    mMergeDuplicatedResMappingFile = new File(mOutDir.getAbsoluteFile().getAbsolutePath()
                             + File.separator
                             + TypedValue.MERGE_DUPLICATED_RES_MAPPING_FILE
                             + basename
                             + TypedValue.TXT_FILE);
  }
在前置工作中我们可以发现,AndResGuard插件中配置的compressFilePattern,其原理是将匹配到的每一项的压缩方式设置为DEFLATED。该方式相对于STORED而言,确实有压缩的效果。
我们接着看ApkDecoder#decode方法。在做完前置工作之后,会先调用RawARSCDecoder进行解码,然后再调用ARSCDecoder进行二次解码。
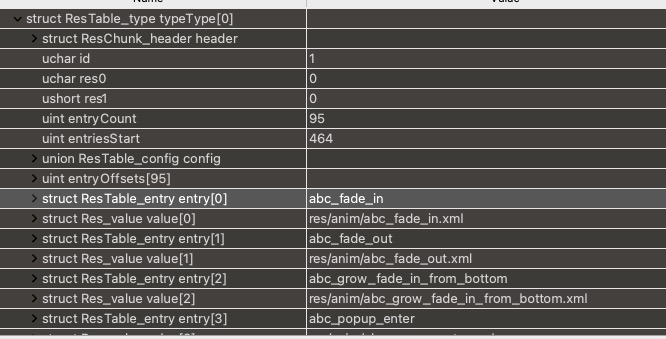
两次解码的目的不一样,RawARSCDecoder会将资源表里面所有的typeId、entry名称保存到HashMap<Integer, Set<String>> mExistTypeNames中。
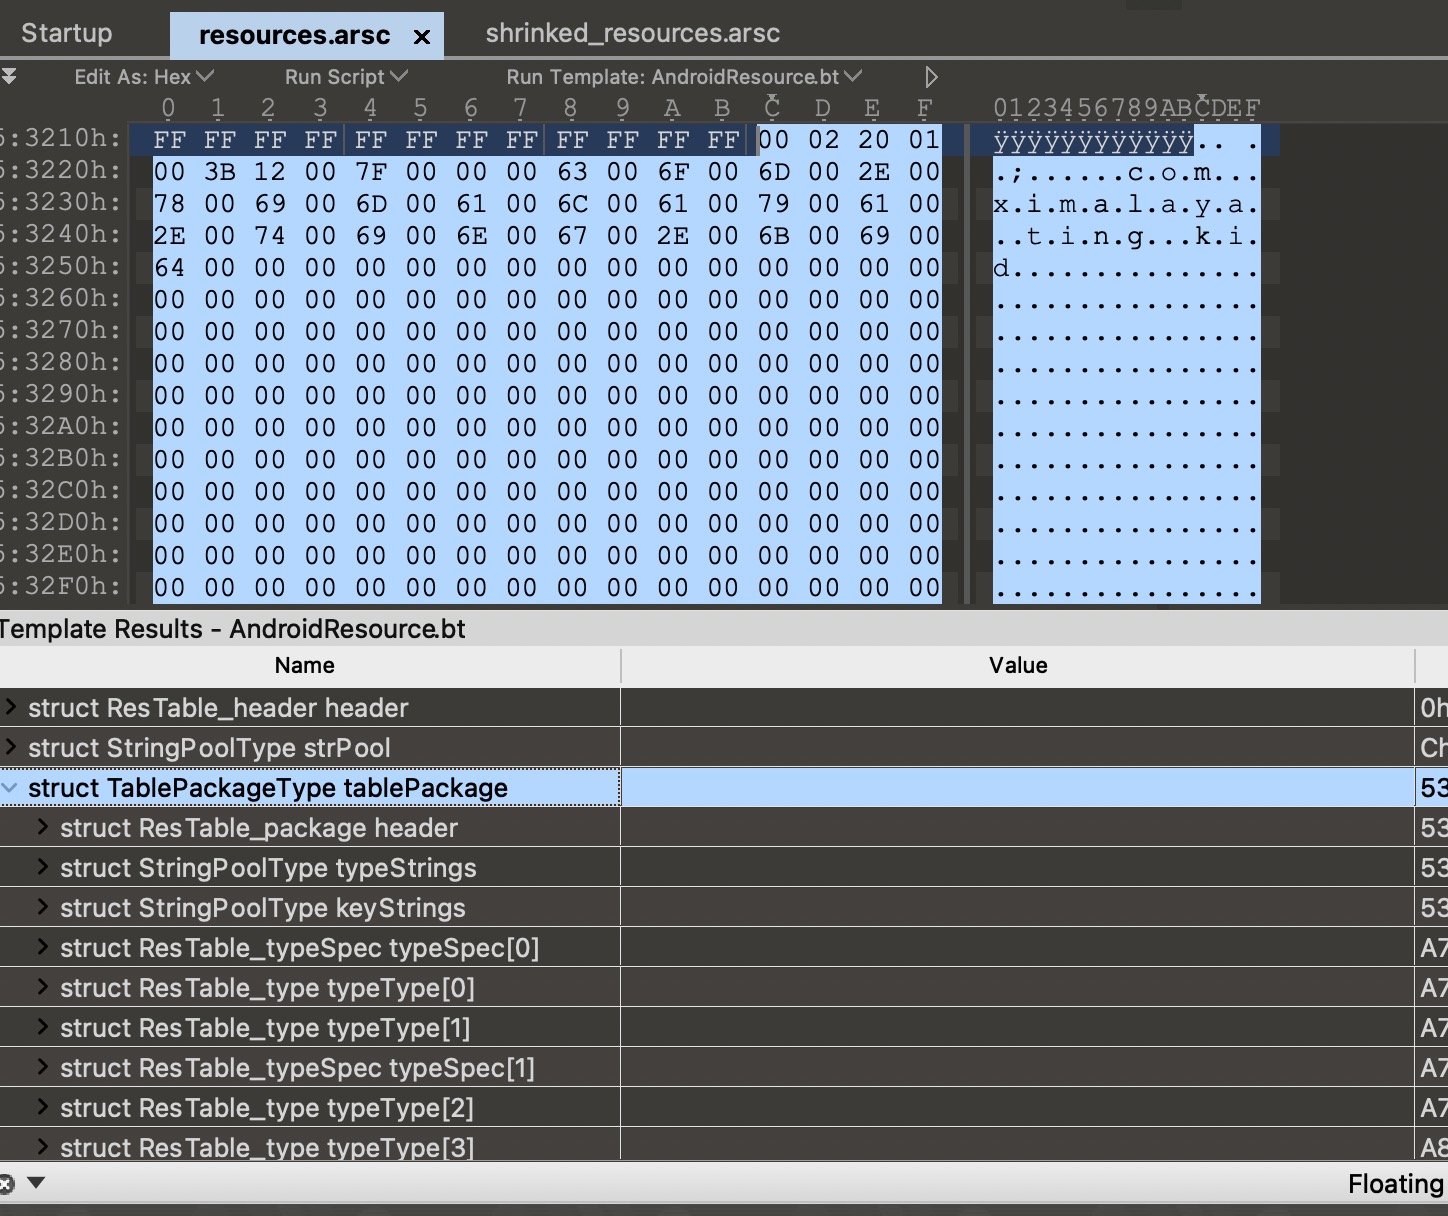
用下图的例子来说,里面保存的就是{ 1 -> ["abc_fade_in", "abc_fade_out"...] }
而ARSCDecoder则解析到ResTable_entry与Res_value时,进行里面涉及到的值的处理,以此来真正实现资源的混淆。所以这个部分才是重中之重。所以这里,我们看看ARSCDecoder的实现。
3.3 ARSCDecoder
ARSCDecoder在读取resources.arsc文件时,使用了LEDataInputStream来读取文件,这是DataInputStream的小端(Little-Endian)版本。
在构造函数中,还通过proguardFileName方法来为res下面的一级目录生成唯一的短路径名,这个映射关系保存在mOldFileName中,映射关系会被generalFileResMapping方法写入到resources_mapping文件中;此外,还会将res目录下出现的资源类型名保存到mShouldResguardTypeSet集合中。
AndResGuard-core/src/main/java/com/tencent/mm/androlib/res/decoder/ARSCDecoder.java
  private void proguardFileName() throws IOException, AndrolibException {
    mMappingWriter = new BufferedWriter(new FileWriter(mApkDecoder.getResMappingFile(), false));
    mMergeDuplicatedResMappingWriter = new BufferedWriter(new FileWriter(mApkDecoder.getMergeDuplicatedResMappingFile(), false));
    mMergeDuplicatedResMappingWriter.write("res filter path mapping:\n");
    mMergeDuplicatedResMappingWriter.flush();

    // 短名字符串生成器
    mResguardBuilder = new ResguardStringBuilder();
    // 不过滤任何东西
    mResguardBuilder.reset(null);

    final Configuration config = mApkDecoder.getConfig();

    File rawResFile = mApkDecoder.getRawResFile();

    File[] resFiles = rawResFile.listFiles();

    // 需要看看哪些 类型 是要混淆文件路径的
    for (File resFile : resFiles) {
      String raw = resFile.getName();
      if (raw.contains("-")) {
        raw = raw.substring(0, raw.indexOf("-"));
      }
      mShouldResguardTypeSet.add(raw);
    }

    if (!config.mKeepRoot) {
      // 需要保持之前的命名方式
      if (config.mUseKeepMapping) {
        HashMap<String, String> fileMapping = config.mOldFileMapping;
        List<String> keepFileNames = new ArrayList<>();
        // 这里面为了兼容以前,也需要用以前的文件名前缀,即res混淆成什么
        String resRoot = TypedValue.RES_FILE_PATH;
        for (String name : fileMapping.values()) {
          int dot = name.indexOf("/");
          if (dot == -1) {
            throw new IOException(String.format("the old mapping res file path should be like r/a, yours %s\n", name));
          }
          resRoot = name.substring(0, dot);
          keepFileNames.add(name.substring(dot + 1));
        }
        // 去掉所有之前保留的命名,为了简单操作,mapping里面有的都去掉
        mResguardBuilder.removeStrings(keepFileNames);

        for (File resFile : resFiles) {
          String raw = "res" + "/" + resFile.getName();
          if (fileMapping.containsKey(raw)) {
            mOldFileName.put(raw, fileMapping.get(raw));
          } else {
            mOldFileName.put(raw, resRoot + "/" + mResguardBuilder.getReplaceString());
          }
        }
      } else {
        for (int i = 0; i < resFiles.length; i++) {
          // res/anim -> r/a
          mOldFileName.put("res" + "/" + resFiles[i].getName(),
             TypedValue.RES_FILE_PATH + "/" + mResguardBuilder.getReplaceString()
          );
        }
      }
      generalFileResMapping();
    }

    Utils.cleanDir(mApkDecoder.getOutResFile());
  }

  private void generalFileResMapping() throws IOException {
    mMappingWriter.write("res path mapping:\n");
    for (String raw : mOldFileName.keySet()) {
      mMappingWriter.write("    " + raw + " -> " + mOldFileName.get(raw));
      mMappingWriter.write("\n");
    }
    mMappingWriter.write("\n\n");
    mMappingWriter.write("res id mapping:\n");
    mMappingWriter.flush();
  }
下面我们开始解析resources.arsc文件,回到ARSCDecoder#decode方法,这里面调用readTable方法开始解析资源表。这个方法返回的是ResPackage对象,其实就是对应着一个个的ResTable_package。
  public static ResPackage[] decode(InputStream arscStream, ApkDecoder apkDecoder) throws AndrolibException {
    try {
      ARSCDecoder decoder = new ARSCDecoder(arscStream, apkDecoder);
      ResPackage[] pkgs = decoder.readTable();
      return pkgs;
    } catch (IOException ex) {
      throw new AndrolibException("Could not decode arsc file", ex);
    }
  }
readTable第一行是nextChunkCheckType方法,该方法会读取2个字节、2个字节、4个字节来组成一个ResChunk_header。这个结构体对应着这里的Header类,该类的type代表了接下来这一块内容是什么数据。
  private void nextChunkCheckType(int expectedType) throws IOException, AndrolibException {
    nextChunk();
    checkChunkType(expectedType);
  }

  private Header nextChunk() throws IOException {
    return mHeader = Header.read(mIn);
  }

  private void checkChunkType(int expectedType) throws AndrolibException {
    if (mHeader.type != expectedType) {
      throw new AndrolibException(String.format("Invalid chunk type: expected=0x%08x, got=0x%08x",
         expectedType,
         mHeader.type
      ));
    }
  }

  public static Header read(ExtDataInput in) throws IOException {
      short type;
      try {
        type = in.readShort();
        short count = in.readShort();
        int size = in.readInt();
        return new Header(type, size);
      } catch (EOFException ex) {
        return new Header(TYPE_NONE, 0);
      }
    }
在读取并检查当前这个chunk是TABLE类型之后,下面的就依次是四个字节的packageCount、一大块的全局字符串池、packageCount个ResPackage对象。可以对照文章开头的resources.arsc格式图来看。
  private ResPackage[] readTable() throws IOException, AndrolibException {
    // ResTable_header
    nextChunkCheckType(Header.TYPE_TABLE); // ResChunk_header
    int packageCount = mIn.readInt();

    // 全局字符串池
    mTableStrings = StringBlock.read(mIn);

    // 若干个Package
    ResPackage[] packages = new ResPackage[packageCount];
    nextChunk();
    for (int i = 0; i < packageCount; i++) {
      packages[i] = readPackage();
    }

    // 其他的收尾工作
    mMappingWriter.close();
    System.out.printf("resources mapping file %s done\n", mApkDecoder.getResMappingFile().getAbsolutePath());
    generalFilterEnd(mMergeDuplicatedResCount, mMergeDuplicatedResTotalSize);
    mMergeDuplicatedResMappingWriter.close();
    System.out.printf("resources filter mapping file %s done\n", mApkDecoder.getMergeDuplicatedResMappingFile().getAbsolutePath());
    return packages;
  }
ResTable_header部分的解析比较清晰,我们再来看看字符串池StringBlock的读取。
字符串池的格式在一个ResChunk_header之后,紧接着就是4字节的stringCount、4字节的styleCount、4字节的flags、4字节的strings start、4字节的styles start,上面这些组成了ResStringPool_header这个结构体。header之后紧接着就是stringCount个4字节的数组(string offsets)、styleCount个4字节的数组(styles offsets)、字符串资源、style资源。
如果在资源表中有通过index引用到字符串池中的某个字符串,那么解析字符串时会通过offsets数组来获得字符串所对对应的结构,然后判断是UTF8编码还是UTF16编码,获取到字符串的byte数,最后解码出来。
下面就是字符串池的解析过程了:
AndResGuard-core/src/main/java/com/tencent/mm/androlib/res/decoder/StringBlock.java
  public static StringBlock read(ExtDataInput reader) throws IOException {
    reader.skipCheckChunkTypeInt(CHUNK_STRINGPOOL_TYPE, CHUNK_NULL_TYPE);
    // 整个字符串池的大小数
    int chunkSize = reader.readInt();
    // 字符串资源的数量
    int stringCount = reader.readInt();
    // 样式资源的数量
    int styleCount = reader.readInt();
    // flags
    int flags = reader.readInt();
    // 相对于整个chunk,字符串资源的起始位置
    int stringsOffset = reader.readInt();
    // 相对于整个chunk,样式资源的起始位置
    int stylesOffset = reader.readInt();

    StringBlock block = new StringBlock();
    block.m_isUTF8 = (flags & UTF8_FLAG) != 0;
    // string offsets
    block.m_stringOffsets = reader.readIntArray(stringCount);
    block.m_stringOwns = new int[stringCount];
    Arrays.fill(block.m_stringOwns, -1);

    if (styleCount != 0) {
      // styles offsets
      block.m_styleOffsets = reader.readIntArray(styleCount);
    }
    {
      // chunkSize表示的是整个字符串池的大小
      // stylesOffset为0时,用整个字符串池大小 减去 stringsOffset,得到了strings值的byte数
      // stylesOffset不为0时,由于styles值排在strings值的后面,两者相减就得到了strings值的byte数
      int size = ((stylesOffset == 0) ? chunkSize : stylesOffset) - stringsOffset;

      if ((size % 4) != 0) {
        throw new IOException("String data size is not multiple of 4 (" + size + ").");
      }
      block.m_strings = new byte[size];

      // strings
      reader.readFully(block.m_strings);
    }
    if (stylesOffset != 0) {
      int size = (chunkSize - stylesOffset);
      if ((size % 4) != 0) {
        throw new IOException("Style data size is not multiple of 4 (" + size + ").");
      }
      // styles
      block.m_styles = reader.readIntArray(size / 4);
    }
    return block;
  }
读取完全局字符串池之后,就开始读取ResPackage了。在readTable调用nextChunk之后,会循环packageCount次调用readPackage。
package的内容还是以ResChunk_header开头,紧接着的是4字节的package id、128字节的package name、4字节的资源类型字符串池偏移量、4字节的lastPublicType、4字节的资源关键词字符串池偏移量、4字节的lastPublicKey、两个字符串池、具体资源类型的结构以及各种变体的数组。
  private ResPackage readPackage() throws IOException, AndrolibException {
    checkChunkType(Header.TYPE_PACKAGE);
    // package的id,常见的就是系统的0x01以及自己的0x7f
    int id = (byte) mIn.readInt();
    // 包名
    String name = mIn.readNullEndedString(128, true);
    System.out.printf("reading packagename %s\n", name);

    /* typeNameStrings */
    mIn.skipInt();
    /* typeNameCount */
    mIn.skipInt();
    /* specNameStrings */
    mIn.skipInt();
    /* specNameCount */
    mIn.skipInt();
    mCurrTypeID = -1;
    // 类型 字符串池
    mTypeNames = StringBlock.read(mIn);
    // 项名称 字符串池
    mSpecNames = StringBlock.read(mIn);
    // 拼接包的id,后面还会拼接type的id,资源的id,这样就构成了0x7f 01 0000
    mResId = id << 24;

    // 保存包id,包名
    mPkg = new ResPackage(id, name);
    // 系统包名不混淆
    if (mPkg.getName().equals("android")) {
      mPkg.setCanResguard(false);
    } else {
      mPkg.setCanResguard(true);
    }
    // 读取下一个chunk
    nextChunk();
    // 判断下一个chunk是不是library,循环读取这个类型
    while (mHeader.type == Header.TYPE_LIBRARY) {
      readLibraryType();
    }
    // 判断是不是ResTable_typeSpec类型,如果是则循环读取
    while (mHeader.type == Header.TYPE_SPEC_TYPE) {
      readTableTypeSpec();
    }
    return mPkg;
  }
readTableTypeSpec读取的是ResTable_typeSpec结构体,这个结构代表的是某一类型的资源,比如anim资源。anim、anim-v21这种限定符的资源将会分到下面不同的ResTable_type数组中。
  private void readTableTypeSpec() throws AndrolibException, IOException {
    checkChunkType(Header.TYPE_SPEC_TYPE);
    // 读取类型id
    byte id = mIn.readByte();
    // 略过 1byte + 2byte 的保留位
    mIn.skipBytes(3);
    // 读取configuration数量的个数
    int entryCount = mIn.readInt();
    // mTypeNames.getString(id - 1)意思就是将类型id这个byte值在资源类型字符串池中解析成string类型
    // 比如这个id是01,在字符串池中解析出来就是anim
    mType = new ResType(mTypeNames.getString(id - 1), mPkg);
    if (DEBUG) {
      System.out.printf("[ReadTableType] type (%s) id: (%d) curr (%d)\n", mType, id, mCurrTypeID);
    }
    // first meet a type of resource
    if (mCurrTypeID != id) {
      mCurrTypeID = id;
      // 初始化短路径名生成器,会根据包名、资源类型名取出所有匹配的白名单项,生成短路径时排除这些与白名单项匹配的项
      initResGuardBuild(mCurrTypeID);
    }
    // 是否混淆文件路径:string、id、array这类资源不混淆
    mShouldResguardForType = isToResguardFile(mTypeNames.getString(id - 1));

    // 对,这里是用来描述差异性的!!!
    // 略过configMask
    mIn.skipBytes(entryCount * 4);
    // 将type id拼接到mResId上,在遍历具体资源时使用
    mResId = (0xff000000 & mResId) | id << 16;

    // 开始读取ResTable_type数组
    while (nextChunk().type == Header.TYPE_TYPE) {
      readConfig();
    }
  }
readConfig的作用是读取ResTable_type数组。每一项ResTable_type都代表着特定限定符的资源集合。
  private void readConfig() throws IOException, AndrolibException {
    checkChunkType(Header.TYPE_TYPE);
    /* typeId */
    // 值同上面的ResTable_typeSpec,可以略过
    // 这里注意一下,id(1byte) + res0(1byte) + res1(2byte) = 4byte,此处直接略过了三个字段
    mIn.skipInt();
    // 资源的数量
    int entryCount = mIn.readInt();
    // 资源偏移量
    int entriesStart = mIn.readInt();
    // 读取ResTable_config,此处只读了,没有保存任何数据,所以不进行分析
    // ResTable_config保存的是这些entry的限定符集合,里面的实现还是可以帮我们加深对于这个结构的了解的
    readConfigFlags();
    // entryCount个entry的偏移量,此处如果资源限定符为default也就是没有的话,offsets每一项都很均匀,都差0x10h,也就是16位,因为entry与value各占8位
    // 如果有限定符的话,entryCount与没有限定符的大小一样,但是资源个数肯定相对于default是有少一些的
    // 因此offset数组对于没有的资源,会全部置为0xFFFFFFFF,对于有的资源,会从0x00开始排布
    int[] entryOffsets = mIn.readIntArray(entryCount);
    for (int i = 0; i < entryOffsets.length; i++) {
      mCurEntryID = i;
      // 如果资源确实存在,即不为0xFFFFFFFF,则进行读取entry与value的对
      if (entryOffsets[i] != -1) {
        mResId = (mResId & 0xffff0000) | i;
        readEntry();
      }
    }
  }
下面开始读取具体资源下具体资源限定符的资源项了:
  private void readEntry() throws IOException, AndrolibException {
    // size
    mIn.skipBytes(2);
    // entry的flag,代表是不是complex类型的
    short flags = mIn.readShort();
    // entry name在资源项名称字符串池中的索引
    int specNamesId = mIn.readInt();

    if (mPkg.isCanResguard()) {
      // 混淆过或者已经添加到白名单的都不需要再处理了
      if (!mResguardBuilder.isReplaced(mCurEntryID) && !mResguardBuilder.isInWhiteList(mCurEntryID)) {
        Configuration config = mApkDecoder.getConfig();
        boolean isWhiteList = false;
        if (config.mUseWhiteList) {
          // 处理白名单
          isWhiteList = dealWithWhiteList(specNamesId, config);
        }

        if (!isWhiteList) {
          // 如果不在白名单里面,则进行保存混淆前后的一些变量,重写文件时真正写入混淆后的变量
          dealWithNonWhiteList(specNamesId, config);
        }
      }
    }

    // 是不是复杂类型
    if ((flags & ENTRY_FLAG_COMPLEX) == 0) {
      readValue(true, specNamesId);
    } else {
      // 复杂类型里面根据struct里面count字段,有多个Res_value struct
      readComplexEntry(false, specNamesId);
    }
  }
读取到资源项之后,会先判断在不在白名单里面。若在,则将资源id、资源名等保存起来。若是白名单,返回true;否则返回false。
  /**
   * deal with whitelist
   *
   * @param specNamesId resource spec name id
   * @param config      {@Configuration} AndResGuard configuration
   * @return isWhiteList whether this resource is processed by whitelist
   */
  private boolean dealWithWhiteList(int specNamesId, Configuration config) throws AndrolibException {
    String packName = mPkg.getName();
    // 白名单在初始化时都会拼接上包名
    if (config.mWhiteList.containsKey(packName)) {
      HashMap<String, HashSet<Pattern>> typeMaps = config.mWhiteList.get(packName);
      String typeName = mType.getName();
      if (typeMaps.containsKey(typeName)) {
        String specName = mSpecNames.get(specNamesId).toString();
        // 根据资源类型取出该类型下的所有白名单
        HashSet<Pattern> patterns = typeMaps.get(typeName);
        for (Iterator<Pattern> it = patterns.iterator(); it.hasNext(); ) {
          Pattern p = it.next();
          // 逐个开始匹配资源项
          if (p.matcher(specName).matches()) {
            if (DEBUG) {
              System.out.printf("[match] matcher %s ,typeName %s, specName :%s\n", p.pattern(), typeName, specName);
            }
            // 0x7f010000 abc_fade_in
            mPkg.putSpecNamesReplace(mResId, specName);
            // abc_fade_in abc_fade_in
            mPkg.putSpecNamesblock(specName, specName);
            mResguardBuilder.setInWhiteList(mCurEntryID);

            // abc_fade_in
            mType.putSpecResguardName(specName);
            return true;
          }
        }
      }
    }
    return false;
  }
如果资源项没有命中白名单,则进行非白名单的处理,也就是混淆了:
  private void dealWithNonWhiteList(int specNamesId, Configuration config) throws AndrolibException, IOException {
    String replaceString = null;
    boolean keepMapping = false;
    ...
    if (!keepMapping) {
      replaceString = mResguardBuilder.getReplaceString();
    }

    // 保存处理过的id
    mResguardBuilder.setInReplaceList(mCurEntryID);
    if (replaceString == null) {
      throw new AndrolibException("readEntry replaceString == null");
    }
    // 写入resource_mapping文件
    generalResIDMapping(mPkg.getName(), mType.getName(), mSpecNames.get(specNamesId).toString(), replaceString);
    // 保存资源id与混淆后的名称:0x7f010000 a
    mPkg.putSpecNamesReplace(mResId, replaceString);
    // 是否需要将name列混淆成固定名字, 这样可以减少string pool大小
    boolean useFixedName = config.mFixedResName != null && config.mFixedResName.length() > 0;
    String fixedName = useFixedName ? config.mFixedResName : replaceString;
    // fixedName a
    mPkg.putSpecNamesblock(fixedName, replaceString);
    // a
    mType.putSpecResguardName(replaceString);
  }

  private void generalResIDMapping(
     String packageName, String typename, String specName, String replace) throws IOException {
    mMappingWriter.write("    "
       + packageName
       + ".R."
       + typename
       + "."
       + specName
       + " -> "
       + packageName
       + ".R."
       + typename
       + "."
       + replace);
    mMappingWriter.write("\n");
    mMappingWriter.flush();
  }
无论混不混淆,对于解析到的每一个entry,都会保存下完整的resId、资源项名称,等待后续重写resources.arsc文件时进行替换。
对于complex的entry会调用readComplextEntry方法进行解析,里面也会调用若干个readValue方法,只是入参flags有区别,complex时flags为true。下面看看readValue的逻辑了:
  /**
   * @param flags whether read direct
   */
  private void readValue(boolean flags, int specNamesId) throws IOException, AndrolibException {
    /* size */
    mIn.skipCheckShort((short) 8);
    /* res0: always zero */
    mIn.skipCheckByte((byte) 0);
    // value的类型
    byte type = mIn.readByte();
    // 值,形如0x26b
    int data = mIn.readInt();

    //这里面有几个限制,一对于string ,id, array我们是知道肯定不用改的,第二看要那个type是否对应有文件路径
    if (mPkg.isCanResguard()        // 非系统包,都是可以混淆点的
       && flags                     // 非complex类型
       && type == TypedValue.TYPE_STRING  // value类型是字符串类型
       && mShouldResguardForType        // 非string ,id, array类型
       && mShouldResguardTypeSet.contains(mType.getName())) {   // res目录下出现了对应的类型的目录
      // 没有混淆过索引为data的字符串,此时可以进行处理
      if (mTableStringsResguard.get(data) == null) {
        // 从全局字符串池中取出字符串:res/anim/abc_fade_in.xml
        String raw = mTableStrings.get(data).toString();
        if (StringUtil.isBlank(raw) || raw.equalsIgnoreCase("null")) return;

        // 混淆过后的资源项名:此处为若不是白名单的话,则形如短字符串a
        String proguard = mPkg.getSpecRepplace(mResId);
        int secondSlash = raw.lastIndexOf("/");
        if (secondSlash == -1) {
          throw new AndrolibException(String.format("can not find \\ or raw string in res path = %s", raw));
        }
        // res/anim
        String newFilePath = raw.substring(0, secondSlash);

        if (!mApkDecoder.getConfig().mKeepRoot) {
          // 获取混淆过的目录名,mOldFileName变量在刚开始时就初始化过了,这里的值形如r/a
          newFilePath = mOldFileName.get(raw.substring(0, secondSlash));
        }
        if (newFilePath == null) {
          System.err.printf("can not found new res path, raw=%s\n", raw);
          return;
        }
        //同理这里不能用File.separator,因为resources.arsc里面就是用这个
        // r/a/a
        String result = newFilePath + "/" + proguard;
        int firstDot = raw.indexOf(".");
        if (firstDot != -1) {
          // r/a/a + .xml = r/a/a.xml
          // 这里混淆过后的路径名就已经出来了
          result += raw.substring(firstDot);
        }
        // windows兼容性处理
        String compatibaleraw = new String(raw);
        String compatibaleresult = new String(result);

        //为了适配window要做一次转换
        if (!File.separator.contains("/")) {
          compatibaleresult = compatibaleresult.replace("/", File.separator);
          compatibaleraw = compatibaleraw.replace("/", File.separator);
        }

        File resRawFile = new File(mApkDecoder.getOutTempDir().getAbsolutePath() + File.separator + compatibaleraw);
        File resDestFile = new File(mApkDecoder.getOutDir().getAbsolutePath() + File.separator + compatibaleresult);

        // 🔥 这里也是有特色的一个功能点,消除冗余文件
        // 这里会将输入的文件按照文件大小归类,并计算相同文件大小的md5值,找出冗余的文件并返回出来
        // 将这个冗余资源的值直接指向唯一保留的文件的值,这样冗余文件就不会被引用到了,且在后面复制文件时,过滤掉冗余文件。这样就完成了冗余文件的删除功能
        MergeDuplicatedResInfo filterInfo = null;
        boolean mergeDuplicatedRes = mApkDecoder.getConfig().mMergeDuplicatedRes;
        if (mergeDuplicatedRes) {
          filterInfo = mergeDuplicated(resRawFile, resDestFile, compatibaleraw, result);
          if (filterInfo != null) {
            resDestFile = new File(filterInfo.filePath);
            // 替换值为原先的那个
            result = filterInfo.fileName;
          }
        }

        //这里用的是linux的分隔符
        HashMap<String, Integer> compressData = mApkDecoder.getCompressData();
        if (compressData.containsKey(raw)) {
          compressData.put(result, compressData.get(raw));
        } else {
          System.err.printf("can not find the compress dataresFile=%s\n", raw);
        }

        if (!resRawFile.exists()) {
          System.err.printf("can not find res file, you delete it? path: resFile=%s\n", resRawFile.getAbsolutePath());
        } else {
          if (!mergeDuplicatedRes && resDestFile.exists()) {
            throw new AndrolibException(String.format("res dest file is already  found: destFile=%s",
               resDestFile.getAbsolutePath()
            ));
          }
          // 如果不存在冗余文件,则进行复制
          if (filterInfo == null) {
            FileOperation.copyFileUsingStream(resRawFile, resDestFile);
          }
          //already copied
          // 将文件从mRawResourceFiles中进行移除,表示处理过了
          mApkDecoder.removeCopiedResFile(resRawFile.toPath());
          // 全局字符串表 映射
          // 0x26b r/a/a.xml
          mTableStringsResguard.put(data, result);
        }
      }
    }
  }
上面就是读取并处理resources.arsc文件的流程了。在读取开始前,完成了资源目录混淆名的预处理;然后在读取到资源项以及资源值时,处理里面的值,并将操作结果保存起来,待重写resources.arsc文件时进行替换。
注意一下上面这段代码实现了 合并冗余资源 的功能。原理就是说,如果两个资源文件的md5一样,那么我只保留先出现的a文件,并记录a文件的路径。在遇到冗余文件b时,将b所在的资源项的值改为文件a的路径在字符串池中的索引即可。这样冗余文件b就没有被引用了,复制文件时就可以直接忽略了。
回到ApkDecoder#decode方法中,在RawARSCDecoder、ARSCDecoder分别decode完成之后,会将剩下的所有没有记录在resources.arsc的资源文件全部拷贝进dest目录中。这样资源目录就完成了,下面再开始重写arsc文件。
AndResGuard-core/src/main/java/com/tencent/mm/androlib/ApkDecoder.java
  public void decode() throws AndrolibException, IOException, DirectoryException {
    if (hasResources()) {
      ensureFilePath();
      // read the resources.arsc checking for STORED vs DEFLATE compression
      // this will determine whether we compress on rebuild or not.
      System.out.printf("decoding resources.arsc\n");
      RawARSCDecoder.decode(apkFile.getDirectory().getFileInput("resources.arsc"));
      ResPackage[] pkgs = ARSCDecoder.decode(apkFile.getDirectory().getFileInput("resources.arsc"), this);

      //把没有纪录在resources.arsc的资源文件也拷进dest目录
      copyOtherResFiles();

      ARSCDecoder.write(apkFile.getDirectory().getFileInput("resources.arsc"), this, pkgs);
    }
  }
3.4 重写arsc文件
重写arsc文件时也会读原始的arsc文件,然后对比着进行写入。由于混淆后的很多chunk的size没法一下子进行确定,所以会先按照原始文件的chunk size进行写,并在写入时统计一下各个部分的diff。最后会 二次写入。
  private void writeTable() throws IOException, AndrolibException {
    System.out.printf("writing new resources.arsc \n");
    mTableLenghtChange = 0;
    writeNextChunkCheck(Header.TYPE_TABLE, 0);
    int packageCount = mIn.readInt();
    mOut.writeInt(packageCount);

    // 写入全局字符串池时,累加整个资源表文件的差量
    mTableLenghtChange += StringBlock.writeTableNameStringBlock(mIn, mOut, mTableStringsResguard);
    writeNextChunk(0);
    if (packageCount != mPkgs.length) {
      throw new AndrolibException(String.format("writeTable package count is different before %d, now %d",
         mPkgs.length,
         packageCount
      ));
    }
    for (int i = 0; i < packageCount; i++) {
      mCurPackageID = i;
      // 写入包资源时,也会累加整个资源表文件的差量
      writePackage();
    }
    // 最后需要把整个的size重写回去,二次写入
    reWriteTable();
  }
写入的逻辑与读写的逻辑非常像,这里主要看一下差异点。
首先是写入全局字符串池时,由于在进行资源混淆时,将全局资源池里面字符串的修改保存到了mTableStringsResguard中。这里在写入全局字符串池时,需要判断要写入的字符串是不是经过了混淆。同时累加写入的字节数,得到新字符串池的大小。返回新旧字符串池的大小之差,用于后续更新整个文件的chunk size。
  public static int writeTableNameStringBlock(
      ExtDataInput reader, ExtDataOutput out, Map<Integer, String> tableProguardMap)
      throws IOException, AndrolibException {
    ... // 读原始的arsc文件的全局资源池

    int totalSize = 0;
    out.writeCheckInt(type, CHUNK_STRINGPOOL_TYPE);
    totalSize += 4;

    totalSize += 6 * 4 + 4 * stringCount + 4 * styleOffsetCount;
    stringsOffset = totalSize;

    byte[] strings = new byte[block.m_strings.length];
    int[] stringOffsets = new int[stringCount];
    System.arraycopy(block.m_stringOffsets, 0, stringOffsets, 0, stringOffsets.length);

    int offset = 0;
    int i;
    for (i = 0; i < stringCount; i++) {
      stringOffsets[i] = offset;
      //如果找不到即没混淆这一项,直接拷贝
      if (tableProguardMap.get(i) == null) {
        //需要区分是否是最后一项
        int copyLen = (i == (stringCount - 1)) ? (block.m_strings.length - block.m_stringOffsets[i])
            : (block.m_stringOffsets[i + 1] - block.m_stringOffsets[i]);
        System.arraycopy(block.m_strings, block.m_stringOffsets[i], strings, offset, copyLen);
        offset += copyLen;
        totalSize += copyLen;
      } else {
        String name = tableProguardMap.get(i);
        if (block.m_isUTF8) {
          strings[offset++] = (byte) name.length();
          strings[offset++] = (byte) name.length();
          totalSize += 2;
          byte[] tempByte = name.getBytes(Charset.forName("UTF-8"));
          if (name.length() != tempByte.length) {
            throw new AndrolibException(String.format(
                "writeTableNameStringBlock UTF-8 length is different  name %d, tempByte %d\n",
                name.length(),
                tempByte.length
            ));
          }
          System.arraycopy(tempByte, 0, strings, offset, tempByte.length);
          offset += name.length();
          strings[offset++] = NULL;
          totalSize += name.length() + 1;
        } else {
          writeShort(strings, offset, (short) name.length());
          offset += 2;
          totalSize += 2;
          byte[] tempByte = name.getBytes(Charset.forName("UTF-16LE"));
          if ((name.length() * 2) != tempByte.length) {
            throw new AndrolibException(String.format(
                "writeTableNameStringBlock UTF-16LE length is different  name %d, tempByte %d\n",
                name.length(),
                tempByte.length
            ));
          }
          System.arraycopy(tempByte, 0, strings, offset, tempByte.length);
          offset += tempByte.length;
          strings[offset++] = NULL;
          strings[offset++] = NULL;
          totalSize += tempByte.length + 2;
        }
      }
    }
    //要保证string size 是4的倍数,要补零
    int size = totalSize - stringsOffset;
    if ((size % 4) != 0) {
      int add = 4 - (size % 4);
      for (i = 0; i < add; i++) {
        strings[offset++] = NULL;
        totalSize++;
      }
    }
    //因为是int的,如果之前的不为0
    if (stylesOffset != 0) {
      stylesOffset = totalSize;
      totalSize += block.m_styles.length * 4;
    }

    // 写全局字符串池
    out.writeInt(totalSize);
    out.writeInt(stringCount);
    out.writeInt(styleOffsetCount);
    out.writeInt(flags);
    out.writeInt(stringsOffset);
    out.writeInt(stylesOffset);
    out.writeIntArray(stringOffsets);
    if (stylesOffset != 0) {
      out.writeIntArray(block.m_styleOffsets);
    }
    out.write(strings, 0, offset);
    if (stylesOffset != 0) {
      out.writeIntArray(block.m_styles);
    }
    return (chunkSize - totalSize);
  }
下面开始写包资源,这里面也涉及到资源项名称字符串池的混淆写入。在写入这个字符串池时,会将所有的字符串与其下标对应起来,保存到输入参数curSpecNameToPos中,用作后续资源项的写入。
  private void writePackage() throws IOException, AndrolibException {
    ...

    if (mPkgs[mCurPackageID].isCanResguard()) {
      int specSizeChange = StringBlock.writeSpecNameStringBlock(mIn,
         mOut,
         mPkgs[mCurPackageID].getSpecNamesBlock(),
         mCurSpecNameToPos
      );
      mPkgsLenghtChange[mCurPackageID] += specSizeChange;
      mTableLenghtChange += specSizeChange;
    } else {
      StringBlock.writeAll(mIn, mOut);
    }
    writeNextChunk(0);
    while (mHeader.type == Header.TYPE_LIBRARY) {
      writeLibraryType();
    }
    while (mHeader.type == Header.TYPE_SPEC_TYPE) {
      writeTableTypeSpec();
    }
  }

  public static int writeSpecNameStringBlock(
          ExtDataInput reader, ExtDataOutput out, Map<String, Set<String>> specNames, Map<String, Integer> curSpecNameToPos)
      throws IOException, AndrolibException {
    ...
    curSpecNameToPos.clear();

    for (Iterator<String> it = specNames.keySet().iterator(); it.hasNext(); ) {
      stringOffsets[i] = offset;
      String name = it.next();
      for (String specName : specNames.get(name)) {
        // N res entry item point to one string constant
        curSpecNameToPos.put(specName, i);
      }
   ...
  }
在后续写入资源项时,会通过资源id找到混淆后的名称,然后通过名称在mCurSpecNameToPos中找到字符串的index,最后写入。
  private void writeEntry() throws IOException, AndrolibException {
    /* size */
    mOut.writeBytes(mIn, 2);
    short flags = mIn.readShort();
    mOut.writeShort(flags);
    int specNamesId = mIn.readInt();
    ResPackage pkg = mPkgs[mCurPackageID];
    if (pkg.isCanResguard()) {
      specNamesId = mCurSpecNameToPos.get(pkg.getSpecRepplace(mResId));
      if (specNamesId < 0) {
        throw new AndrolibException(String.format("writeEntry new specNamesId < 0 %d", specNamesId));
      }
    }
    mOut.writeInt(specNamesId);

    if ((flags & ENTRY_FLAG_COMPLEX) == 0) {
      writeValue();
    } else {
      writeComplexEntry();
    }
  }
上面就是第一次写入的一些要点了,这次的写入真正将混淆结果写入到了文件中,之前解码时都只是保存了而已。
第二次写入的主要目的就是为了让chunk size对的上。
  private void reWriteTable() throws AndrolibException, IOException {

    mIn = new ExtDataInput(new LEDataInputStream(new FileInputStream(mApkDecoder.getOutTempARSCFile())));
    mOut = new ExtDataOutput(new LEDataOutputStream(new FileOutputStream(mApkDecoder.getOutARSCFile(), false)));
    // mTableLenghtChange就是新旧两个arsc chunk的差值
    writeNextChunkCheck(Header.TYPE_TABLE, mTableLenghtChange);
    int packageCount = mIn.readInt();
    mOut.writeInt(packageCount);
    StringBlock.writeAll(mIn, mOut);

    for (int i = 0; i < packageCount; i++) {
      mCurPackageID = i;
      // 更新package的chunk size
      writeNextChunk(mPkgsLenghtChange[mCurPackageID]);
      mOut.writeBytes(mIn, mHeader.chunkSize - 8);
    }
    mApkDecoder.getOutTempARSCFile().delete();
  }
上面就是对resources.arsc实现资源混淆的全部内容了。下面快速过一下重新打包的过程。
3.5 buildApk
buildApk会根据签名版本的配置,调用不用的命令来实现签名:
AndResGuard-core/src/main/java/com/tencent/mm/resourceproguard/Main.java
  private void buildApk(
      ApkDecoder decoder, File apkFile, File outputFile, InputParam.SignatureType signatureType, int minSDKVersion)
      throws Exception {
    ResourceApkBuilder builder = new ResourceApkBuilder(config);
    String apkBasename = apkFile.getName();
    apkBasename = apkBasename.substring(0, apkBasename.indexOf(".apk"));
    builder.setOutDir(mOutDir, apkBasename, outputFile);
    System.out.printf("[AndResGuard] buildApk signatureType: %s\n", signatureType);
    switch (signatureType) {
      case SchemaV1:
        builder.buildApkWithV1sign(decoder.getCompressData());
        break;
      case SchemaV2:
      case SchemaV3:
        builder.buildApkWithV2V3Sign(decoder.getCompressData(), minSDKVersion, signatureType);
        break;
    }
  }
对于v1签名,在重新zip生成未签名的包之后,会经过 签名 -> 7z压缩 -> 对齐。
对于v2、v3签名,在重新zip生成未签名的包之后,会经过 7z压缩 -> 对齐 -> 签名。
v1签名与v2签名的区别
V1签名:来自JDK(jarsigner), 对zip压缩包的每个文件进行验证, 签名后还能对压缩包修改(移动/重新压缩文件)
对V1签名的apk/jar解压,在META-INF存放签名文件(MANIFEST.MF, CERT.SF, CERT.RSA), 其中MANIFEST.MF文件保存所有文件的SHA1指纹(除了META-INF文件), 由此可知: V1签名是对压缩包中单个文件签名验证
V2签名:来自Google(apksigner), 对zip压缩包的整个文件验证, 签名后不能修改压缩包(包括zipalign), 对V2签名的apk解压,没有发现签名文件,重新压缩后V2签名就失效, 由此可知: V2签名是对整个APK签名验证
因此,在打包的过程中,v1签名会先签名,后进行7z压缩、对齐操作。而v2则在7z压缩、对齐操作之后才进行签名的动作。
META-INF下面的签名文件介绍
MANIFEST.MF:对所有文件记录路径并进行SHA1/SHA2摘要,转为BASE64进行存储
CERT.SF:对整个MANIFEST.MF文件以及其中每一项进行SHA1/SHA2摘要,转为BASE64进行存储
CERT.RSA:对CERT.SF文件用私钥签名,并将签名以及包含公钥信息的数字证书一同写入CERT.RSA中进行保存。
在重新zip生成未签名的包的过程中,会根据compressData对某一些文件采用Deflated压缩方式,有利于减小包的体积。
v1签名的代码如下:
AndResGuard-core/src/main/java/com/tencent/mm/androlib/ResourceApkBuilder.java
  private void signWithV1sign(File unSignedApk, File signedApk) throws IOException, InterruptedException {
    String signatureAlgorithm = "MD5withRSA";
    try {
      signatureAlgorithm = getSignatureAlgorithm(config.digestAlg);
    } catch (Exception e) {
      e.printStackTrace();
    }
    String[] argv = {
        "jarsigner",
        "-sigalg",
        signatureAlgorithm,
        "-digestalg",
        config.digestAlg,
        "-keystore",
        config.mSignatureFile.getAbsolutePath(),
        "-storepass",
        config.mStorePass,
        "-keypass",
        config.mKeyPass,
        "-signedjar",
        signedApk.getAbsolutePath(),
        unSignedApk.getAbsolutePath(),
        config.mStoreAlias
    };
    Utils.runExec(argv);
  }
v2、v3签名代码如下:
  private void signWithV2V3Sign(File unSignedApk, File signedApk, int minSDKVersion, InputParam.SignatureType signatureType) throws Exception {
    String[] params = new String[] {
        "sign",
        "--ks",
        config.mSignatureFile.getAbsolutePath(),
        "--ks-pass",
        "pass:" + config.mStorePass,
        "--min-sdk-version",
        String.valueOf(minSDKVersion),
        "--ks-key-alias",
        config.mStoreAlias,
        "--key-pass",
        "pass:" + config.mKeyPass,
        "--v3-signing-enabled",
        String.valueOf(signatureType == SchemaV3),
        "--out",
        signedApk.getAbsolutePath(),
        unSignedApk.getAbsolutePath()
    };
    ApkSignerTool.main(params);
  }
zipalign代码如下:
  private void alignApk(File before, File after) throws IOException, InterruptedException {
    System.out.printf("zipaligning apk: %s, exists:%b\n", before.getAbsolutePath(), before.exists());
    if (!before.exists()) {
      throw new IOException(String.format("can not found the raw apk file to zipalign, path=%s",
          before.getAbsolutePath()
      ));
    }
    String cmd = Utils.isPresent(config.mZipalignPath) ? config.mZipalignPath : TypedValue.COMMAND_ZIPALIGIN;
    Utils.runCmd(cmd, "4", before.getAbsolutePath(), after.getAbsolutePath());
    if (!after.exists()) {
      throw new IOException(String.format("can not found the aligned apk file, the ZipAlign path is correct? path=%s",
          mAlignedApk.getAbsolutePath()
      ));
    }
  }
4. 总结
AndResGuard的整体代码是为了实现资源混淆的功能,除此之外,还有一些其他功能:
- 重复资源合并
在3.3小节ARSCDecoder#readValue方法中实现:原理就是说,如果两个资源文件的md5一样,那么我只保留先出现的a文件,并记录a文件的路径。在遇到冗余文件b时,将b所在的资源项的值改为文件a的路径在字符串池中的索引即可。这样冗余文件b就没有被引用了,复制文件时就可以直接忽略了。 - 统一资源项的EntryName
在3.3小节ARSCDecoder#dealWithNonWhiteList方法中实现:解析entry时保存resId、entryName。若需要统一entryName,这里保存时替换即可。
需要提醒一下,Glide加载本地resources时,会调用Resources#getResourceEntryName方法拼接出URL,需要在AndResGuard中keep一下。 - 指定文件采取DEFLATED压缩方式
在3.5小节Main#buildApk时会对每一项进行压缩方式的设置,DEFLATED方式有利于减小包体积。 - 最后对zip进行了整包7z压缩
在3.5小节Main#buildApk时会对整包进行7z压缩,如果压缩率比默认的更高的话,包体积就会更小。